Laravel Notifications - Telegram Bot
- Upgrading to Laravel 9 with all it's bells and whistles
- Moving to Laravel Breeze for authentication scaffolding
- Removing Jetstream
Overview
I wanted to receive Telegram notifications when certain events within some of my Laravel Apps occurred. This guide shares what I have learnt and how I approached and set it up.
I am going to make some assumptions; you are familiar with PHP and the Laravel framework as well as JavaScript and the VueJS Framework. However, with some development background you should be able to understand most of the lines of code I introduce and should be able to follow along.
I opted to use a Laravel Notification and a community built delivery channel to send Telegram notifications using the Telegram Bot API. I will implement it in an example Laravel Breeze application using the Inertia stack. If you are not familiar with InertiaJS, Jeffery Way describes it as follow:
Inertia.js allows you to build single-page applications, while still allowing Laravel to be responsible for routing, controllers, authorization, policies, and more. Think of it like the glue that connects a server-side framework like Laravel, to a client-side framework like Vue.
Getting Started
As this is not a 101 on Laravel, I suggest looking at the Laravel Documentation for more information on the installation options
Install Laravel
This command will get us started:
# Install
composer create-project laravel/laravel laravel-telegram-bot

# Navigate into Application root
cd laravel-telegram-bot
We also want to add Laravel Breeze which scaffolds simple authentication features. This will provide us with all the pages and views required to demonstrate and help us understand how to implement Telegram notifications in Laravel applications.
# Include the Breeze package
composer require laravel/breeze --dev

# Install Breeze (--dark is optional)
php artisan breeze:install vue --dark
Serve the application...
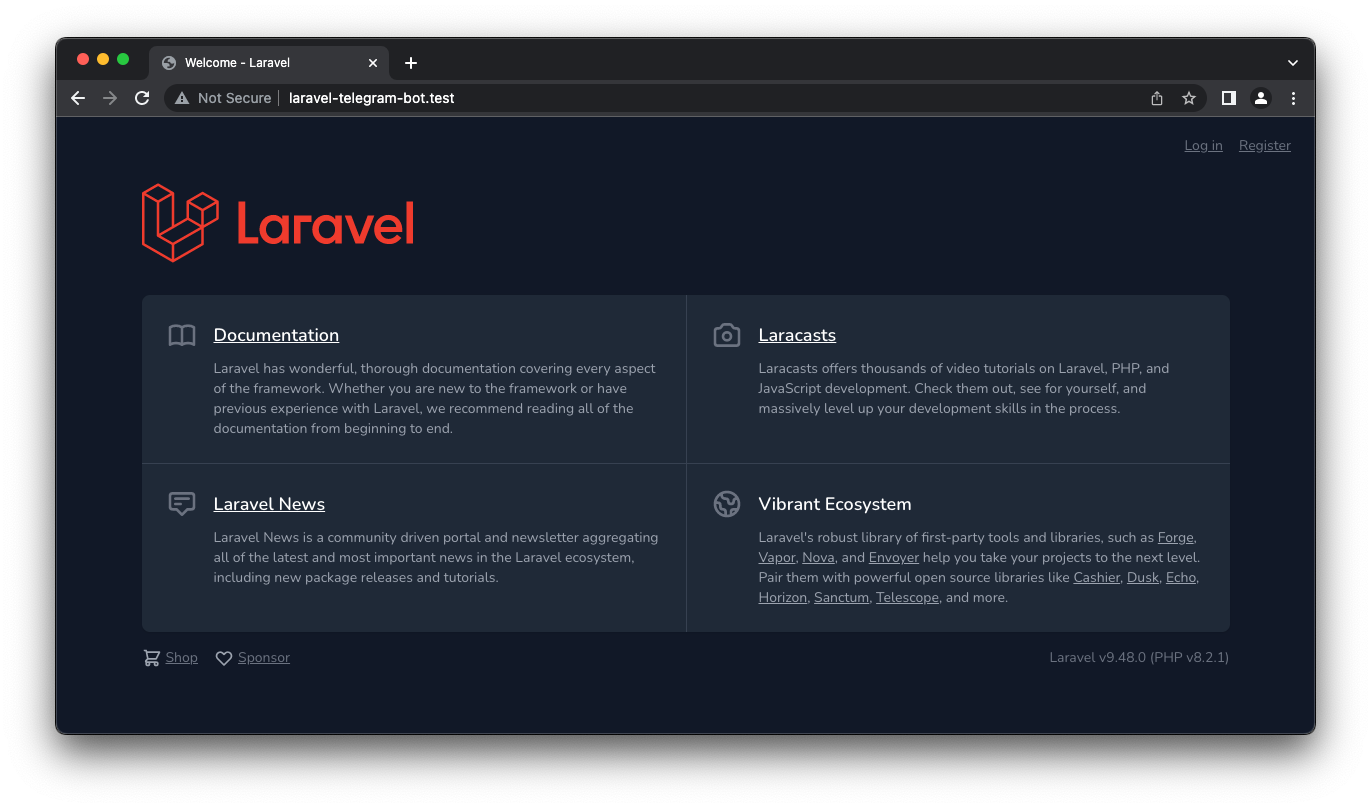
I am using Laravel Valet for my development environment. There are a number of other options to serve a Laravel Application, however, I would suggest Laravel Sail if Valet is not an option for you.
Whatever you decide, once you are up and running you will be presented with a starting page similar to this when browsing to your new Laravel Application.
Add Packages
In addition to installing Laravel with the InertiaJS stack, the installation only really requires the Telegram Notifications Channel for Laravel composer package.
composer require laravel-notification-channels/telegramTelegram Bot
The main event. So let's start with creating a Telegram Bot and capturing a few details after.
Start a new chat with the @BotFather and create our new bot to obtain a Bot API Token.
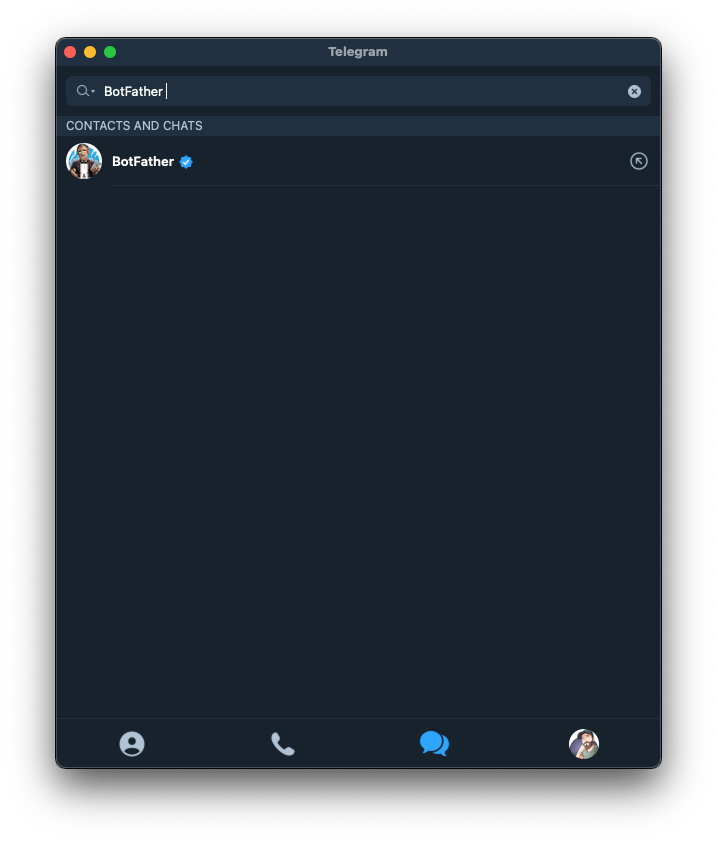
I think the team at Telegram made it fairly easy to use, and for the most part self-explanatory. I mean, we know what we are here for, so let's create a new bot using /newbot. Start the conversation to create a bot.
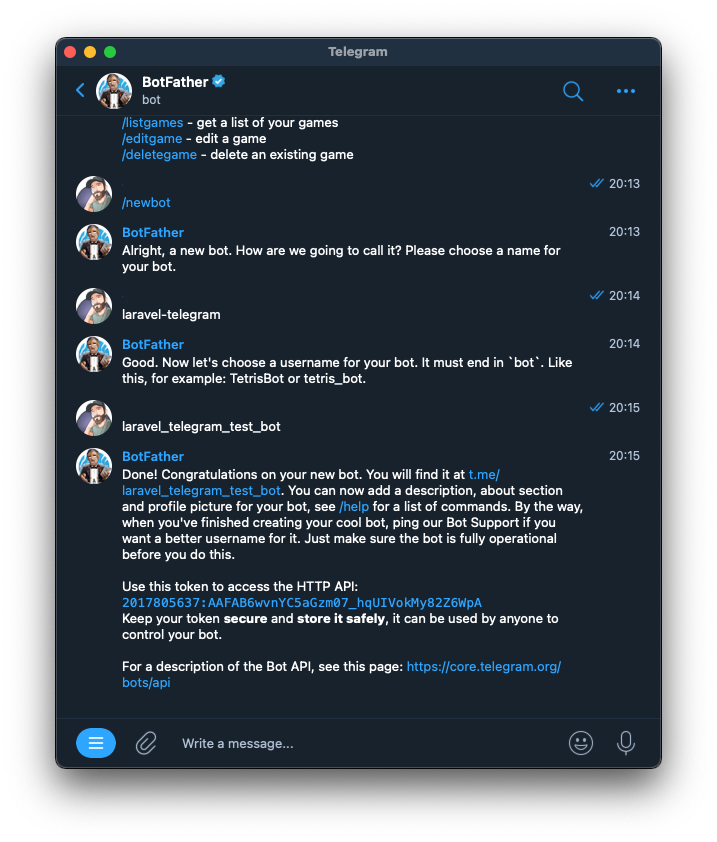
Once the BotFather congratulates us, we'll will be presented with your Bot's API Token and the bot URL (look for the link which starts with t.me/<bot name>). Open the project with your chosen IDE and save these to your .env file
TELEGRAM_BOT_URL=https://t.me/<Bot>
TELEGRAM_BOT_TOKEN=<YOUR BOT TOKEN HERE>
In addition, add a telegram-bot-api array in config/services.php. This will allow our application to read these values from the environment variables, which we just added to the .env file
'telegram-bot-api' => [
    'bot_url' => env('TELEGRAM_BOT_URL'),
    'token' => env('TELEGRAM_BOT_TOKEN', 'YOUR BOT TOKEN HERE'),
],
With this we now have a Laravel App, the Package which will help us with notification installed, as well as our bot with some details of it captures.
Laravel Notification
Let's create a Laravel Notification and use the Telegram Notification Channel within it. We can follow the standard process of generating a Laravel Notification. Each notification you create is represented by a single class that is typically stored in the app/Notifications directory.
php artisan make:notification TelegramNotificationAlthough the documentation for the Telegram Notification Channel for Laravel explains this well, I have updated the class at app/Notifications/TelegramNotification.php as follows:
1. Specify the delivery channel in the via() method:
use NotificationChannels\Telegram\TelegramChannel;

public function via($notifiable)
{
    return [TelegramChannel::class];
}
2. Update the so-called message building methods. By default this is toMail which should also be renamed to toTelegram and updated as follows:
use NotificationChannels\Telegram\TelegramMessage;

public function toTelegram($notifiable)
{
    return TelegramMessage::create()
        ->to($notifiable->telegram_chat_id)
        ->content($this->message);
}
That is it, the to() is where the notification should be sent, this will be a Telegram Chat ID which is how Telegram identifies the chat you have open with a bot and the content() method specifies what the Telegram message should contain.
3. Finally, let's also add a $message property and set it in the constructor of the class:
class TelegramNotification extends Notification
{
    // ...

    protected $message;

    public function __construct($message)
    {
        $this->message = $message;
    }

    // ...

}
Here is the full class for review:
 CryDeTaan
Laravel Notifiable Trait Explained
Notifications can be sent using the notify method from the Notifiable trait which is defined on the App/Models/User model by default:
<?php

namespace App\Models;

use Illuminate\Foundation\Auth\User as Authenticatable;
use Illuminate\Notifications\Notifiable;

class User extends Authenticatable
{
    use Notifiable;
}
The notify method that is provided by this trait expects to receive a notification instance, in our case the TelegramNotification, and which we can implement as the send method in a new controller, let's call it the TelegramNotificationController.
Let's create this controller and add a send method.
# Create a new controller
php artisan make:controller TelegramNotificationController
use App\Notifications\TelegramNotification;
public function send(Request $request)
{
$user = auth()->user();
$user->notify(new TelegramNotification($request->notification));
return back();
}
We will come back to this controller several times throughout this guide, but this does hook up a User with the Notifiable Trait to the Telegram Notification we created earlier.
Telegram Chat ID
Now, knowing that the to($notifiable->telegram_chat_id) method in the app/Notifications/TelegramNotification we created earlier is where the notification should be sent to, let's set that up.
Update User Migration
We should set the telegram_chat_id on the user model by preparing the user migration by adding a column to the create method on the Schema facade
$table->string('telegram_chat_id')->nullable();
At this point it is a good idea to configure the database setting in the .env and run the migration command.
php artisan migrate
Telegram Chat ID Explained
There are a few things required here to set up the application to update the user's telegram_chat_id column with the Chat ID of the chat we'll have with a bot.
When starting a chat with a bot, that chat instance has a unique ID, this is the Chat ID. Not only do we need to capture this Chat ID in our application, but we also need to associate it with a user within our Laravel Application.
This can be confusing, I know I initially struggled to wrap my mind around it.
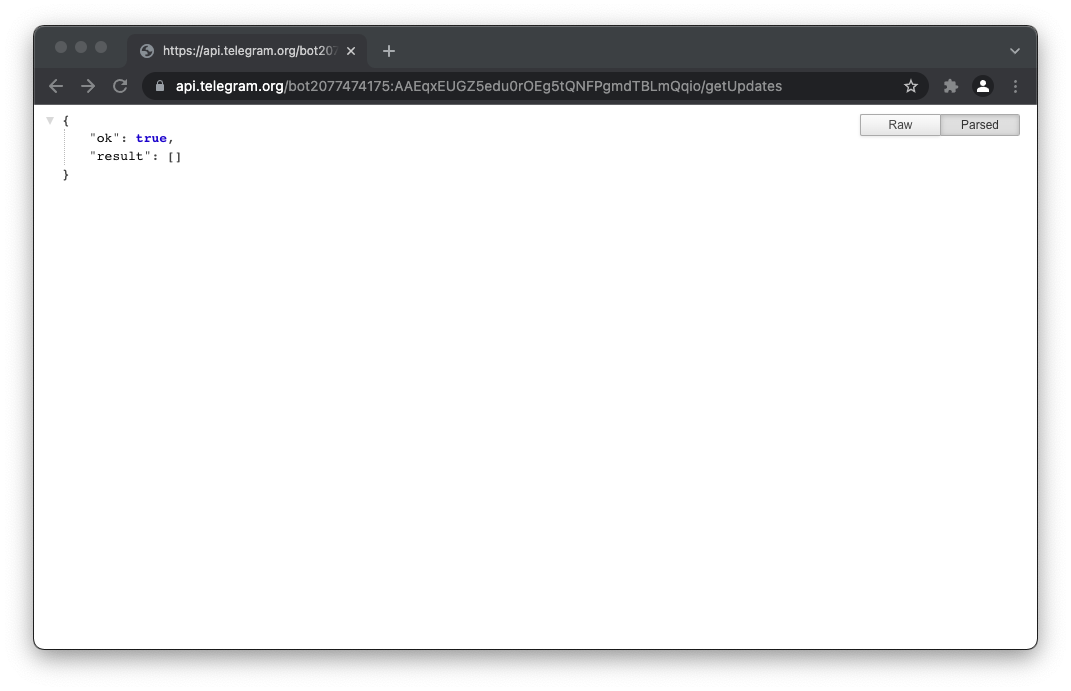
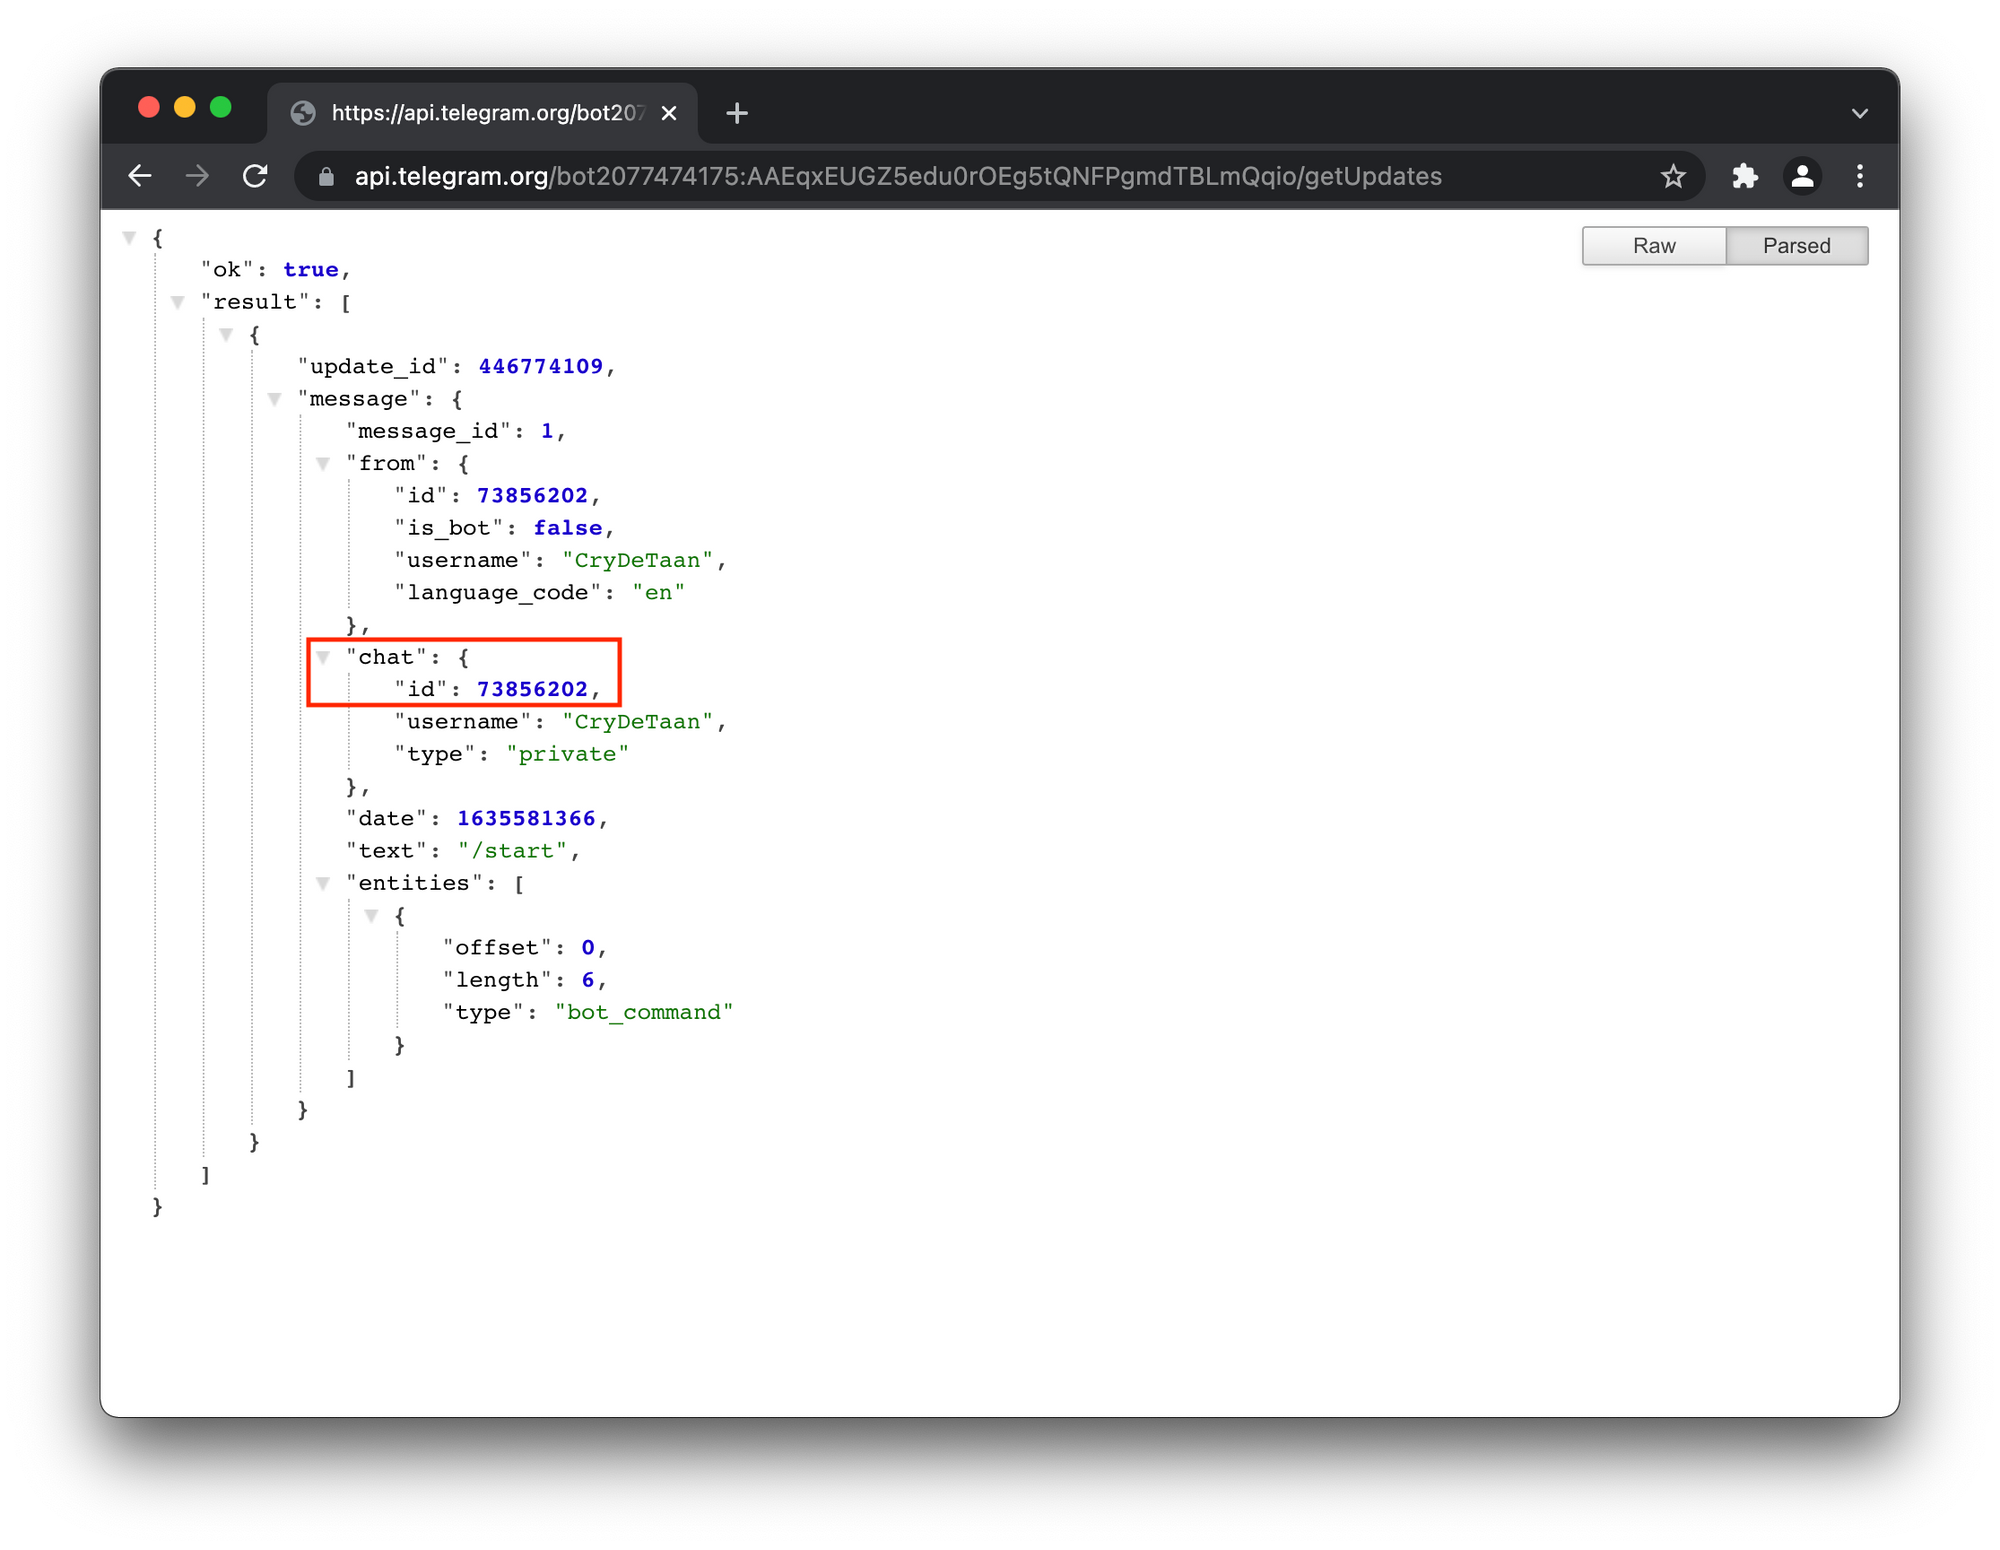
Let me further clarify this Chat ID concept by starting a chat with the bot and then interacting with it using the Telegram Bot API.
We can do this by making a request to the the getUpdates method by using the following URL:https://api.telegram.org/bot<token>/getupdates . NOTE the <token> was returned when the bot was created, which in my case is: 077474175:AAEqxEUGZ5edu0rOEg5tQNFPgmdTBLmQqio
📢 If at any point you need information about your bot, for example the bot URL, simply use the /mybots bot command in the BotFather chat view for further information on your bot(s).Initially making this request will return an empty result array.
So, let's start a chat with the bot and see how this changes. Start a chat using the URL that was presented when the bot was created, in my case: https://t.me/laravel_telegram_test_bot.
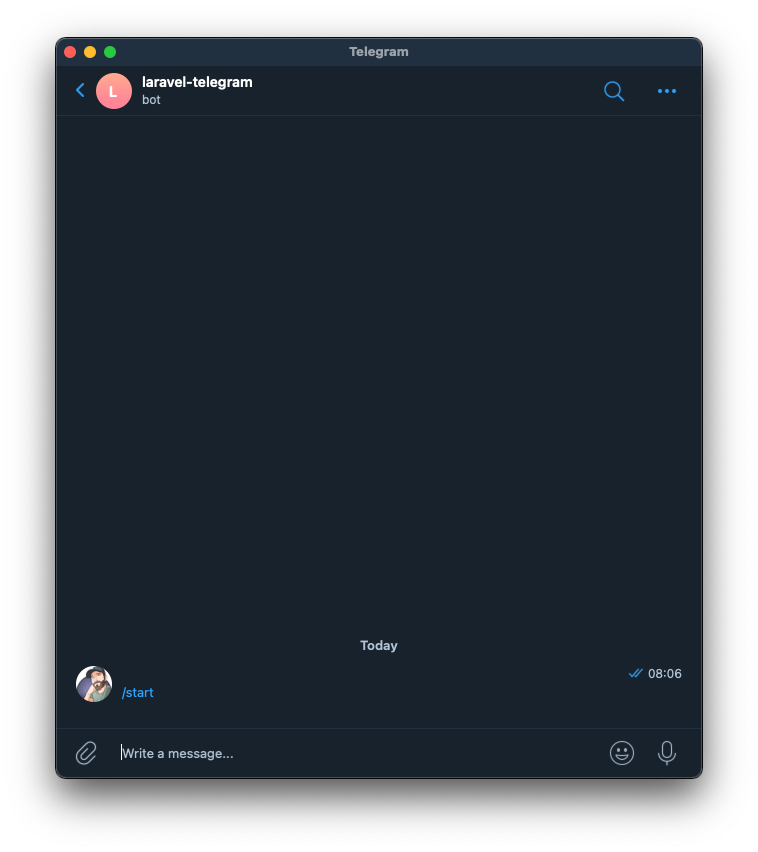
Starting a chat with a bot will produce some results when making a request to the getUpdates method. There are a few interesting pieces of information here, but most importantly we can now get the Chat ID from the result array.
Deep Linking
Telegram User
Remember, this being our bot, only we should know the API Token for it, this is not something known by the user who will be using our Telegram Bot. Meaning that users may /start and/or interact with Telegram Bots, but only bot owners will be able to see the Chat IDs using the getUpdates bot API method as well as the details of the Telegram user who started to interact with our bot.
Laravel User
However, a user's details in Telegram may be different to the details in our Laravel Application. In fact, in this example Laravel Application, there is no concept of a username. The application is only concerned with name, surname and email address which can be used to distinguish a user. But from the last screenshot from the getUpdates output, the only available information from a Telegram chat perspective (in this case at least) is the username. And even if the example Laravel Application had a username field for a user, a user may choose to use different usernames on these two applications. Therefore, there is no way for us to be sure that the user's details in a Telegram message matches a user within our Laravel Application.
So how could we connect a user's Telegram account with their account within our Laravel Application.
Deep Linking Explained
Fortunately, Telegram bots have a Deep Linking mechanism that can aid us to programmatically connect a user's Telegram account to their account in our Laravel Application.
To make use of deep linking, a parameter(?start= or ?=startgroup) can be passed with the bot's URL, for example, https://t.me/laravel_telegram_test_bot?start=test.
The start parameter will open a one-on-one conversation with the bot, if the startgroup parameter is used, the user is prompted to select a group to add the bot to. In this example Laravel Application, I am making use of the start parameter, but you are free to make use of the startgroup parameter.
Your browser will prompt you to Open Telegram, notice the start parameter in the URL.
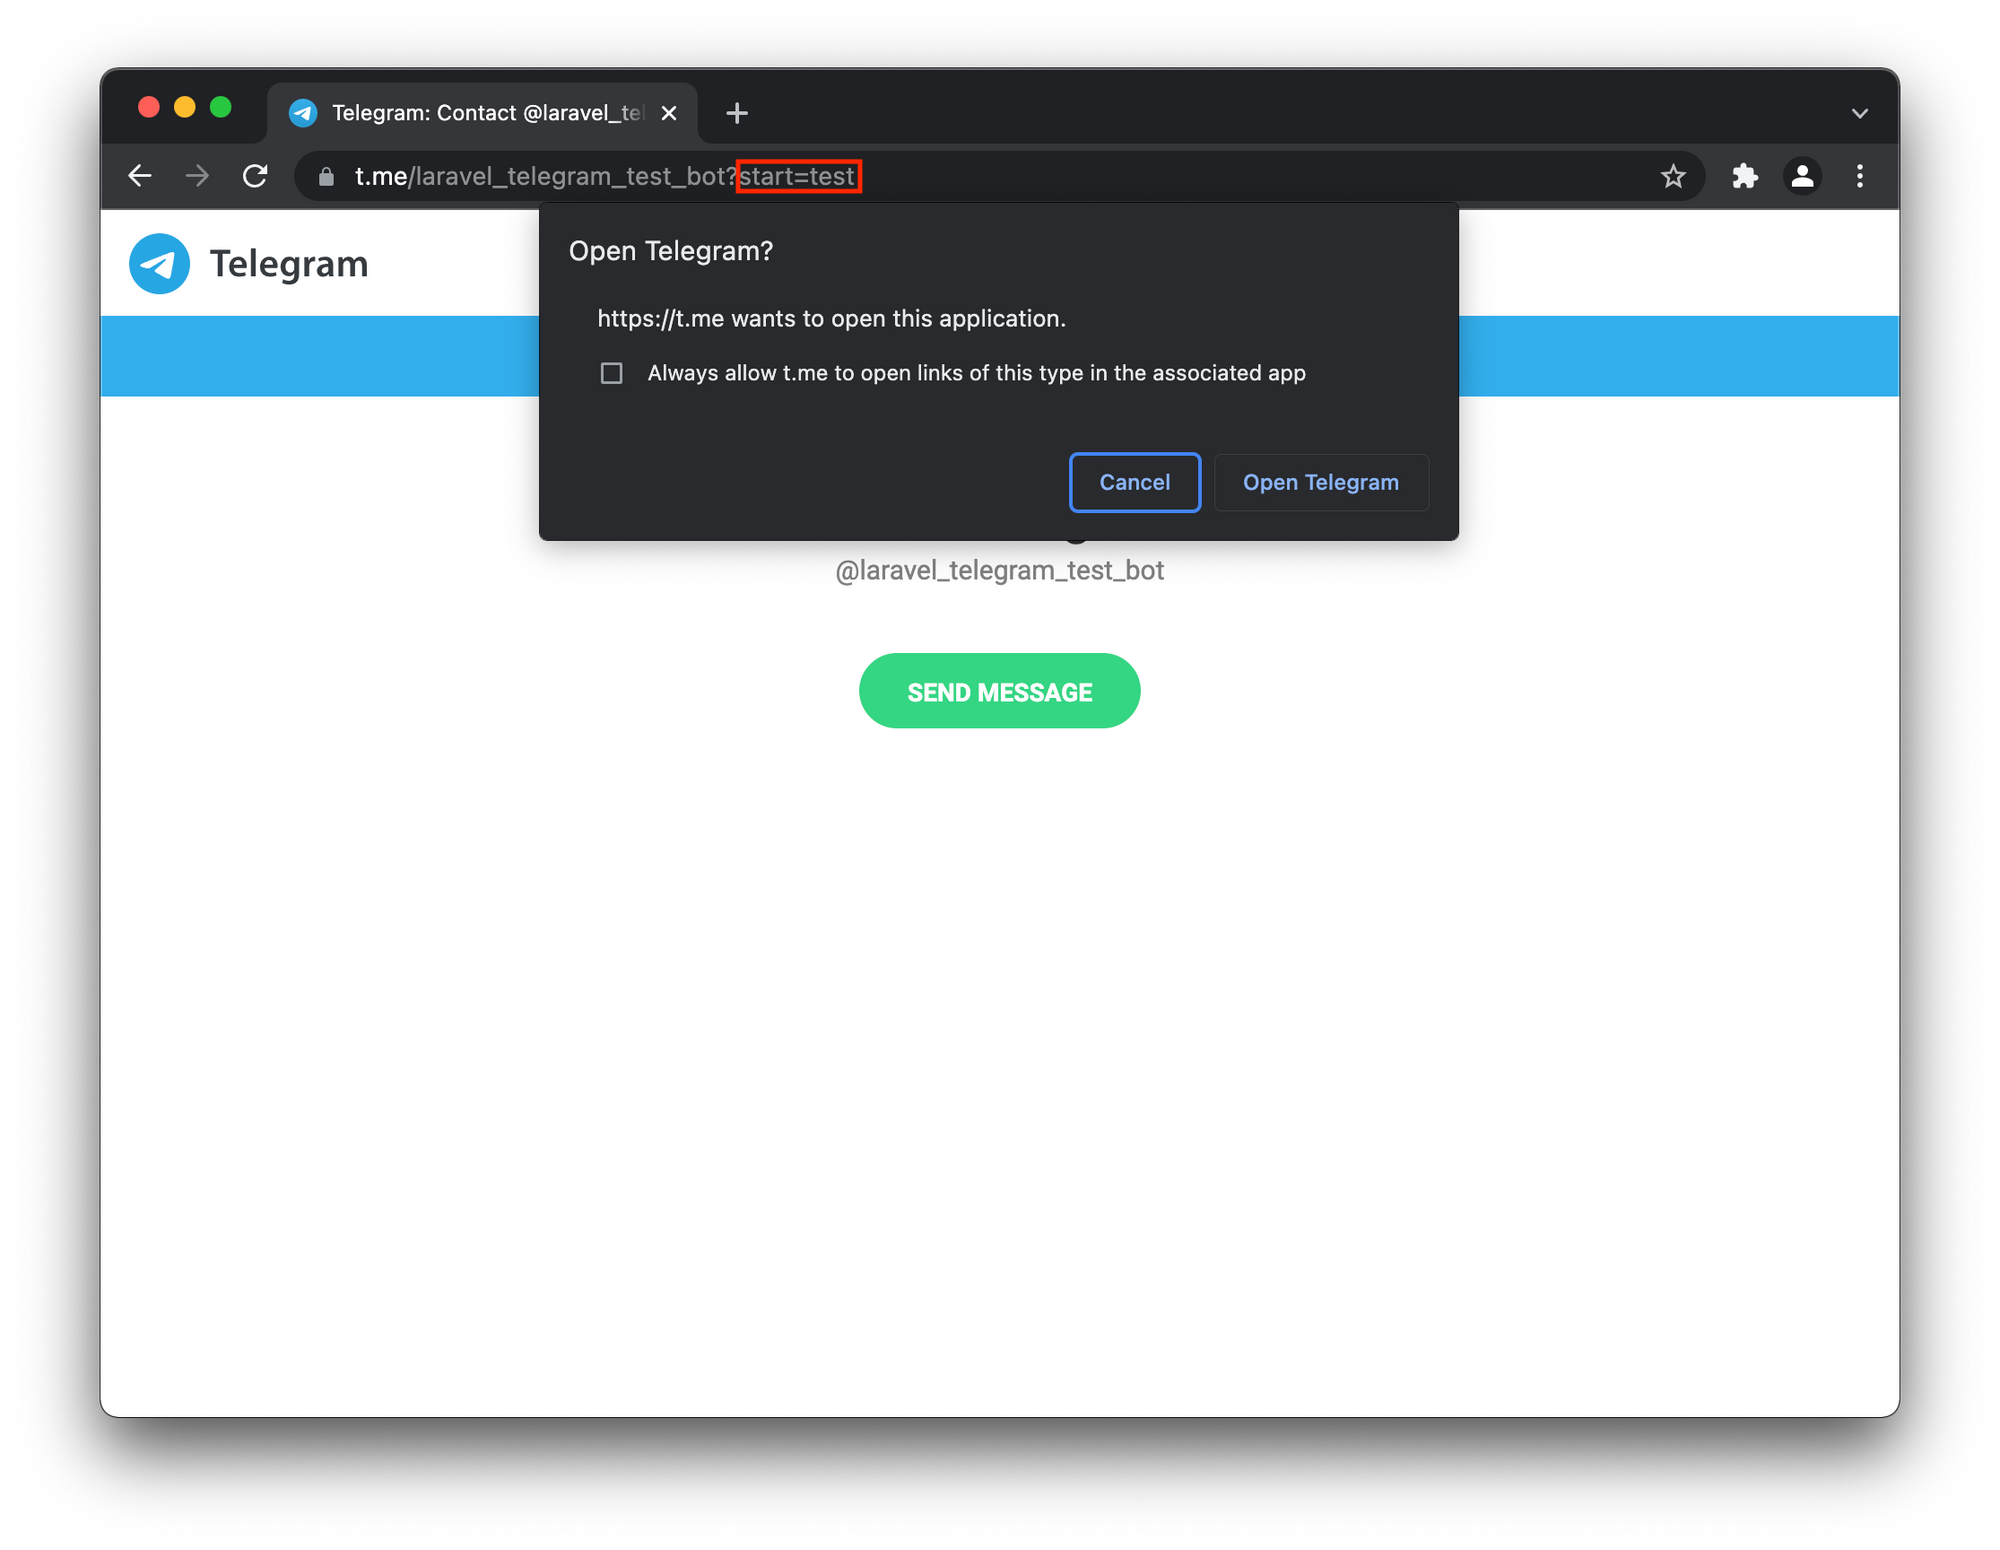
Starting a chat using this URL will have the resulting message contain the word test we specified as the ?start= parameter.
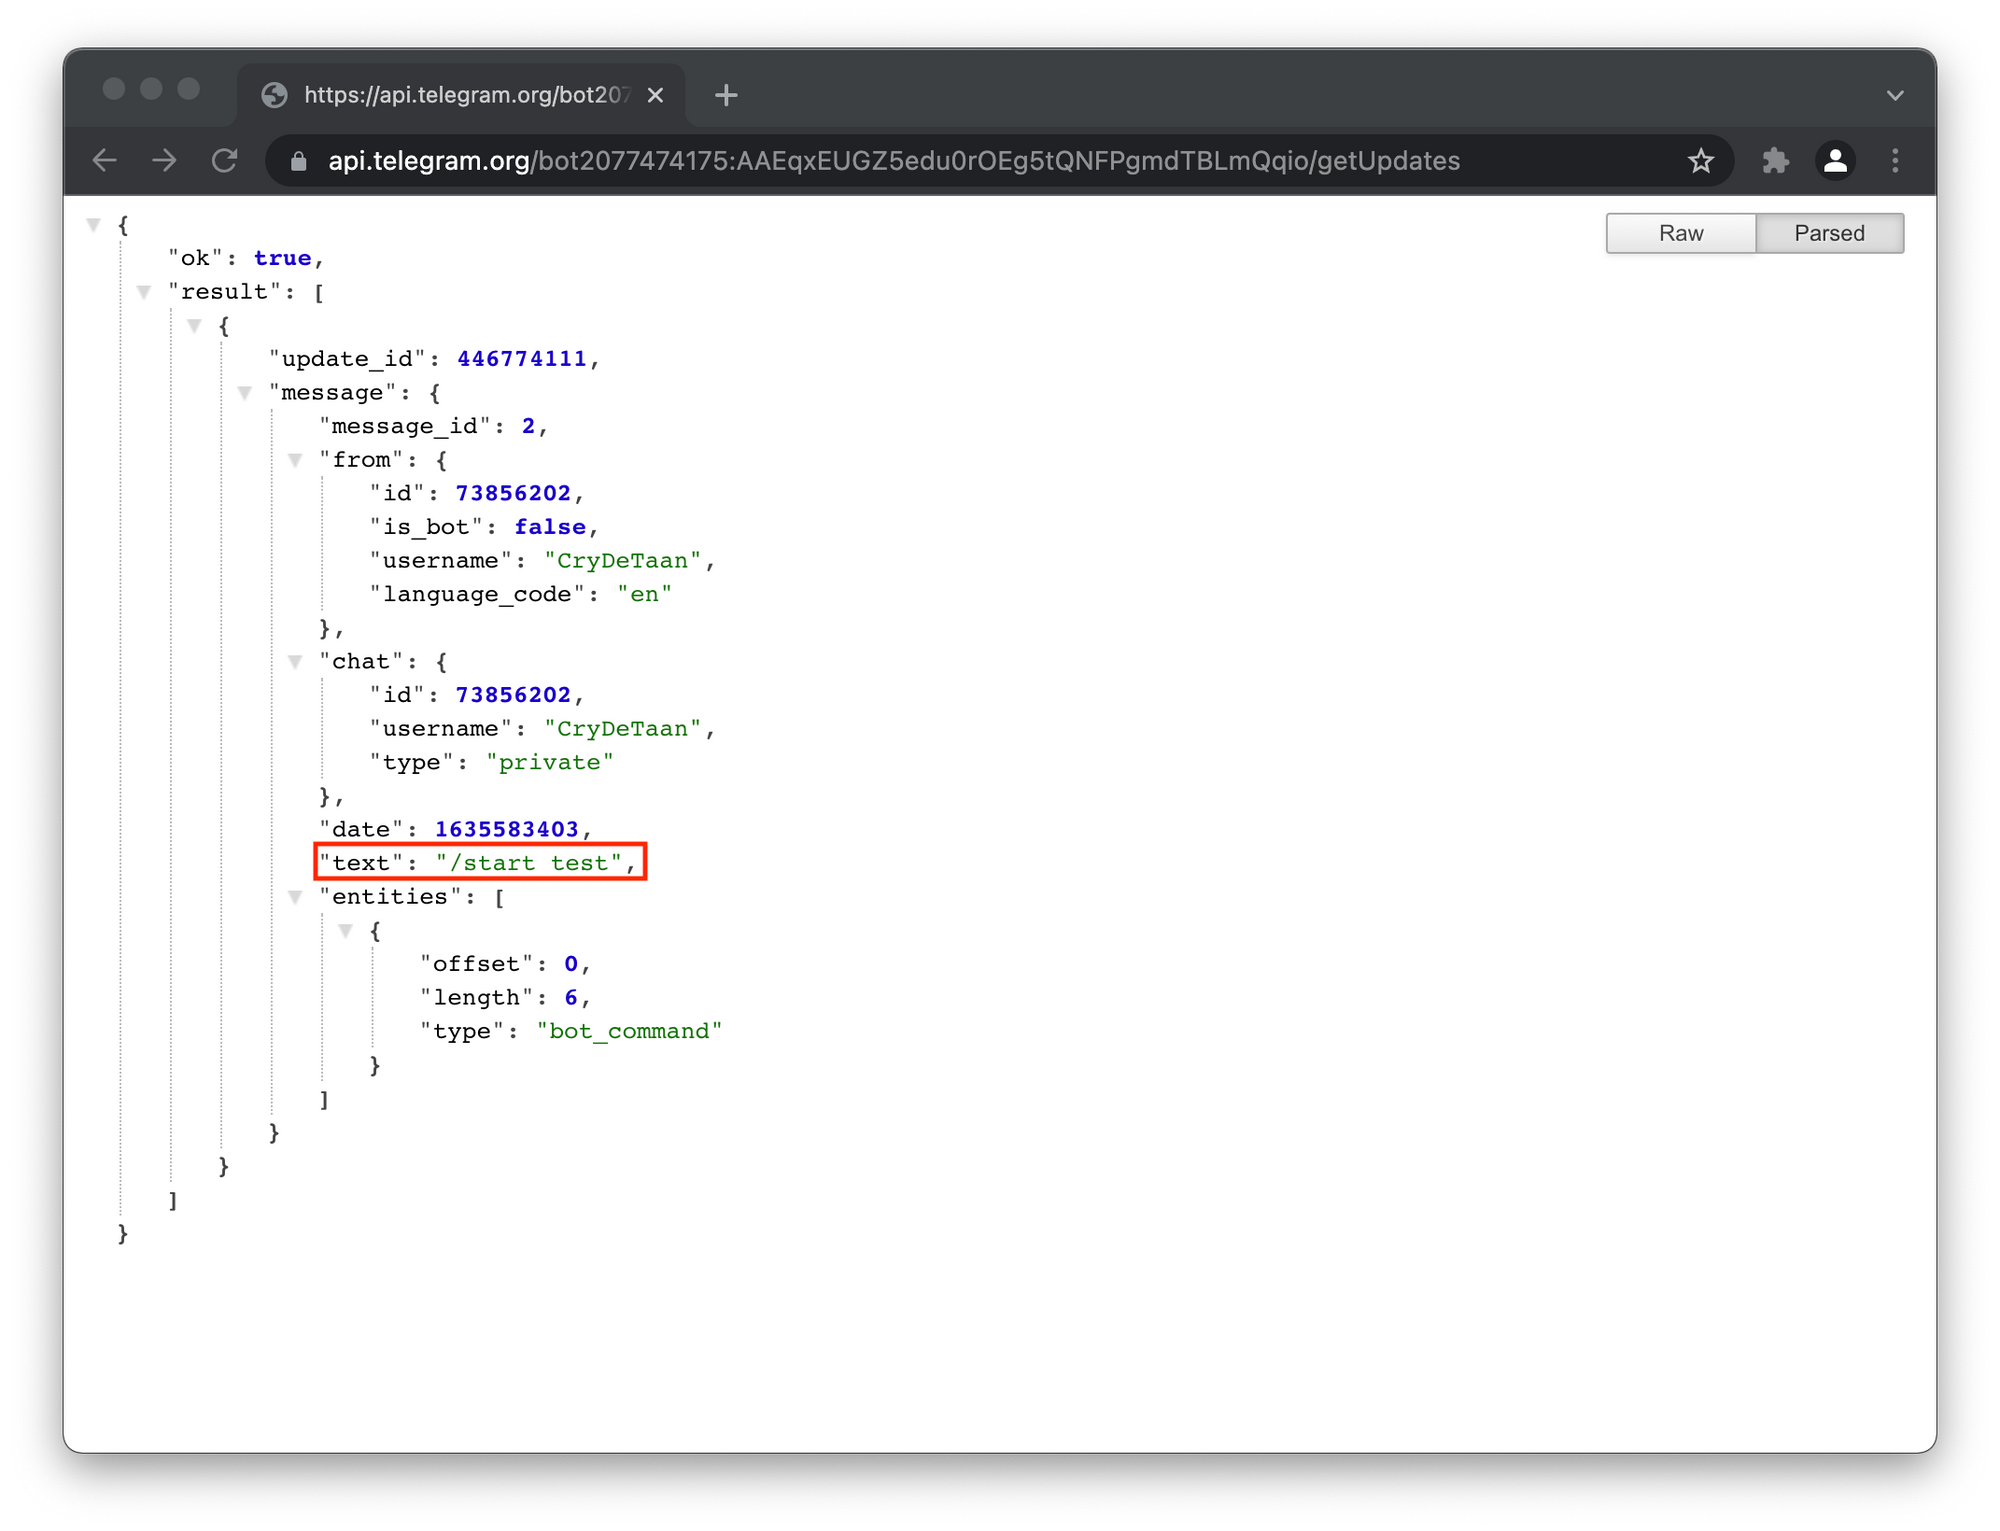
Now, the significance of this is that we have a value we can control from within our Laravel Application that can be unique to each request. So suppose we generate a unique value for a user and show them a button that links to the following URL: https://t.me/laravel_telegram_test_bot?start=vCH1vGWJxfSeofSAs0K5PA.
This will allow us to read the messages from the getUpdates method, and capture the Chat ID of the messages. Furthermore, using the unique value passed as the start parameter that appears in the text field, i.e. /start vCH1vGWJxfSeofSAs0K5PA, to lookup the user it has been associated with in our Laravel Application, thereby giving us a programmatic way to assign the Chat ID to a user within our Laravel Application.
Now that this provides us with a way to connect the user's Telegram account to their account on our Laravel Application, let's look at an alternative to the getUpdates method we have used so far.
Telegram Bot Webhook
Telegram currently support two ways of processing bot updates, the getUpdates API method we have used up to this point or a webhook. The getUpdates is a pull mechanism, where as the webhook is a push. This means that as soon as an update arrives, Telegram delivers it to application or bot for processing. This avoids having our application to ask Telegram for updates frequently and having the need to develop some kind of polling mechanism in our code.
Getting updates via a Telegram API Webhook is the preferred option when using deep linking with Telegram and all this means is that we would supply Telegram with an URL where Telegram posts updates to our application for processing.
Telegram access to Webhook
Now, the following is probably going to cause some confusion, and more so in a development environment, but Telegram needs to be able to connect and post updates to the specified Webhook URL of our application.
As I mentioned, I am using Laravel Valet which makes it easy to make an application accessible from the internet while in a development setting, i.e. behind some sort of NAT etc. Laravel Valet is using ngrok under the hood to share development applications on the Internet. So, if you are not using Valet to serve the application and you do not currently have a way to expose the application in a development setting to the internet, I suggest looking at ngrok. Or an alternative would be Expose from the team at BeyondCode which is a team I rate highly in the PHP Laravel community.
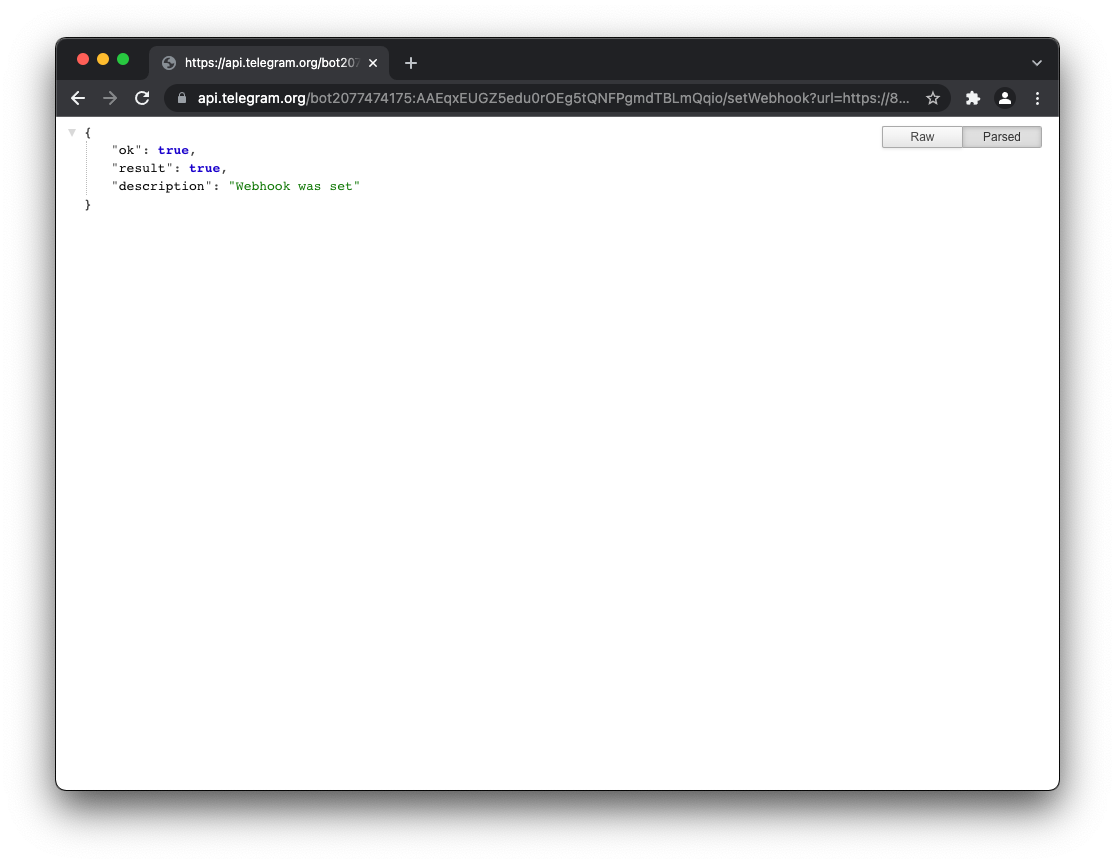
After sharing or exposing the Laravel Application using Laravel Valet to the Internet, we am presented with a https URL that I can use to set the Telegram Bot's webhook.

We can be sure, at least with some certainty, that the Webhook request comes from Telegram by using a "secret" path as our Webhook URL, e.g. https://www.example.com/<token>. This Webhook URL can then be set by sending it as the ?url= parameter to the setWebhook method.
⚠️ Although nobody else knows the bot's webhook token, you can be pretty sure that the requests are from Telegram, however, it is also possible to set the webhook with a public key certificate so that the root certificate in use can be checked which is probably even better (I will maybe discuss this in a future post).
It should be noted that there are other parameters that can be configured for the webhook, such as which update types you want your bot to receive or, as mentioned previously, supplying a certificate that can be checked during communication (which I will discuss in a future post).
Automatically setting a Webhook
Although setting a webhook in the way outlined above is not that complicated, I came up with a mechanism to do this with an Artisan Command.
This console command is perhaps a bit unnecessary to fully explain here, however, if you want to create this in your own application you can make a console command using the following artisan command:
php artisan make:command ConfigureTelegramWebhook Copy the following code to the app/Console/Commands/ConfigureTelegramWebhook.php console / artisan command.
CryDeTaanFrom a high level, the following happens:
- A webhook "secret" is generated
- This "secret" is updated in the
.env - The user is prompted for the base URL
- The webhook is constructed
- The Bot is set with the new webhook using the API
setWebhookmethod
Although the frist two keys have already been specified, there are three values that are required in the .env to be updated if you want to use this Console Command.
- The URL, you can copy it from the message from the BotFather and set a
TELEGRAM_BOT_URL=key with, in my case, https://t.me/laravel_telegram_test_bot - Set a
TELEGRAM_BOT_TOKEN=with the API Token, in my case2017805637:AAFAB6wvnYC5aGzm07_hqUIVokMy82Z6WpA - Set an empty
TELEGRAM_BOT_WEBHOOK=key
The values in the .env should now look something like this:
TELEGRAM_BOT_TOKEN=2077474175:AAEqxEUGZ5edu0rOEg5tQNFPgmdTBLmQqio
TELEGRAM_BOT_URL=https://t.me/laravel_telegram_test_bot
TELEGRAM_BOT_WEBHOOK=These keys should also be added in the telegram-bot-api array in config/services.php. Again, the token and bot_url keys should already have been specified earlier during the installation of the Laravel Notifications Channel.
'telegram-bot-api' => [
'token' => env('TELEGRAM_BOT_TOKEN', 'YOUR BOT TOKEN HERE'),
'bot_url' => env('TELEGRAM_BOT_URL'),
'webhook' => env('TELEGRAM_BOT_WEBHOOK'),
],Once this has been configured, the Telegram Bot's Webhook URL can be set using the telegram:configure-webhook artisan command.

⚠️ If you are making use of ngrok, or something similar during development, make sure to run this command every time when the exposed URL changes.
Webhook Route
It's great that we have set a webhook, but we'll need a route within our Laravel Application to handle incoming requests to the webhook that we configured previously.
We can update the routes/web.php file with the webhook URI and specify the store method in theTelegramNotificationController class.
use App\Http\Controllers\TelegramNotificationController;
Route::post('/telegram/webhook/'.config('services.telegram-bot-api.webhook'),
[TelegramNotificationController::class, 'store']);
💡 Note that the <token>portion of the webhook is dynamic and determined automatically at runtime from the value in the .env as TELEGRAM_BOT_WEBHOOK= (thanks to the above mentioned Artisan command). This is after all only supposed to be shared with Telegram as previously explained, and having it static will only end up leaking it in places like source control repositories.
Very importantly, we also need to exclude this route from Laravel's CSRF protection. This is achieved by adding this route to the $except array in the app/Http/Middleware/VerifyCsrfToken.php class.
protected $except = [
'/telegram/webhook/*',
];Now that we have set the webhook route, let's add the store method in the TelegramNotificationController. There is more to come with this method, but for the moment, let's just log incoming requests to this webhook to a file to get an idea of what we are working with here.
We will add some initial checks to make sure that we are working with a Telegram message as there are other types of request coming from Telegram, we are only interested in the message type updates. You may notice that a try catch but still return a 2xx on an exception. The reason for this is that Telegram will continue to try and send the updates unless it receives a 2xx and therefore, if the update is not what we are expecting on the webhook, ww'll want to let Telegram know that we accepted the response and will deal with it in the application. And therefore means that Telegram no longer needs to care about it, and that way Telegram can forget this update and not try to resend it.
Update App/Http/Controllers/TelegramNotificationController as follow:
use Illuminate\Support\Facades\Log
use Exception;
/**
* Store Telegram Chat ID from telegram webhook message.
*
* @param Request $request
* @return \Illuminate\Http\Response
*/
public function store(Request $request)
{
try {
$messageText = $request->message['text'];
} catch (Exception $e) {
return response()->json([
'code' => $e->getCode(),
'message' => 'Accepted with error: \'' . $e->getMessage() . '\'',
], 202);
}
Log::build([
'driver' => 'single',
'path' => storage_path('logs/webhook.log'),
])->info($request->all());
return response('Success', 200);
}
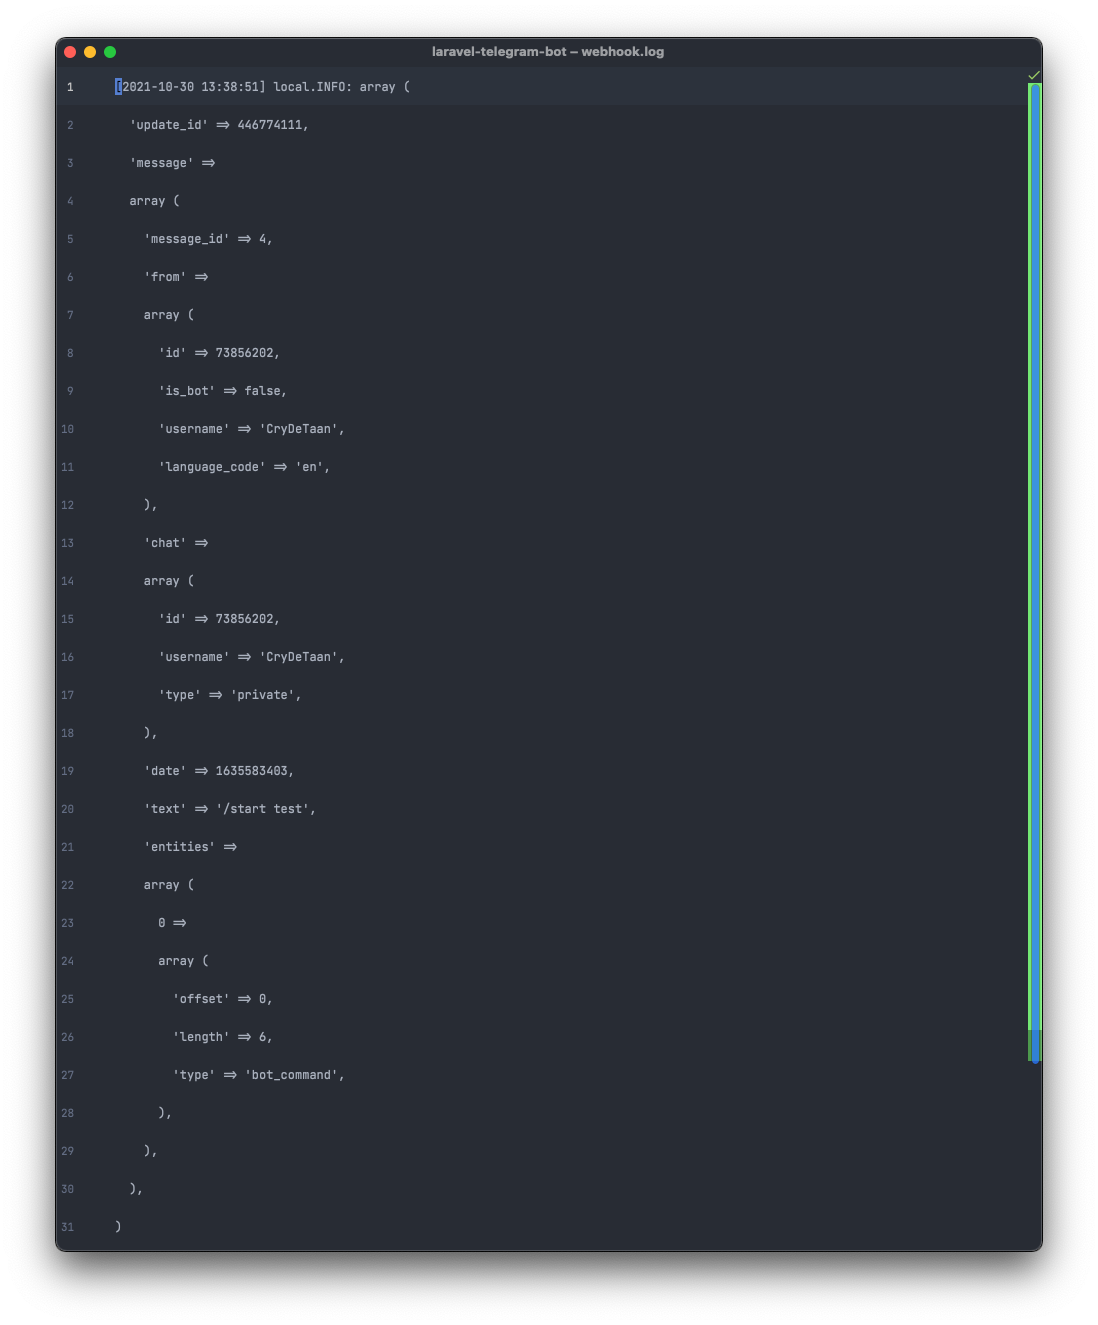
Send a new message to the Telegram bot or restart the chat using the /start feature. This will write the POST request to the storage/logs/webhook.log file whenever a message is received by our Telegram Bot, similar to this:

This confirms that we have correctly set up the webhook and that we are receiving message updates from the Telegram Bot API.
We can now start building our front-end to test notification with.
Notification Form
If you recall, we have already added a send method to the TelegramNotificationController class as follows:
use App\Notifications\TelegramNotification;

public function send(Request $request)
{
    $user = auth()->user();
    $user->notify(new TelegramNotification($request->notification));

    return back();

}Let's build a form which we can use to send a notification that will reach this method.
Routes
First, let's start with the routes, we will have two routes:
- One that will render the view containing the form using a basic closure, and
- One that will receive a
POSTrequest containing the notification message from the form.
We can wrap these in the "default" route group where the default auth middleware provided by Laravel Breeze which we included in our Laravel installation. This will be required later.
Route::middleware('auth')->group(function () {
    //

    Route::get('/notification', function () {
        return Inertia::render('Notification');
    })->name('notification');

    Route::post('/telegram/notification', [TelegramNotificationController::class, 'send'])->name('send-notification');
});
Views - Notification Page
Laravel's Breeze Inertia starter kit comes with an example Dashboard page that we can use as a template to create a Notification page. Let's copy the resources/js/Pages/Dashboard.vue file to resources/js/Pages/Notification.vue.
Update the <template> with the following:
<template>
    <Head title="Notification"/>

    <AuthenticatedLayout>
        <template #header>
            <h2 class="font-semibold text-xl text-gray-800 dark:text-gray-200 leading-tight">Notification</h2>
        </template>

        <div class="py-12">
            <div class="max-w-7xl mx-auto sm:px-6 lg:px-8">
                <div class="bg-white dark:bg-gray-800 overflow-hidden shadow-sm sm:rounded-lg">
                    <div class="p-6 text-gray-900 dark:text-gray-100">
                        <form @submit.prevent="sendNotification">
                            <input-label for="notification" value="Message"/>
                            <text-area-input id="notification" type="text" class="mt-1 block w-full"
                                       v-model="form.notification" ref="notification"/>
                            <input-error :message="form.errors.notification" class="mt-2"/>
                            <p class="mt-2 text-sm">Write a few sentences as a notification.</p>

                            <div class="flex mt-2 items-center justify-end px-4 py-3 gap-4">
                                <PrimaryButton :disabled="form.processing">Send</PrimaryButton>

                                <Transition enter-from-class="opacity-0" leave-to-class="opacity-0" class="transition ease-in-out">
                                    <p v-if="form.recentlySuccessful" class="text-sm text-gray-600 dark:text-gray-400">Sent.</p>
                                </Transition>
                            </div>
                        </form>
                    </div>
                </div>
            </div>
        </div>

    </AuthenticatedLayout>
</template>
Within the script section, make sure the imports and components match the following:
<script setup>
import AuthenticatedLayout from '@/Layouts/AuthenticatedLayout.vue';
import {Head} from '@inertiajs/vue3';
import InputLabel from "@/Components/InputLabel.vue";
import TextArea from "@/Components/TextArea.vue";
import InputError from "@/Components/InputError.vue";
import PrimaryButton from "@/Components/PrimaryButton.vue";
import {useForm} from '@inertiajs/vue3'

const form = useForm({
    notification: '',
})

const sendNotification = () => {
    form.post(route('send-notification'), {
        onSuccess: () => form.reset(),
    })
}
</script>
You'll notice that we are making use of Inertia's Form Helper to send the message to the send-notification route. You can review the full vue component here.
A quick note on the imports. These are all components which ship with the Breeze Inertia stack, apart from TextAreaInput. This one we'll create by copying the Breeze Input component (resources/js/Components/TextInput.vue).
Save it to as a new vue component at this location resources/js/Components/TextAreaInput.vue and change the <input /> tag to a <textarea /> tag and add rows=8 to the same tag. This should be the end result.
<script setup>
import { onMounted, ref } from 'vue';

defineProps(['modelValue']);

defineEmits(['update:modelValue']);

const input = ref(null);

onMounted(() => {
    if (input.value.hasAttribute('autofocus')) {
        input.value.focus();
    }
});

defineExpose({ focus: () => input.value.focus() });
</script>

<template>
    <textarea
        class="border-gray-300 dark:border-gray-700 dark:bg-gray-900 dark:text-gray-300 focus:border-indigo-500 dark:focus:border-indigo-600 focus:ring-indigo-500 dark:focus:ring-indigo-600 rounded-md shadow-sm"
        :value="modelValue"
        @input="$emit('update:modelValue', $event.target.value)"
        ref="input"
        rows="8"
    />
</template>
Views - Navigation
Before we compile our frontend assets, let's add a navigation button to our Laravel Application, this can be done by making some changes to the resources/js/Layouts/AuthenticatedLayout.vue file.
There are two sections that we can duplicate and make some changes to, in order to add the navigation for both desktop as well as mobile screen sizes to the Notifications page we created.
Look for the Navigation links section and duplicate the Dashboard.
<!-- Navigation Links -->
<div class="hidden space-x-8 sm:-my-px sm:ml-10 sm:flex">
	<NavLink :href="route('dashboard')" :active="route().current('dashboard')">
		Dashboard
	</NavLink>
    <NavLink :href="route('notification')" :active="route().current('notification')">
		Notification
	</NavLink>
</div><div class="pt-2 pb-3 space-y-1">
<ResponsiveNavLink :href="route('dashboard')" :active="route().current('dashboard')">
Dashboard
</ResponsiveNavLink>
<ResponsiveNavLink :href="route('notification')" :active="route().current('notification')">
Notification
</ResponsiveNavLink>
</div>Build
Now we can compile the frontend assets by running the following from the root of the project:
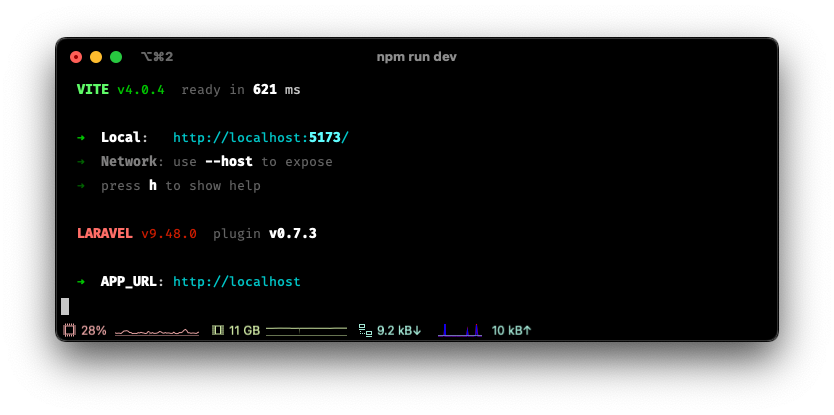
npm run dev
Laravel makes use of vite to build the frontend assets and has Hot Module Replacement (HMR), which means there is no reason to run the npm command for the remainder of our tutorial (Ts&Cs apply 🙃, so if at any time your frontent changes are not updating in the browser, try to restart this.)
Test - Notification Form
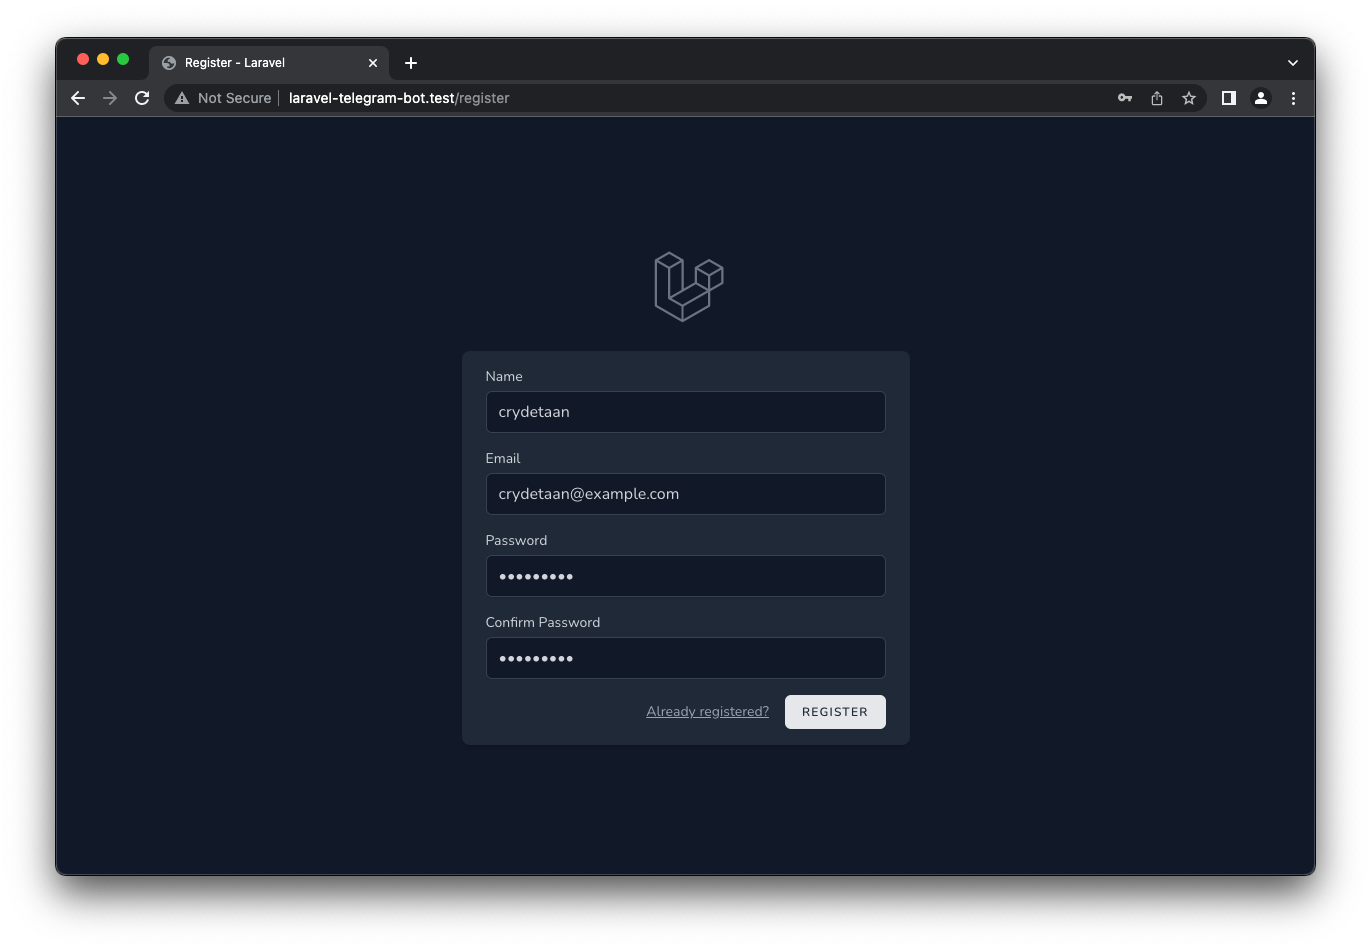
Let's head to our Laravel Application and register a new user.
We can now navigate to the Notification tab and try to send a Notification.
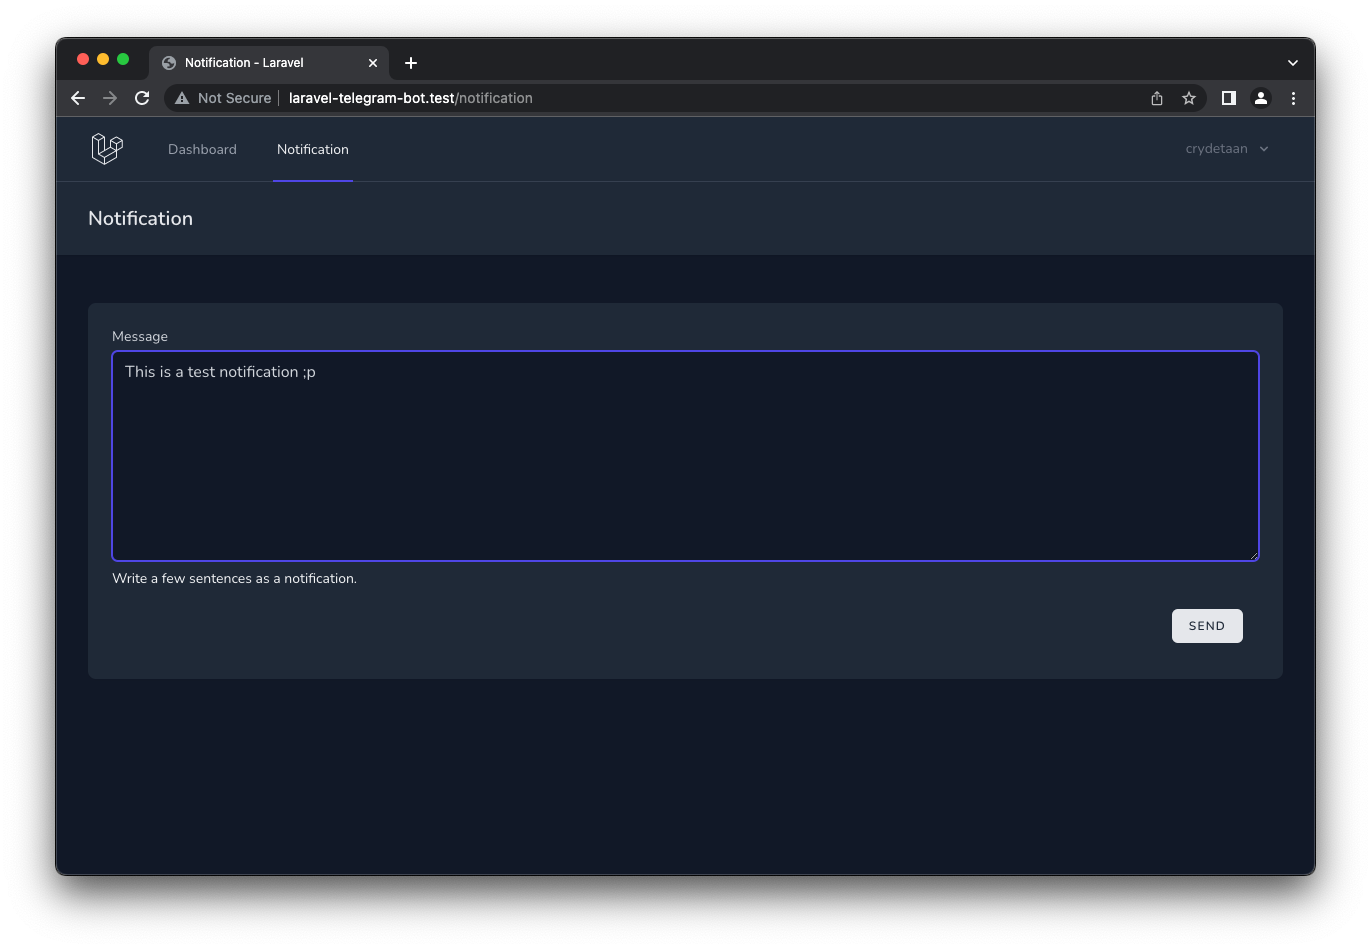
This will not work. Remember that we have not yet set the Chat ID of the user we are currently logged in as. Let's manually set this, just to make sure everything works before we do so programmatically.
Set Chat ID - Manually
We have already seen our Chat ID a few times. First when we used the getUpdates method in our browser, as well as when we received updates via our webhook which was then written to the log file. Take note of this from either of the following before manually setting the Chat ID for the user.

Open a Laravel Tinker session from your terminal
php artisan tinker
Find the user using the where clause, update my name with whatever you used when registering your user.
$user = User::where('name', 'CryDeTaan')->first();
Set the telegram_chat_id
$user->telegram_chat_id = 73856202
Finally, save this value
$user->save();
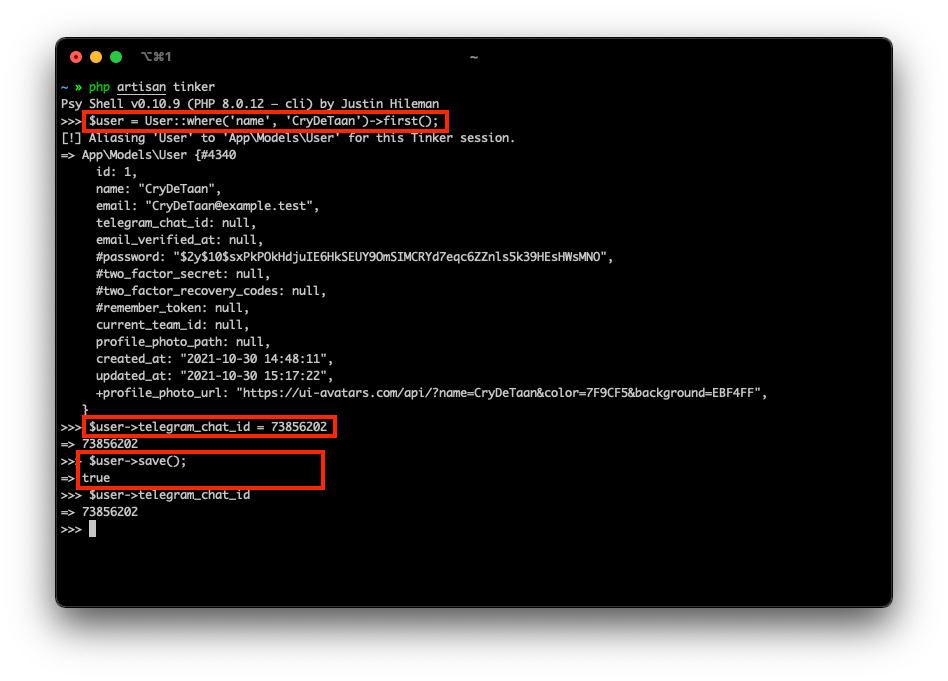
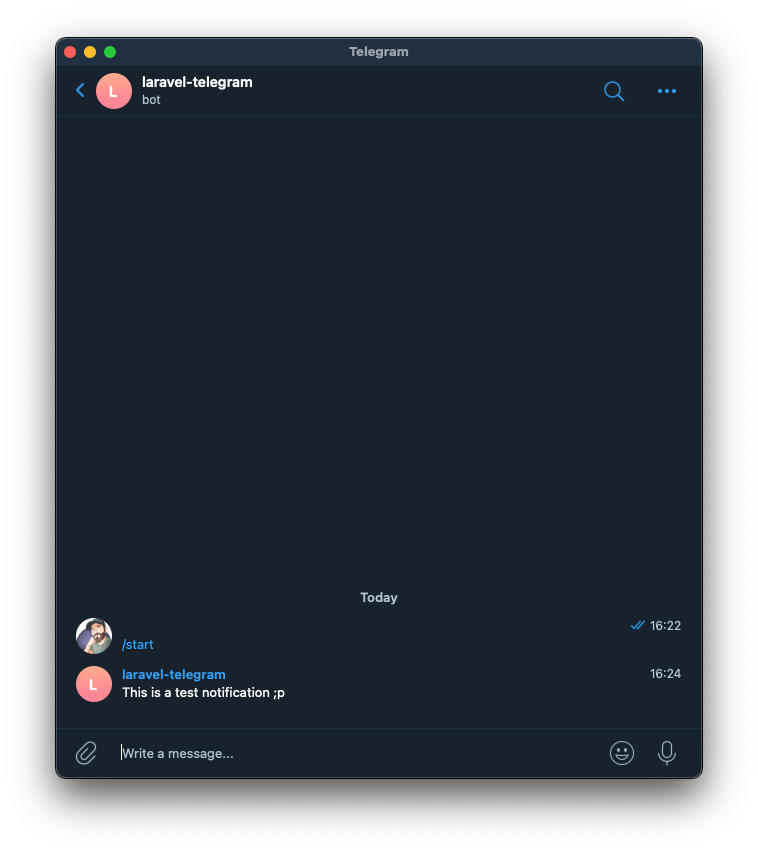
Now try to send the notification from the Notification page once again, if all goes well you should receive a message in Telegram as can be seen below.
Programmatically Set Chat ID
The concept of deep linking has already been explained, so we can just go ahead and implement that logic now.
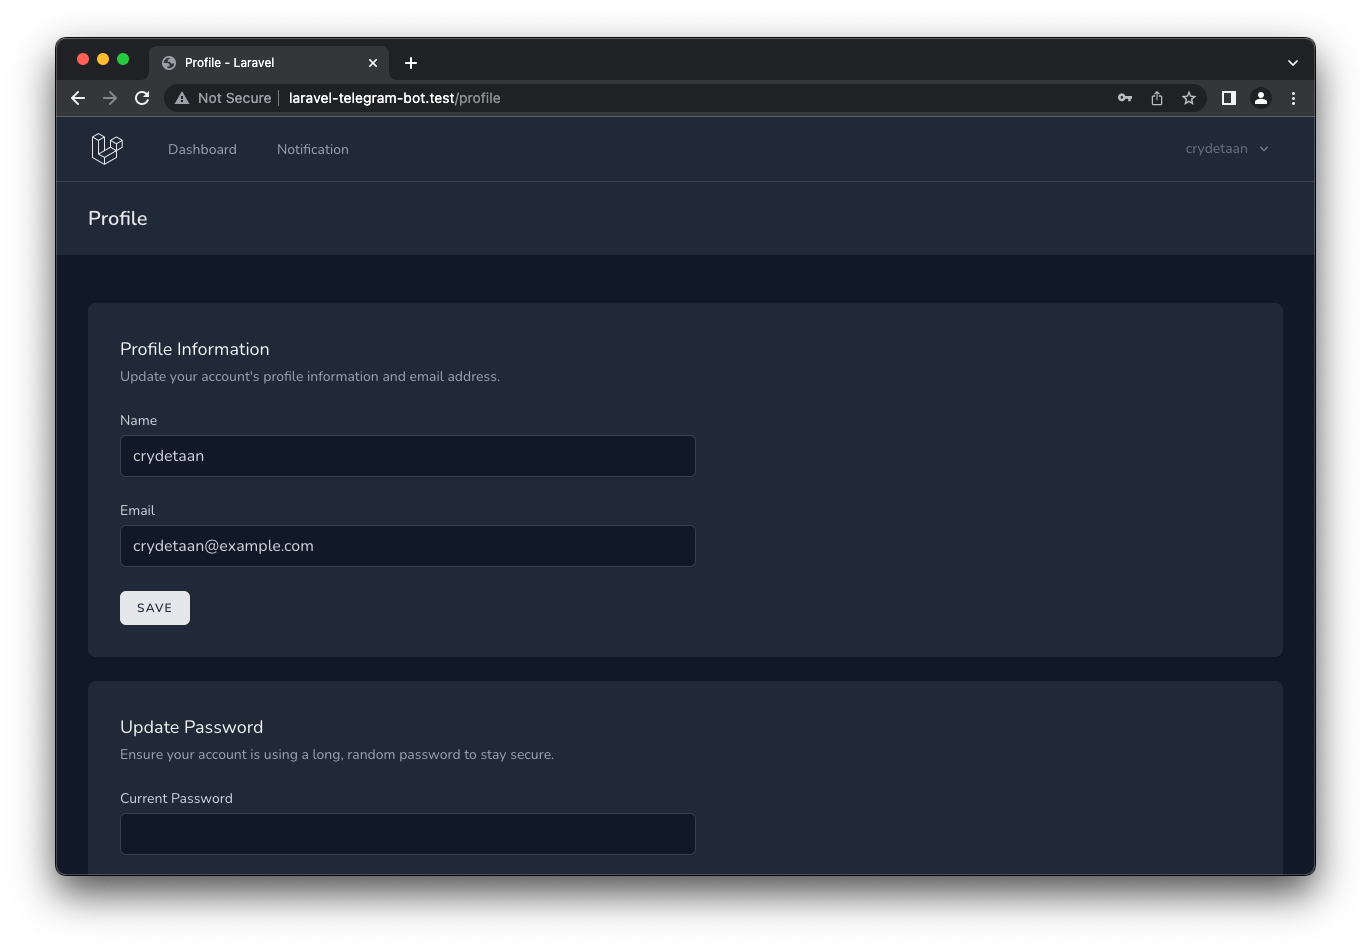
As mentioned before, we are making use of Laravel Breeze to scaffold some aspects of the application which particularly useful for the user logic and the profile section this provides.
This can be seen after logging in and heading to the profile section from the dropdown to the top right of the screen.
Adding Profile Partial
These profile partials, are built up from the Breeze components and can very easily be used as example for new components and can be customised to our liking.
Let's add another partial in the resources/js/Pages/Profile/Partials directory. You will see each of the profile panels match a partial in the Partials directory. The Vue component responsible for rendering these partials is in the parent Profile, directory called Edit.vue.
We will create a new partial, TelegramNotificationsForm.vue, in the resources/js/Pages/Profile/Partials directory and use the Breeze components to build our new profile panel. The following can be added to the newly created partial.
<script setup>
import DangerButton from '@/Components/DangerButton.vue';
import PrimaryButton from "@/Components/PrimaryButton.vue";
import { ref } from 'vue';
const processing = ref(false);
</script>
<template>
<section class="space-y-6">
<header>
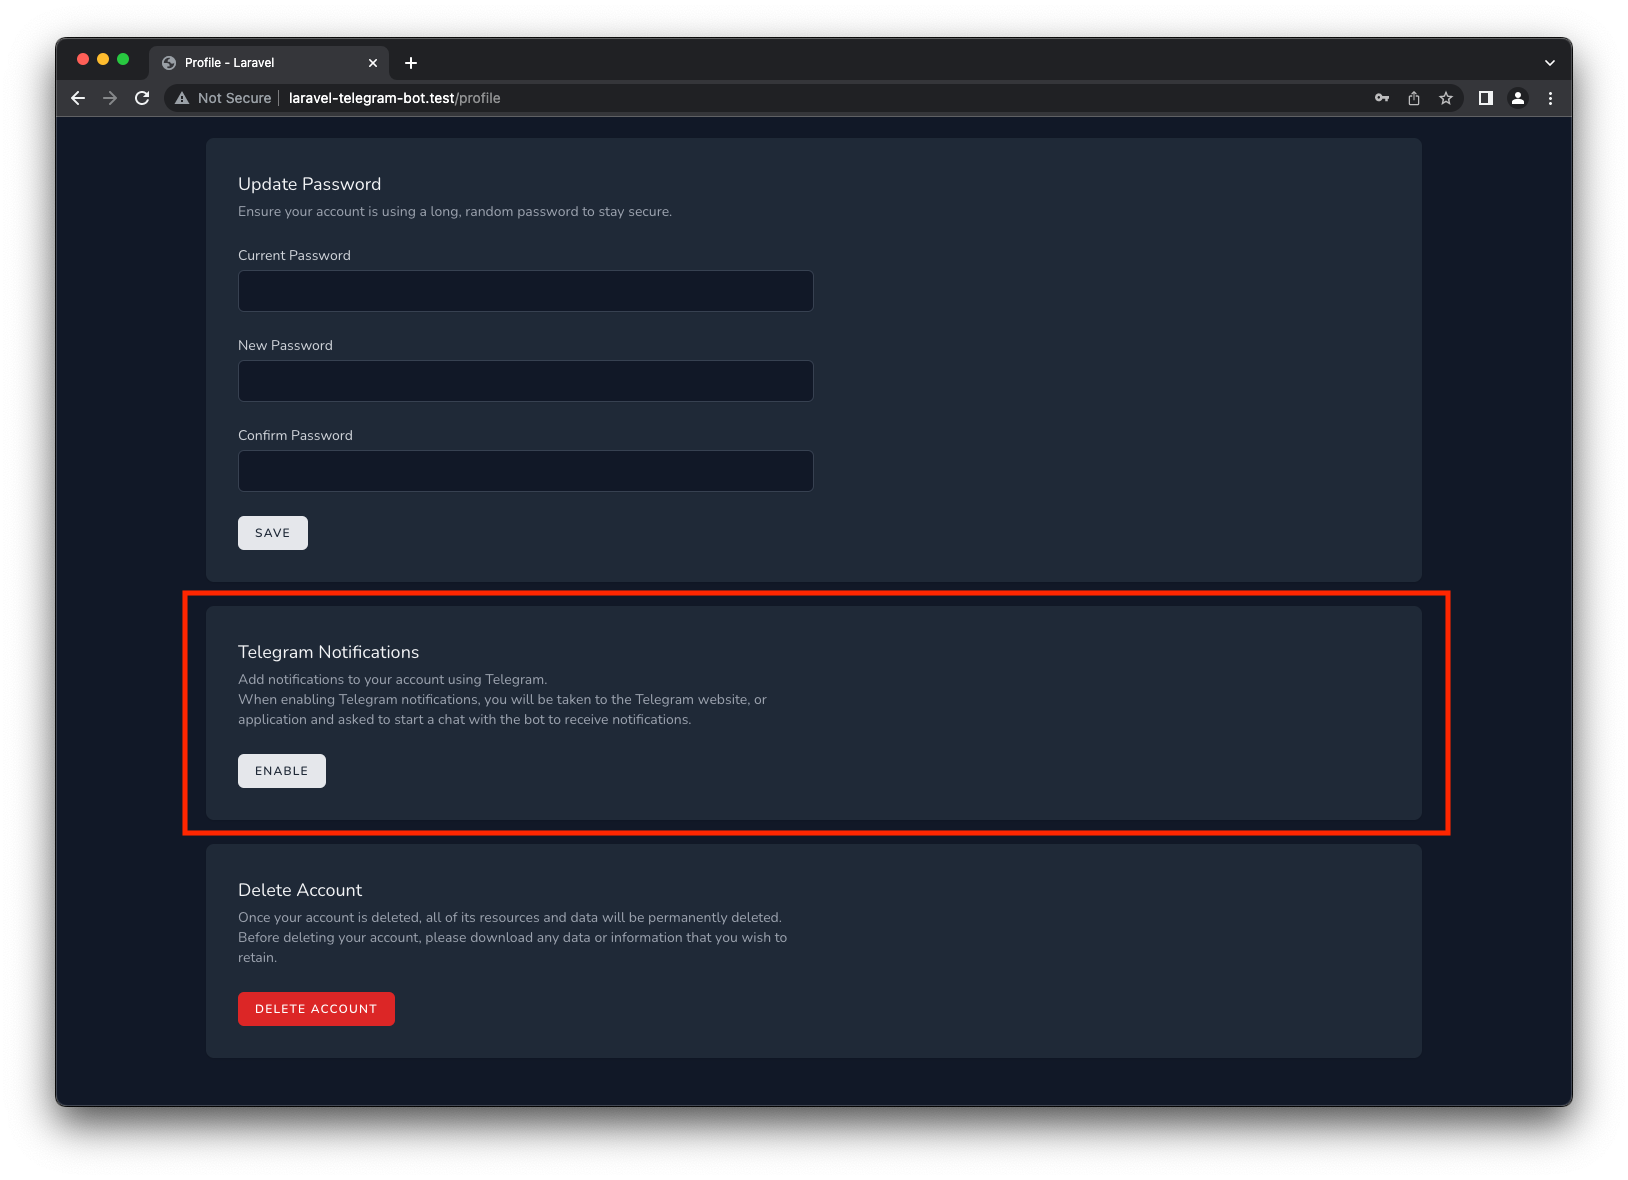
<h2 class="text-lg font-medium text-gray-900 dark:text-gray-100">Telegram Notifications</h2>
<p v-if="!$page.props.auth.user.telegram_chat_id" class="mt-1 text-sm text-gray-600 dark:text-gray-400">
Add notifications to your account using Telegram. <br>
When enabling Telegram notifications, you will be taken to the Telegram website, or application and
asked to start a chat with the bot to receive notifications.
</p>
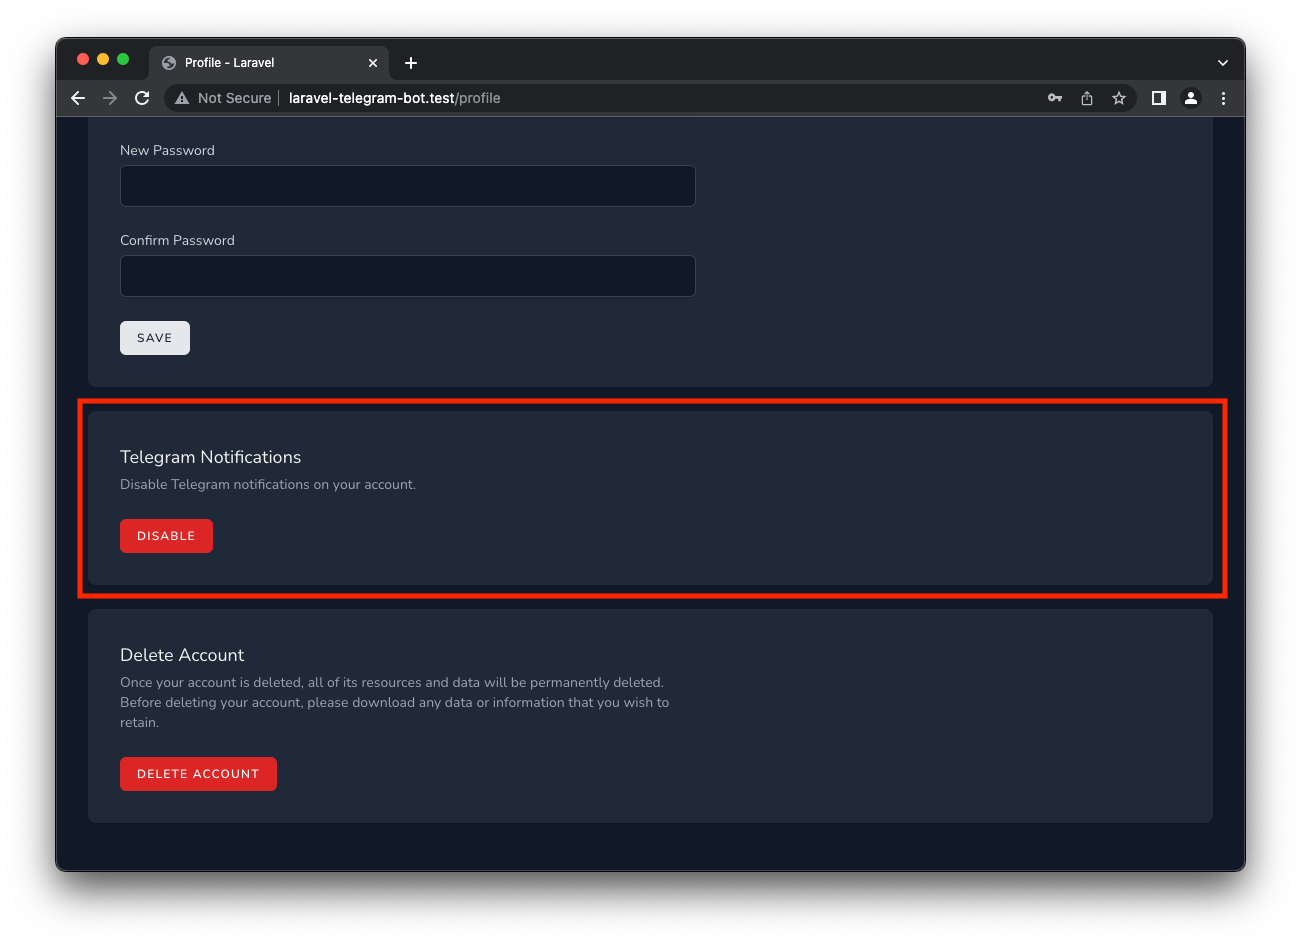
<p v-else class="mt-1 text-sm text-gray-600 dark:text-gray-400">
Disable Telegram notifications on your account.
</p>
</header>
<PrimaryButton
v-if="!$page.props.auth.user.telegram_chat_id"
@click="enableTelegramNotifications"
:class="{ 'opacity-25': processing }" :disabled="processing"
>
Enable
</PrimaryButton>
<DangerButton
v-else @click="disableTelegramNotifications"
:class="{ 'opacity-25': processing }"
:disabled="processing"
>
Disable
</DangerButton>
</section>
</template>
Let's render this profile panel partial component just after the update password partial panel. To do this we can import our new panel as a component TelegramNotificationsForm in the resources/js/Pages/Profile/Edit.vue parent component.
<script setup>
// ... Snip ...

import TelegramNotificationsForm from "./Partials/TelegramNotificationsForm.vue";

// ... Snip ...
</script>

</template>
    <!-- ... Snip ... -->
	<div class="p-4 sm:p-8 bg-white dark:bg-gray-800 shadow sm:rounded-lg">
		<UpdatePasswordForm class="max-w-xl" />
	</div>

	<div class="p-4 sm:p-8 bg-white dark:bg-gray-800 shadow sm:rounded-lg">
		<TelegramNotificationsForm class="max-w-xl" />
	</div>

    <!-- ... Snip ... -->

</template>Opening the Profile section should now include a Telegram Notification panel. We have not yet added any logic, but this does confirm we hooked it all up correctly to successfully render the panel in the profile section.
Backend Logic
From the frontend a request will be made by the user of our Laravel Application to obtain a URL with a unique value that we can use with the Telegram Deep Linking mechanism. So let's update our Routes and add a method to the TelegramNotificationController.
Add the /telegram/temp-url route to the existing Route group as follows:
Route::middleware(['auth:sanctum'])->group(function () {
    // ...
    Route::get('/telegram/temp-url', [TelegramNotificationController::class, 'create'])->name('telegram-temp-url');
});
In the TelegramNotificationController add the create method as follows:
use Illuminate\Support\Facades\Cache;
use Illuminate\Support\Str;

class TelegramNotificationController extends Controller
{

    /**
    * Create a unique code for the user to activate Telegram notifications.
    *
    * @param Request $request
    * @return \\Illuminate\\Http\\JsonResponse
    */
    public function create(Request $request)
    {
        $telegramBotUrl = config('services.telegram-bot-api.bot_url');

        $userTempCode = Str::random(35);
        Cache::store('telegram')
            ->put($userTempCode, auth()->id(), $seconds = 120);

        // Telegram URL:
        // <https://t.me/ExampleBot?start=vCH1vGWJxfSeofSAs0K5PA>
        $telegramUrl = $telegramBotUrl . '?start=' . $userTempCode;

        return response()->json([
            'telegramUrl' => $telegramUrl,
        ]);

    }

    // ...
}
This method will use our Telegram Bot's URL and construct a temporary Deep Link URL that includes a 35 character random string. This string is saved to a cache for 2 minutes (we will set this up next).
This temp url will be returned to the user and will be opened in a new tab. This will be covered more in the Frontend Logic section.
Caching
Laravel provides a caching mechanism which we can make use of to store the user's temporary codes. We can then retrieve the code from the cache to match the user's Telegram account with their account in our application. This, again, has been discussed in the Deep Linking mechanism section above.
I prefer an additional cache store for this purpose that will make use of the Database driver. I do not foresee thousands of users requesting to enable Telegram Notifications on their accounts at the same time, so there is no need for using very fast data stores such as Memcached or Redis for caching or even having worry about cache locks.
Add the telegram store to the end of the stores array in config/cache.php.
<?php

use Illuminate\Support\Str;

return [
    'stores' => [
    	// ...

        'telegram' => [
       	    'driver' => 'database',
            'table' => 'telegram_cache',
            'connection' => null,
            'lock_connection' => null,
        ],
    ]

];
As I mentioned before, I opted for the database drive, so a telegram_cache table needs to be set up which will contain the cached items. We can do this with a new migration.
php artisan make:migration create_telegram_cache_table
The Schema::create should be updated as follows.
Schema::create('telegram_cache', function (Blueprint $table) {
    $table->string('key')->primary();
    $table->mediumText('value');
    $table->integer('expiration');
});
The complete migration can be viewed here.
Run the new migration:
php artisan migrate
Let's add some frontend logic...
Frontend Logic
The logic is fairly simple, when clicking on the enable button, an axios request (available to us through the Laravel installation) will be made to our backend. This axios request is returned a temporary Deep Link URL that will open in a new browser tab.
Add the following to the TelegramNotificationsForm.vue component's <scrip> section:
<script setup>
// ... Snip ...

const enableTelegramNotifications = async () => {
    processing.value = true
    try {
        const response = await axios.get(route('telegram-temp-url'));
        window.open(response.data.telegramUrl, '_blank').focus();

    } catch (error) {
        // TODO: Display error to user.
        console.error(error);
    }
};

// ... Snip ...

</script>

<template>
    <!-- ... Snip ... -->
From the Profile page click the Enable button on the Telegram Notification panel. This should now open a new tab with a prompt to Open Telegram. Notice the start=<token> in the URL, this should now be familiar and is what is needed for the Deep Linking mechanism.
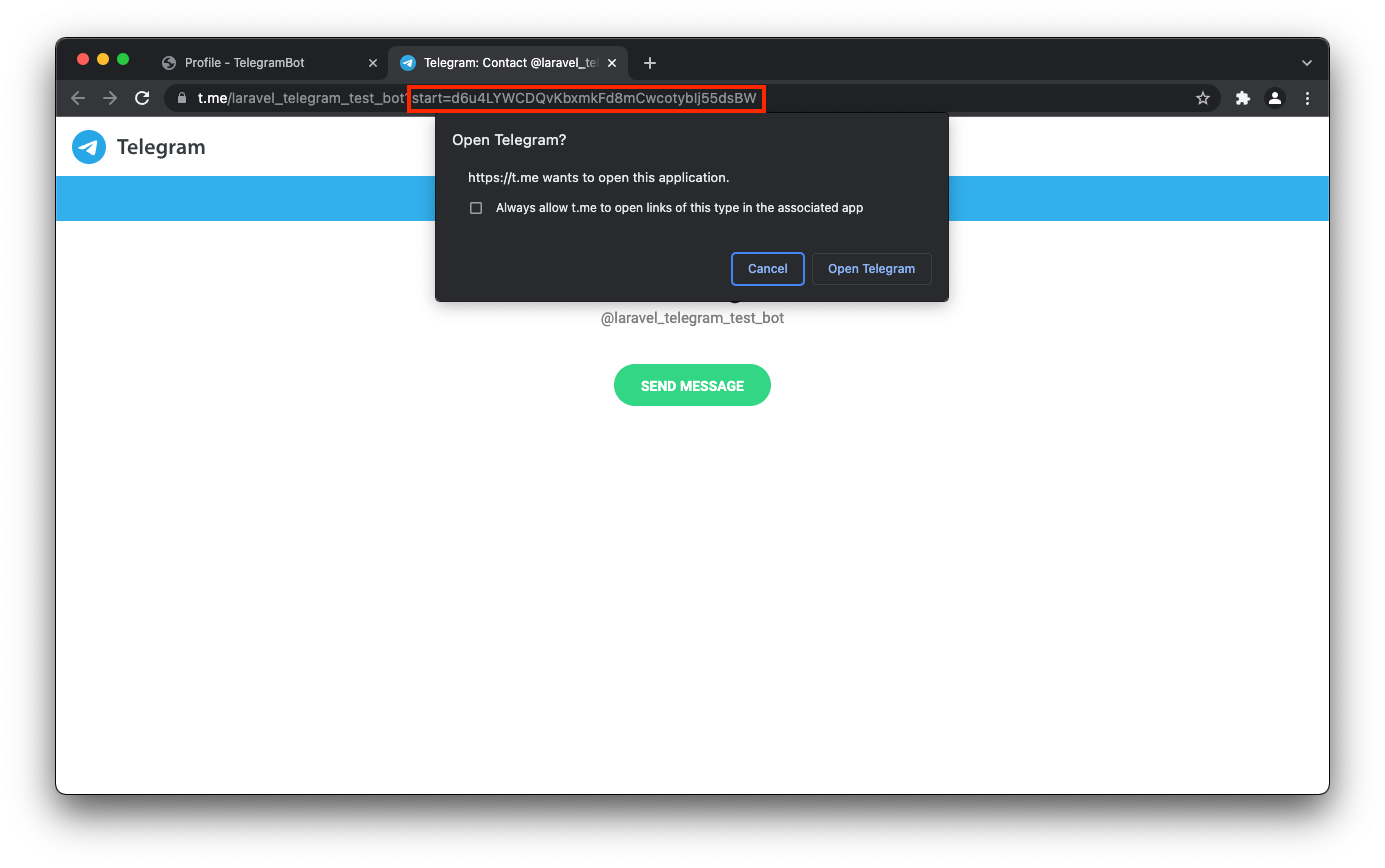
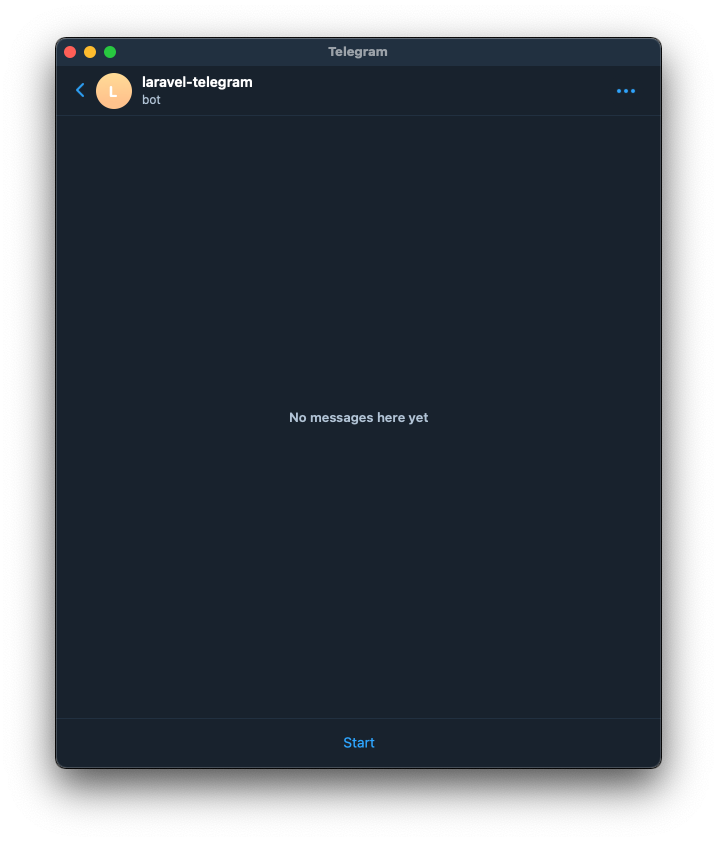
Once the Open Telegram option has been selected, Telegram will open a chat with our bot and from here you can start the bot by clicking on the Start button.
Storing Chat ID of User
When clicking the start button in the Telegram App, Telegram will send a POST request to the configured webhook that we discussed earlier. We have already created the store method in the TelegramNotificationController, we just need to implement the logic to take the unique value from the message and perform a lookup in the cache we have set to determine which user the unique code is associated with.
Once the user is identified, the user's telegram_chat_id can be set to their database record from the message's Chat ID. This will then be used to deliver the notifications in the same way that was already seen when we manually set the telegram_chat_id previously.
The store method in the TelegramNotificationController should be updated with the following:
🔥 Remove the use Illuminate\Support\Facades\Log; from the controller and also delete the storage/logs/webhook.log file as well as these are no longer needed.
use App\Models\User;

/**
 * Store Telegram Chat ID from telegram webhook message.
 *
 * @param Request $request
 * @return \Illuminate\Http\Response
 */
public function store(Request $request)
{
    try {
        $messageText = $request->message['text'];
    } catch (Exception $e) {
        return response()->json([
            'code'     => $e->getCode(),
            'message'  => 'Accepted with error: \'' . $e->getMessage() . '\'',
        ], 202);
    }
    // Check if the message matches the expected pattern.
    if (!Str::of($messageText)->test('/^\/start\s[A-Za-z0-9]{35}$/')) {
        return response('Accepted', 202);
    }

    // Cleanup the string
    $userTempCode = Str::of($messageText)->remove('/start ');

    // Get the User ID from the cache using the temp code as key.
    $userId = Cache::store('telegram')->pull($userTempCode);
    $user = User::find($userId);

    // Get Telegram ID from the request.
    $chatId = $request->message['chat']['id'];

    // Update user with the Telegram Chat ID
    $user->telegram_chat_id = $chatId;
    $user->save();

    return response('Success', 200);
}
This will now programmatically set the user's Telegram Chat ID, and notifications can be sent using the Notification tab in the example Laravel Application.
There is one small thing that we still need to take care of before we can consider this to be complete. This is to give the user the ability to disable Telegram notifications.
Disable Telegram Notifications
Some of the work has already been done. If you look at the the Profile panel partial we added, resources/js/Pages/Profile/Partials/TelegramNotificationsForm.vue, you will notice that there is a section that does VueJS Conditional Rendering (v-if / v-else).
This conditional rendering is based on the presence of the telegram_chat_id part of the user object sent to the view using the Inertia page object.
v-if="!$page.props.auth.user.telegram_chat_id"We can refresh the profile page and if the user already has a telegram_chat_id set, the Telegram Notification panel will show the disable button.
The only other thing that is needed here is to hook up the logic behind this disable button.
Frontend Logic
The resources/js/Pages/Profile/Partials/TelegramNotificationsForm.vue requires one additional method for this logic to function correctly.
Updated the methods: section with an additional method:
<script setup>
// ... Snip ...
import {useForm} from '@inertiajs/vue3';

// ... Snip ...

const disableTelegramNotifications = () => {
    processing.value = true

    useForm({}).delete(route('disable-telegram-notifications'), {
        preserveScroll: true,
        onSuccess: () => processing.value = false,
    });
};

</script>

<template>
    <!-- ... Snip ... -->
Now, once the Disable button is clicked, a Delete request will be made to the disable-telegram-notifications route, let's set this up.
Backend Logic
From a backend perspective, we need a route to accept this request from the frontend and add a destroy method in die the TelegramNotificationController to update the user by removing their telegram_chat_id.
Add the delete route to the existing Route group as follows:
Route::middleware(['auth:sanctum', 'verified'])->group(function () {
    // ...
    Route::delete('/telegram/notifications', [TelegramNotificationController::class, 'destroy'])->name('disable-telegram-notifications');
});
And finally we can update the TelegramNotificationController with the destroy method.
public function destroy()
{
    $user = auth()->user();
    $user->telegram_chat_id = null;
    $user->save();

    return back();

}
Conclusion
That should be it, if the currently logged in user had their Telegram_chat_id manually set as explained earlier, the button in the Telegram Notifications panel in the Profile page will be the Red disable button.
In either case, the Telegram Notification process is now automated, and clicking on the Enable button will open a new tab with a Deep Link URL. Opening Telegram from this tab will automatically capture the user's telegram_chat_id and the Notification tab can be used to test the sending of a message to the configure the Telegram Chat ID.
Conversely, clicking the Disable button will disable Telegram Notifications by removing their telegram_chat_id.
I hope this helps me in the future, especially when I need to enable Telegram Notification in one of my new Laravel Applications!
The full source code of this example Laravel Application can be found here:
https://github.com/CryDeTaan/laravel-telegram-bot
If you enjoyed the post, please consider to subscribe so that you receive future content in your inbox :)
Psssst, worried about sharing your email address and would rather want to hide it? Consider using a service I created to help with that: mailphantom.io
Also, if you have any questions, comments, or suggestions please feel free to Contact Me.