OAuth 2.0 - Authorization Code Flow
I have a general understanding of what OAuth is, and what it is trying to achieve, but I wanted to better understand how OAuth works from a code perspective.
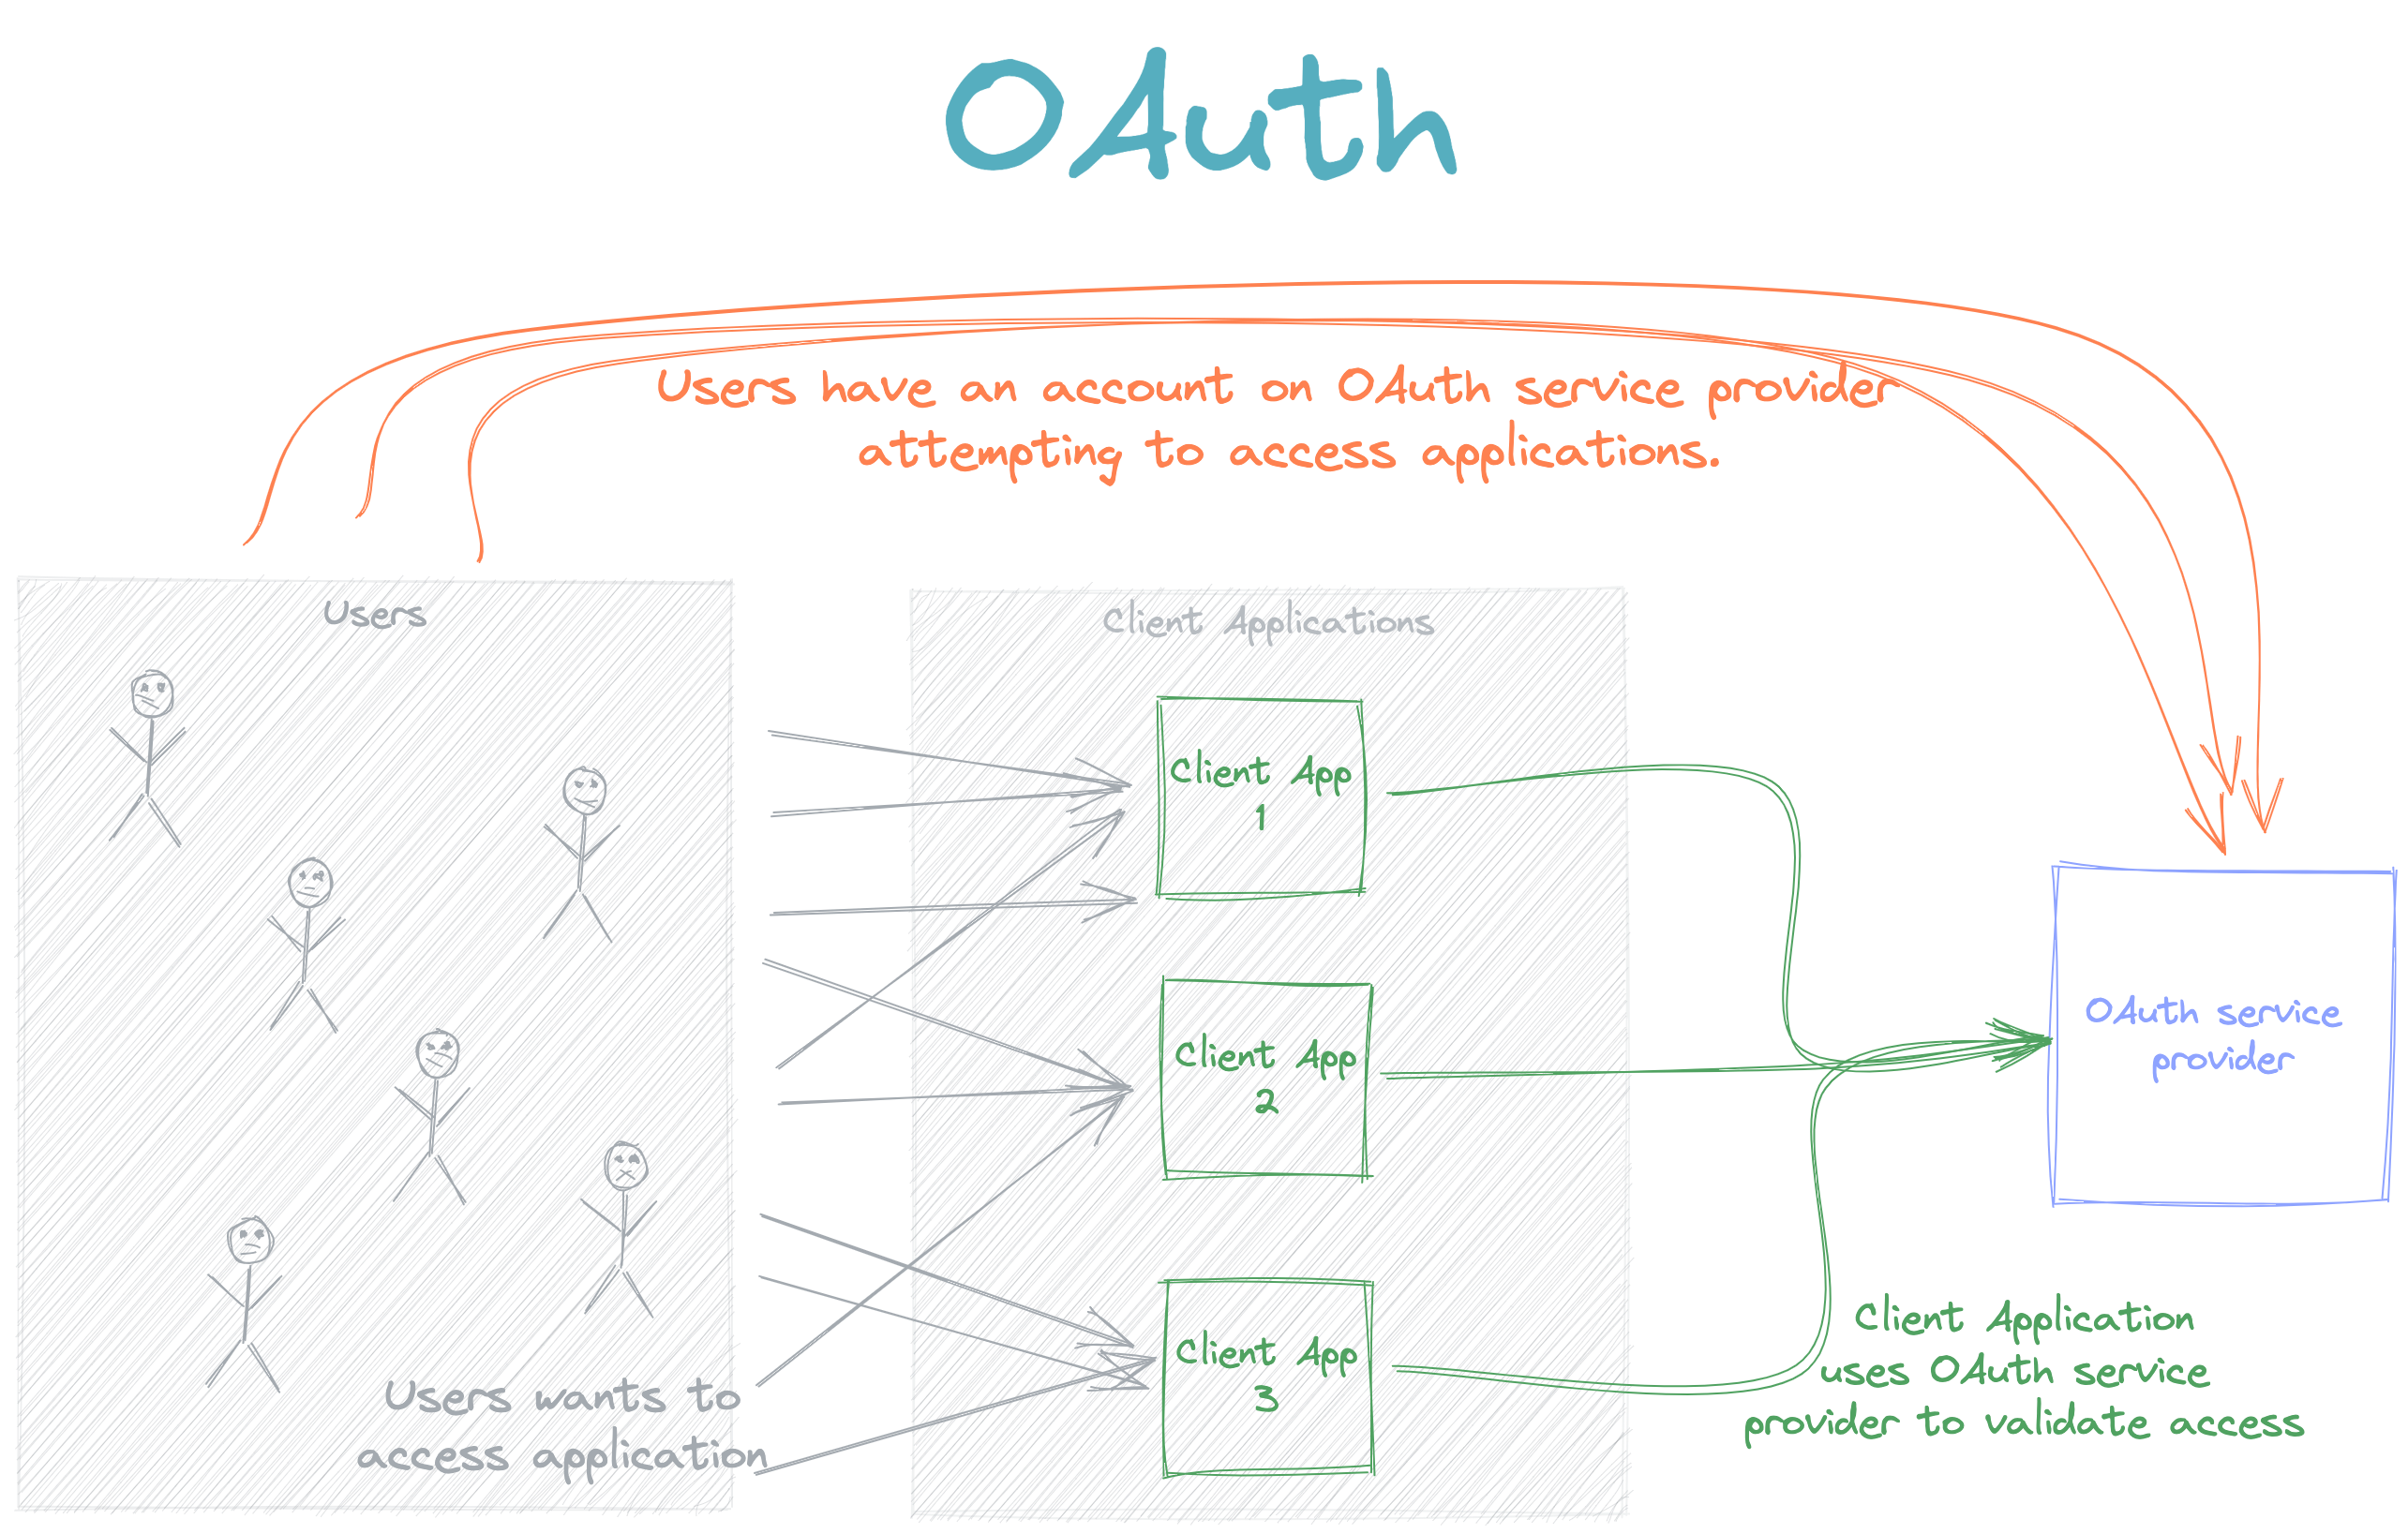
There are essentially three components that I read about while I was doing research on OAuth, which makes the mosts sense for me when defined as follows:
- Client application - The website or web application that wants to authenticate their user.
- User - The user who wants to authenticate to the client application.
- OAuth service provider - The website or application where the User object lives and that is used to authenticate a user against.
In its most basic form, an OAuth service provider can take care of authenticating a user to a Client Application. This approach is sometimes specifically useful in corporate environments; an OAuth, or similar service, where a user has an account and can then access several application using this single authentication provider. It is essentially a form of Single Sign-On (SSO).
However, there are some public use cases for implementing OAuth. Let's take, for example, GitHub. What if you specifically build a service which deploys code from a GitHub user's repositories? Well, this is where OAuth scopes can be useful. OAuth service providers can publish certain scopes, which a developer from a client application can request access to as part of the authorization request presented to the user. In that case, the scope will essentially give the developer client application access to the user's repositories. Github has scopes for many scenarios for accessing repositories: public, private, or specific repositories. But the bottomline is that the GitHub OAuth Service Provider can control access to resources using scopes.
So... to return to my original thinking of using an OAuth Service Provider to act as a SSO authentication mechanism, I decided to make use of the Laravel Passport package in a Laravel application.
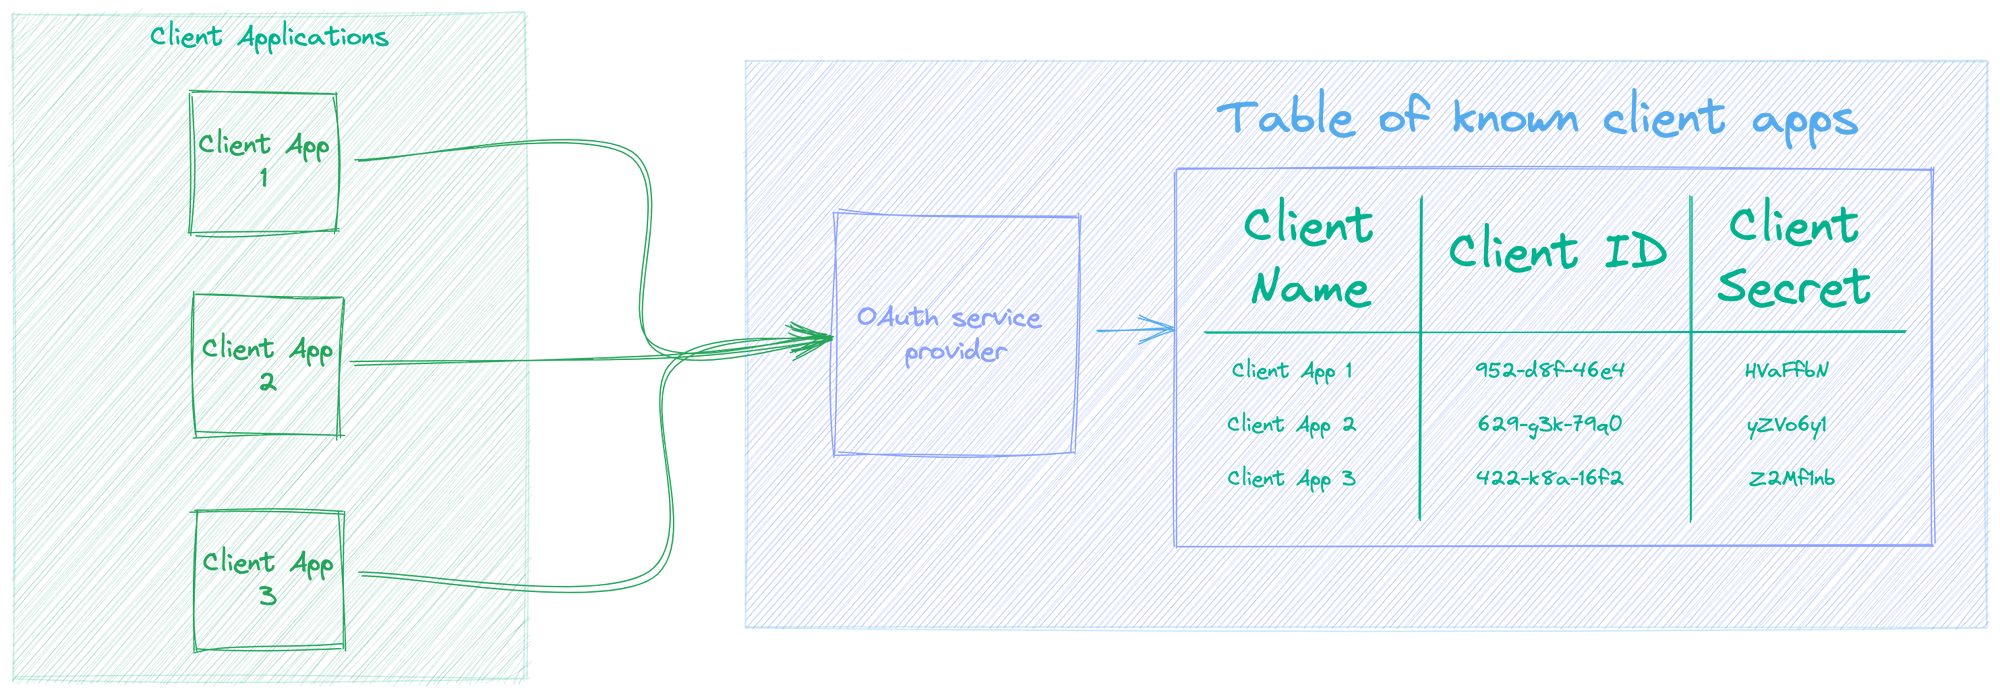
Firstly, an OAuth Service Provider can't just be asked to authenticate a user for any Client Application. No, the OAuth service provider needs to know about the Client Application. So an OAuth Service Provider needs a way to know on behalf of which Client Applications it can act as an authentication mechanism. So logically it would need some sort of identifier for Client Applications and possibly a secret; I mean, any requests from the Client Application would ideally be authenticated.
Here is a OAuth Service Provider with a table of known Client Applications
To further help with understanding this concept, it is worth showing what it may look like in practice. For example, a developer of a Client Application can register a new application on the OAuth Service Provider as well as view Client Applications they may have already registered on the OAuth Service Provider.
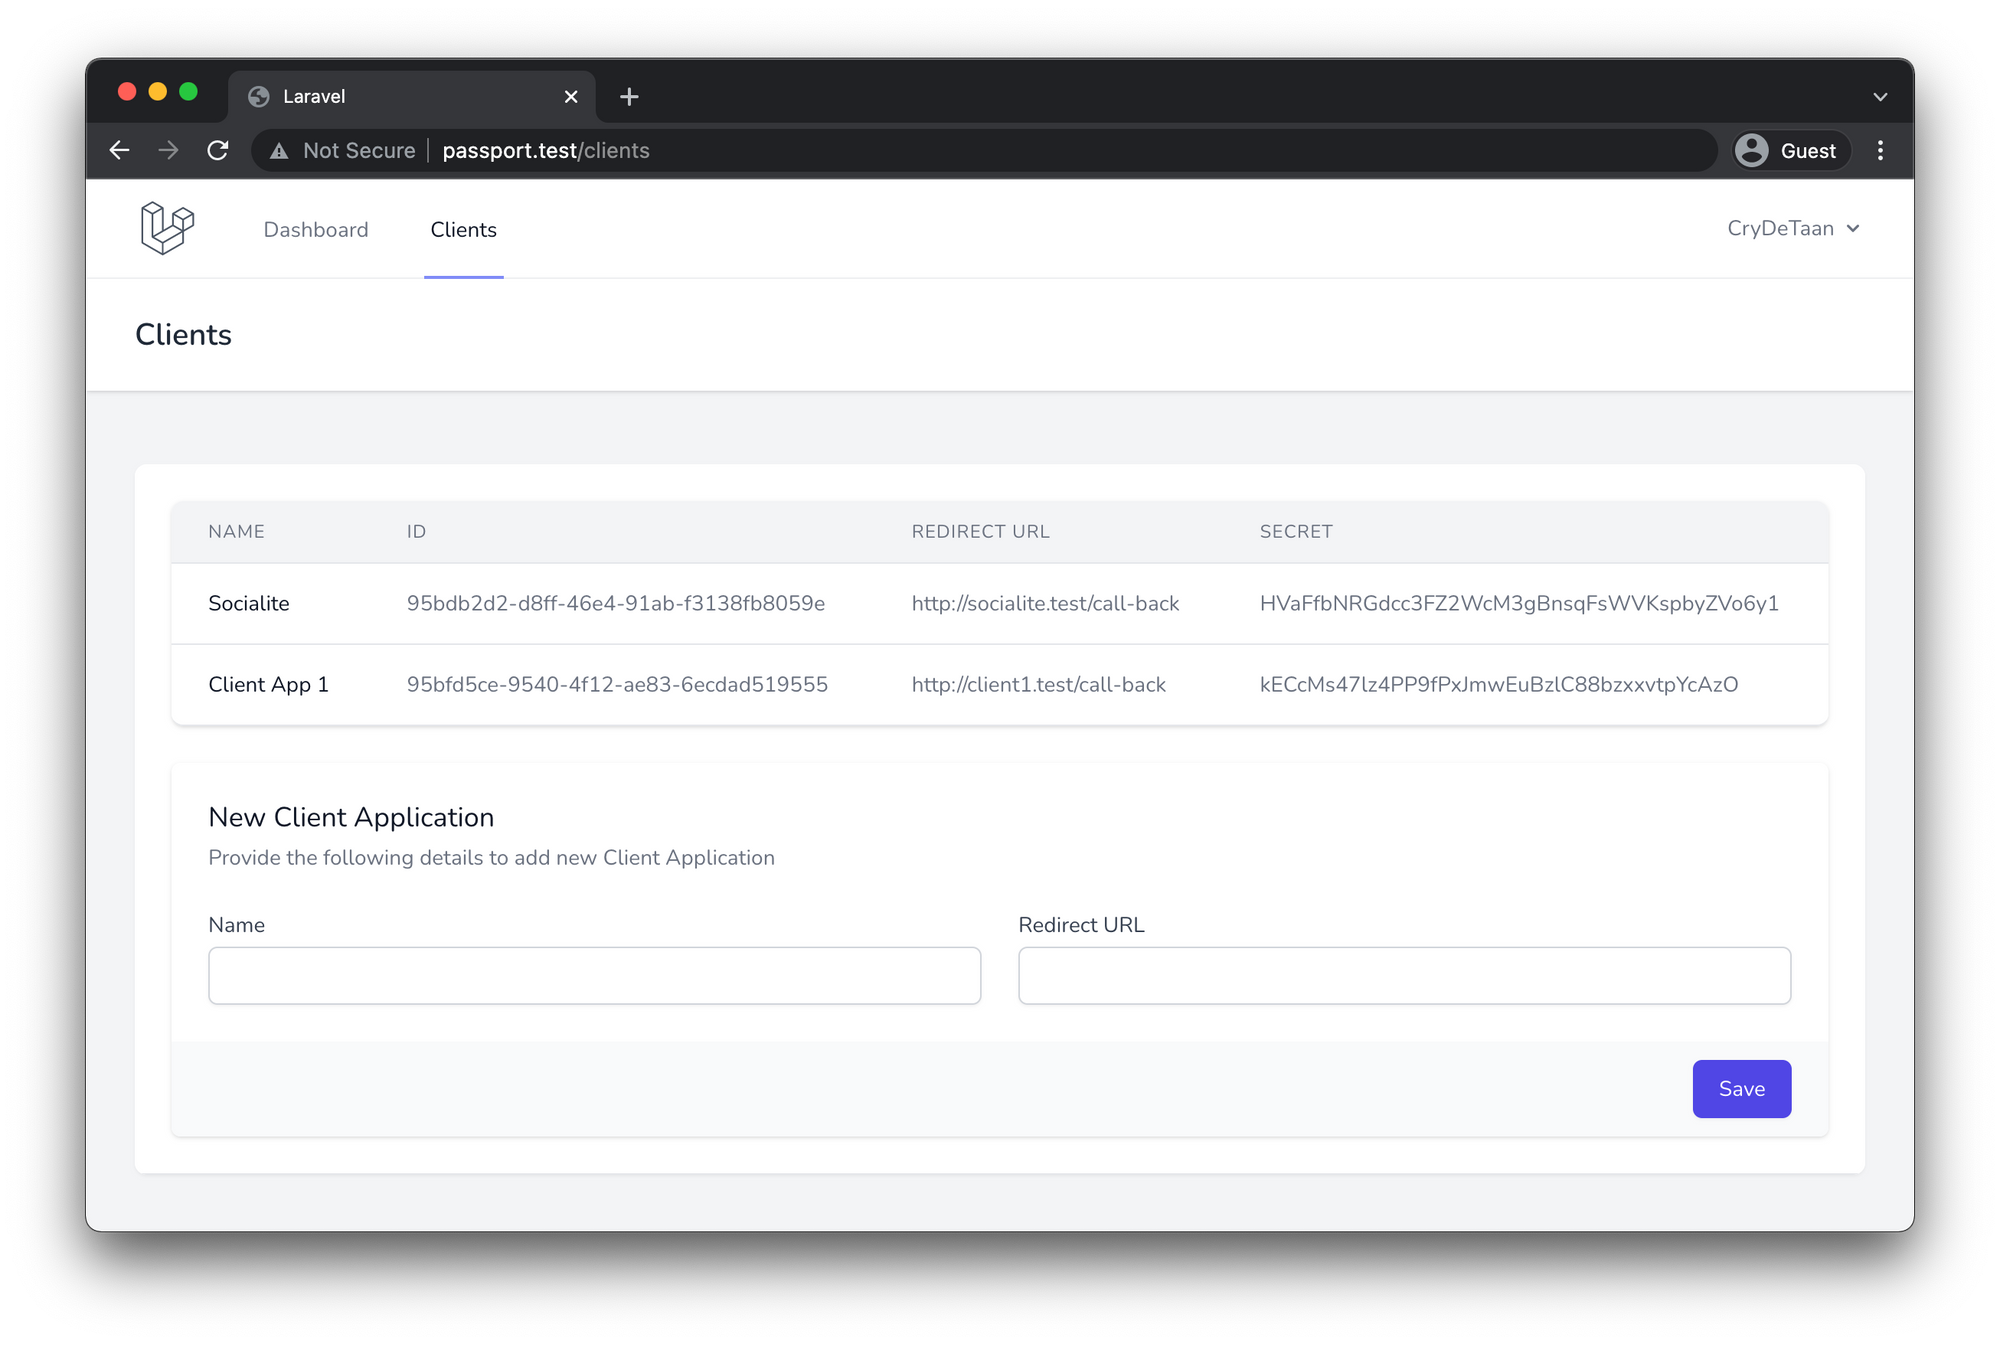
As can be seen from the screenshot above, a Redirect URL should be provided. "Why is the Redirect URL required?" you may ask.
As it turns out, the Redirect URL is a critical part of the OAuth flow. Meaning, after a user successfully authorises a Client Application, the OAuth Service Provider will redirect the user back to the client application.
Because the redirect URL will contain sensitive information, it is crucial that the OAuth Service Provider doesn’t redirect the user to arbitrary locations. The best way to ensure the user will only be redirected to appropriate locations, which should be the Client Application, is to require the developer to register the redirect URL when they create the application in the OAuth Service Provider and to validate the redirect URL during the OAuth Flow.
Authentication Flow
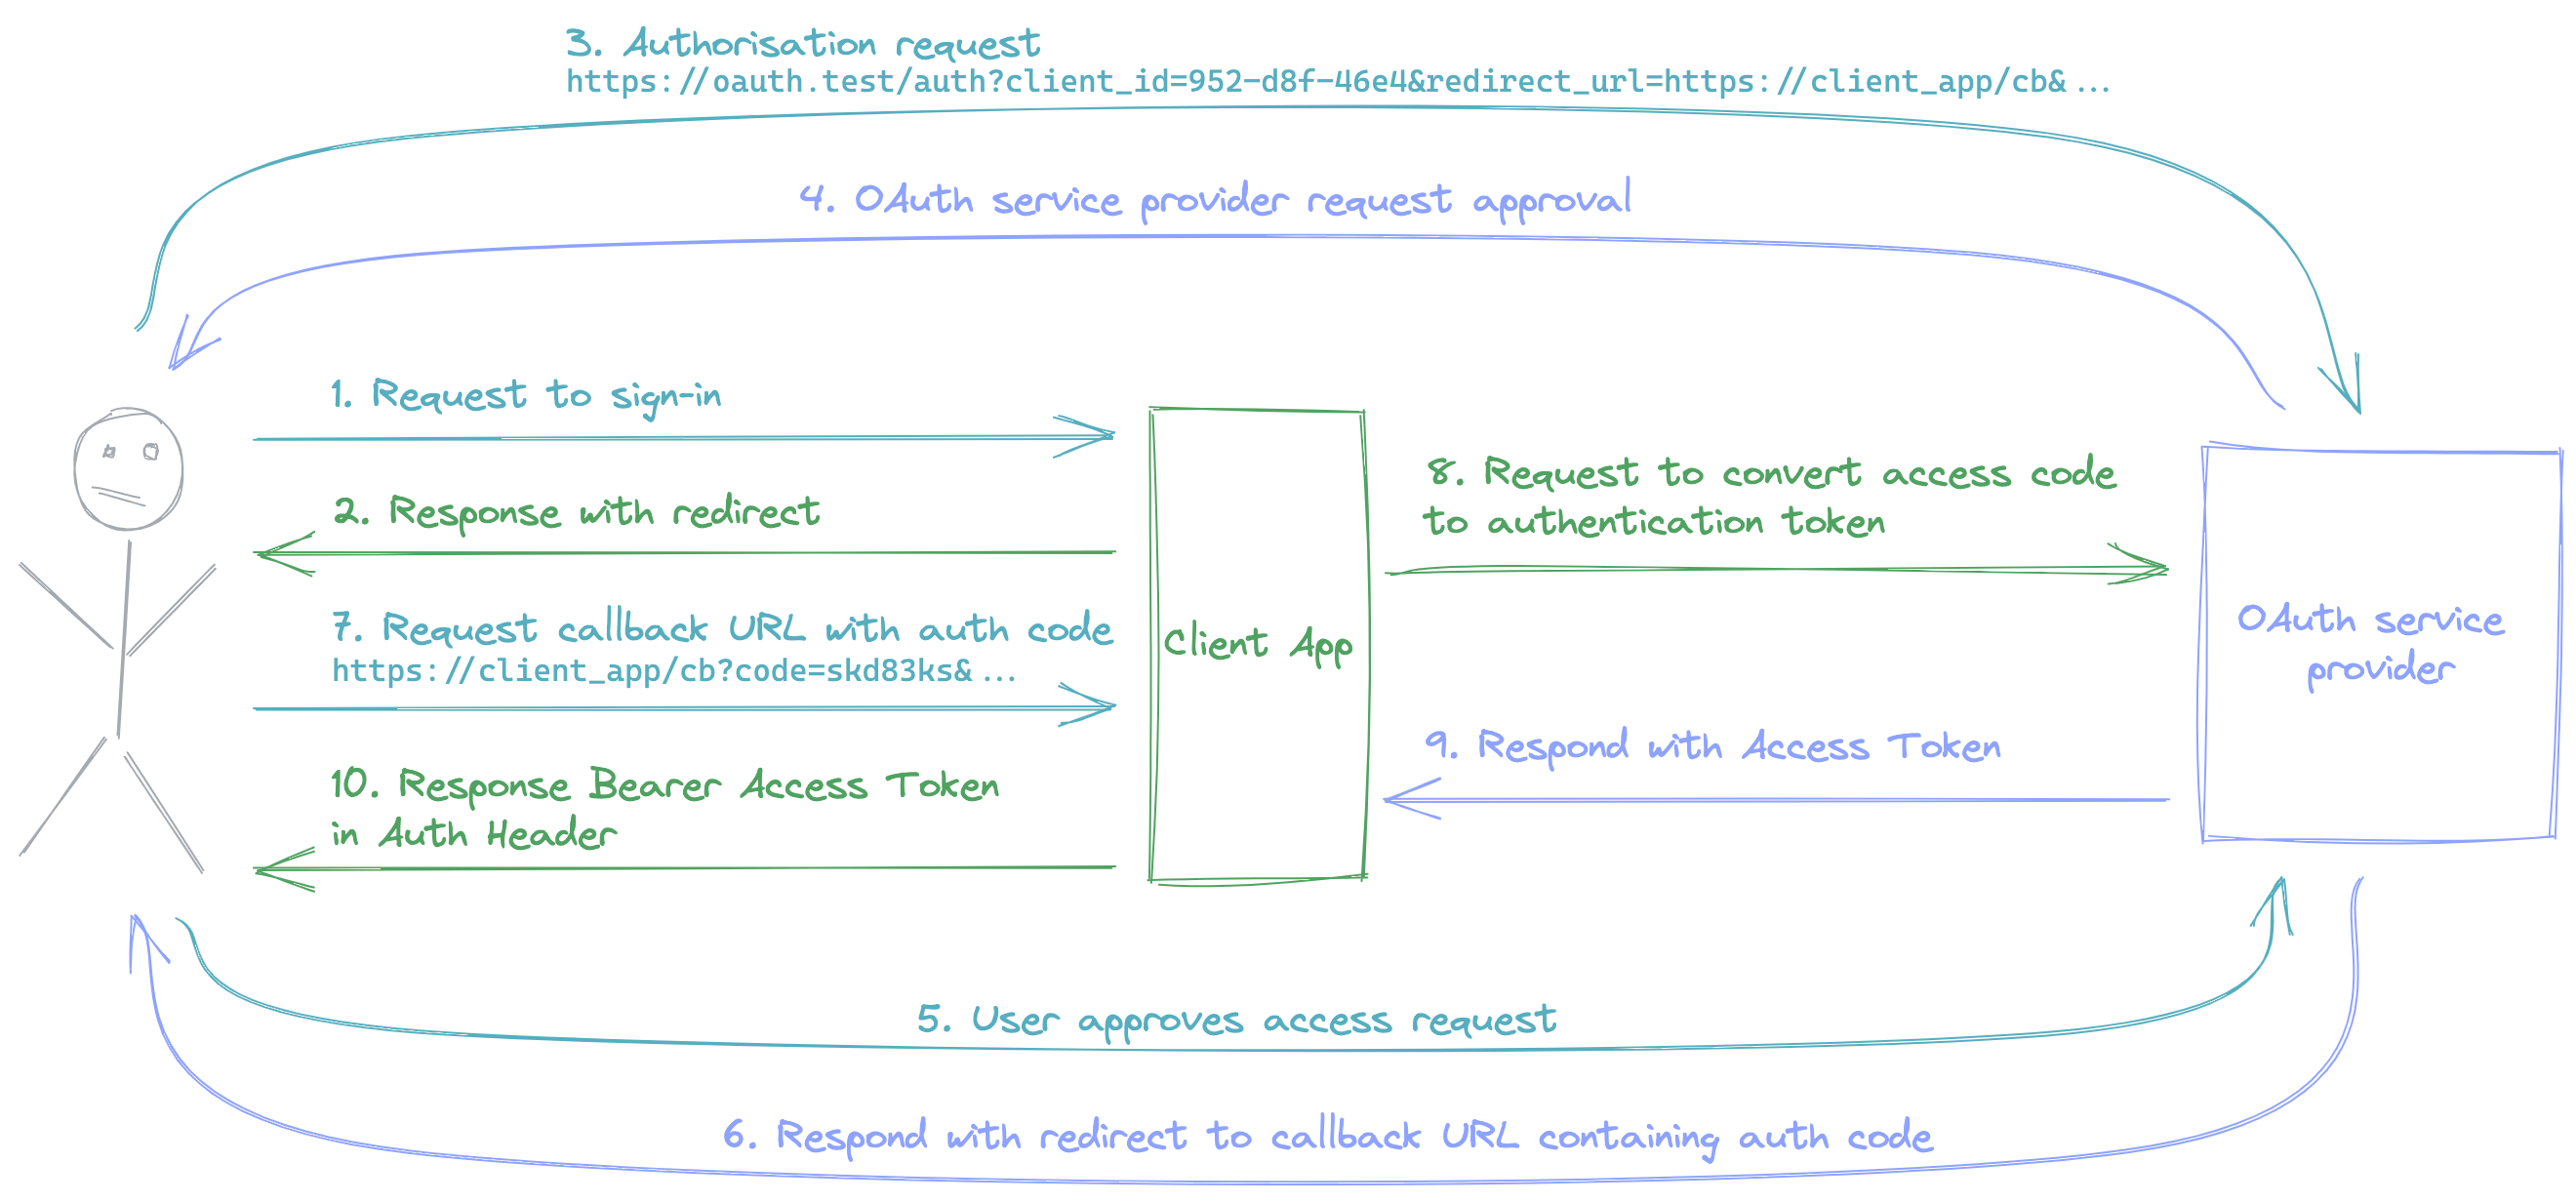
Now that we have a general understanding of OAuth, let's discuss an Authentication Flow; in this case the Authorization Code flow.
- The User accesses the Client Application's sign-in page.
- The Client Application responds with a redirect to the OAuth Service Provider containing details of the Client Application.
- The user makes an authorisation request to the OAuth Service Provider.
- The OAuth Service Provider requests the user to authorise the access the Client Application has requested.
- The User approves the access requested by the Client Application.
- The OAuth Service Provider will issue an Authorisation Code and respond with a redirect to the specified Client Application's redirect URL.
- The Client Application receives the request from the user containing the authorisation code.
- The Client application contacts the OAuth Service Provider to convert the authorisation code to an Access Token.
- The OAuth Service provides the Client Application with an Access Token for the user.
- The Client Application provides the access token to the user, generally as a Bearer Token in the Authentication Header, for example, to be used on an API. This step may be optional, and authentication can be dealt with by the Client Application from that point forward (as will be shown in the code example).
Code examples
From the above steps, it may be useful to review some of the steps from a code implementation perspective to better visualise what is happening, specifically the requests and responses which has some logic.
Client Application Redirect
The first step to discuss is the redirect response from the client application; Step 2 from above.
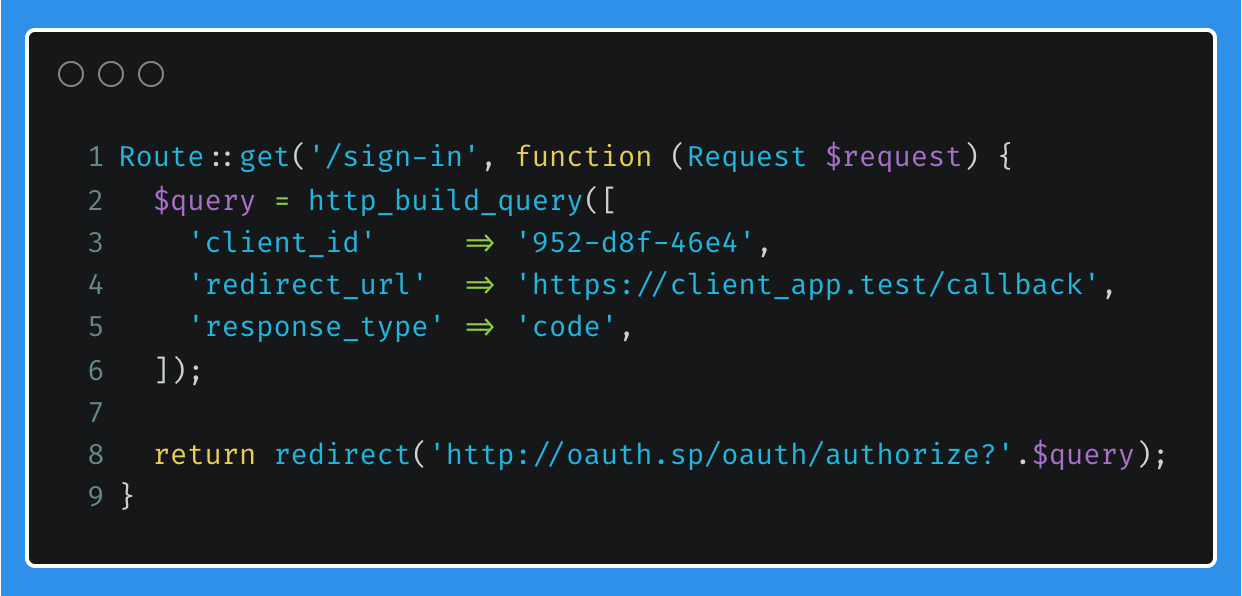
Below is the /sign-in route which will construct a query string which is going to be appended to the URL to the OAuth Service Provider and redirect a user to it.
Lines 3 and 4 contain the details about the client application, the client_id as well as the redirect_url. Both of these values are used to identify which Client Application, registered at the OAuth Service Provider, is initiating the Authorisation Flow.
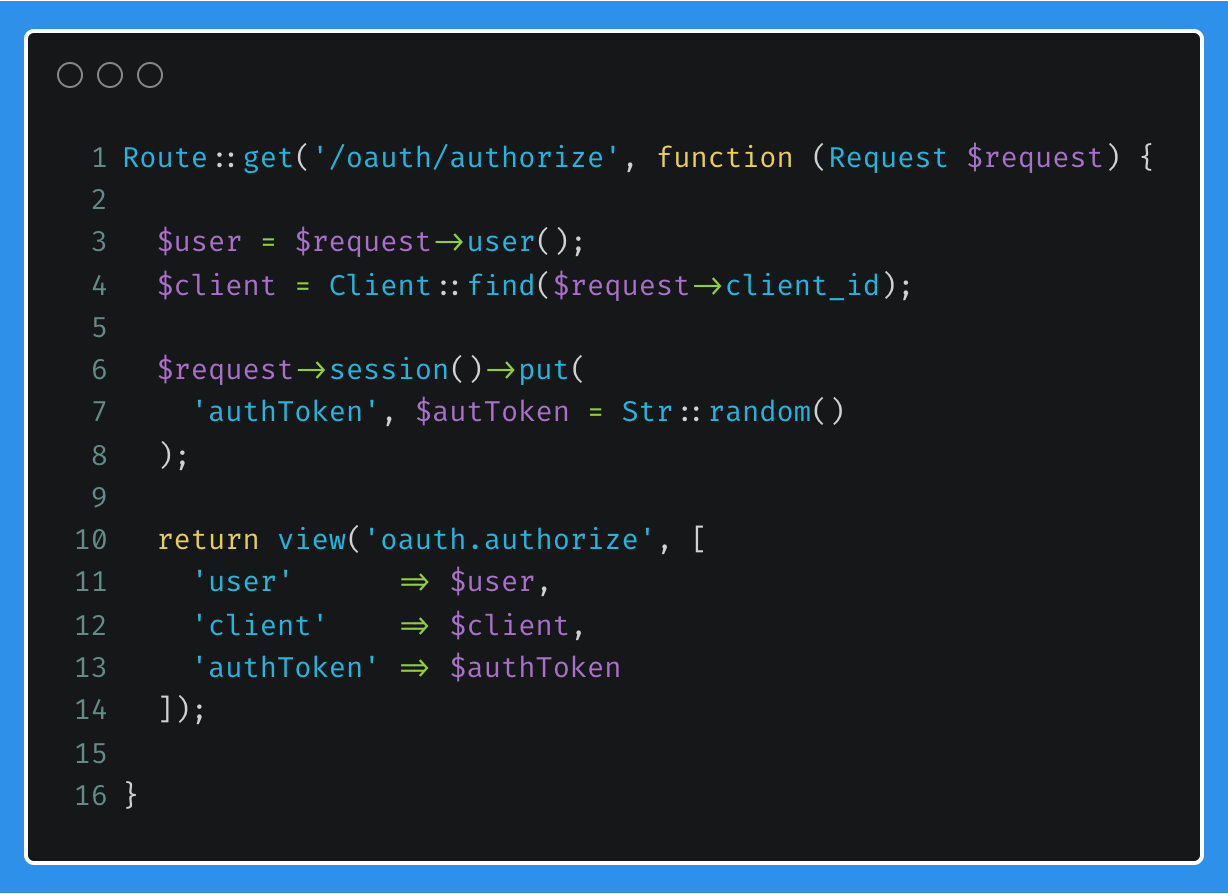
OAuth Service Provider - Approved Access
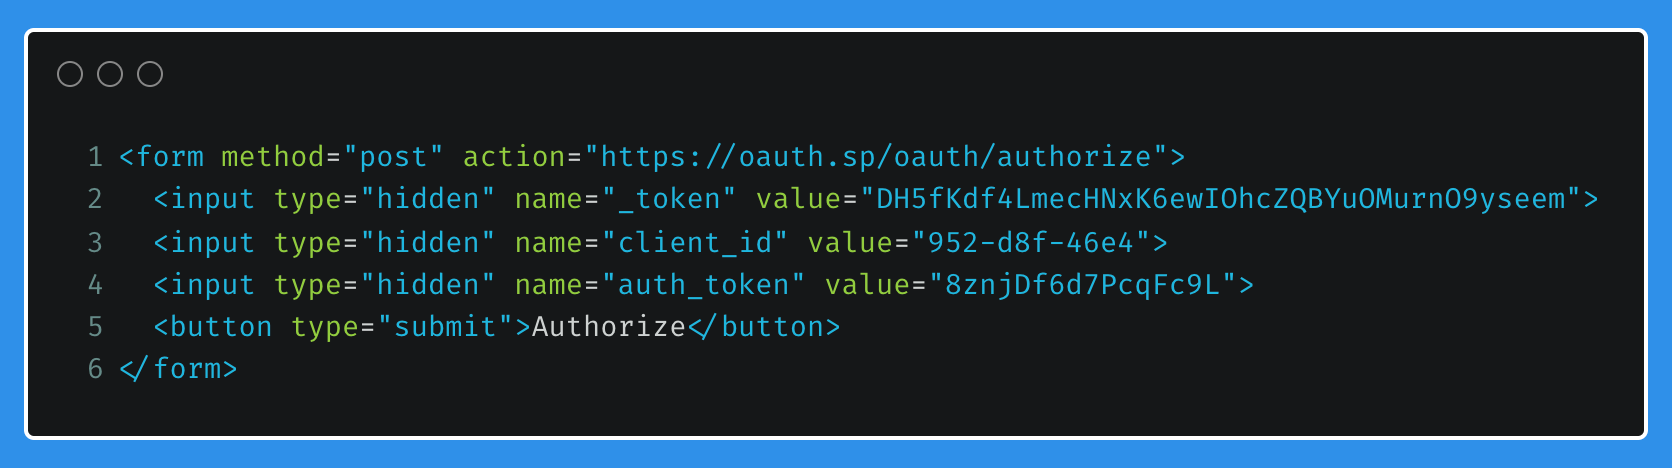
Once the users accesses the OAuth service provider on the /oauth/authorize route, they would have to login if they are not already logged in. After which, some variables are set, and a random string, authToken, is saved to the session. These variables are passed to the oauth.authorize view, which in my case contains a form with hidden values, displaying to the user an Authorise and Cancel button.
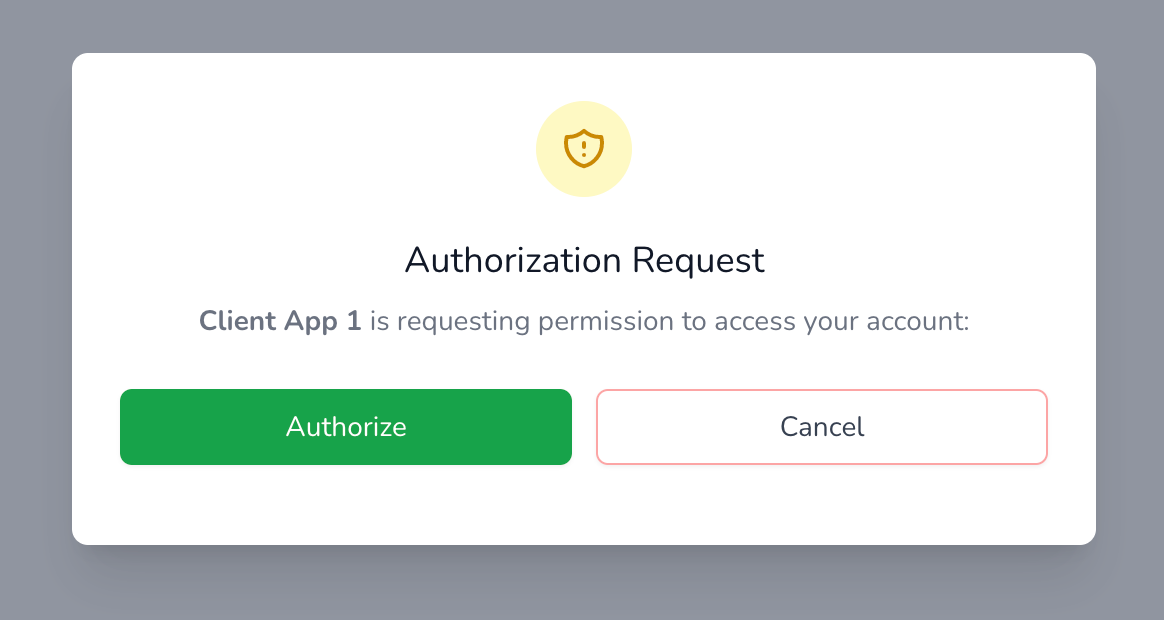
As an example, this is what the Authorisation request modal may look like.
Once a user selects Authorize, the form will send a POST request to https://oauth.sp/oauth/authorize along with the values from the input fields relevant to the authorisation request.
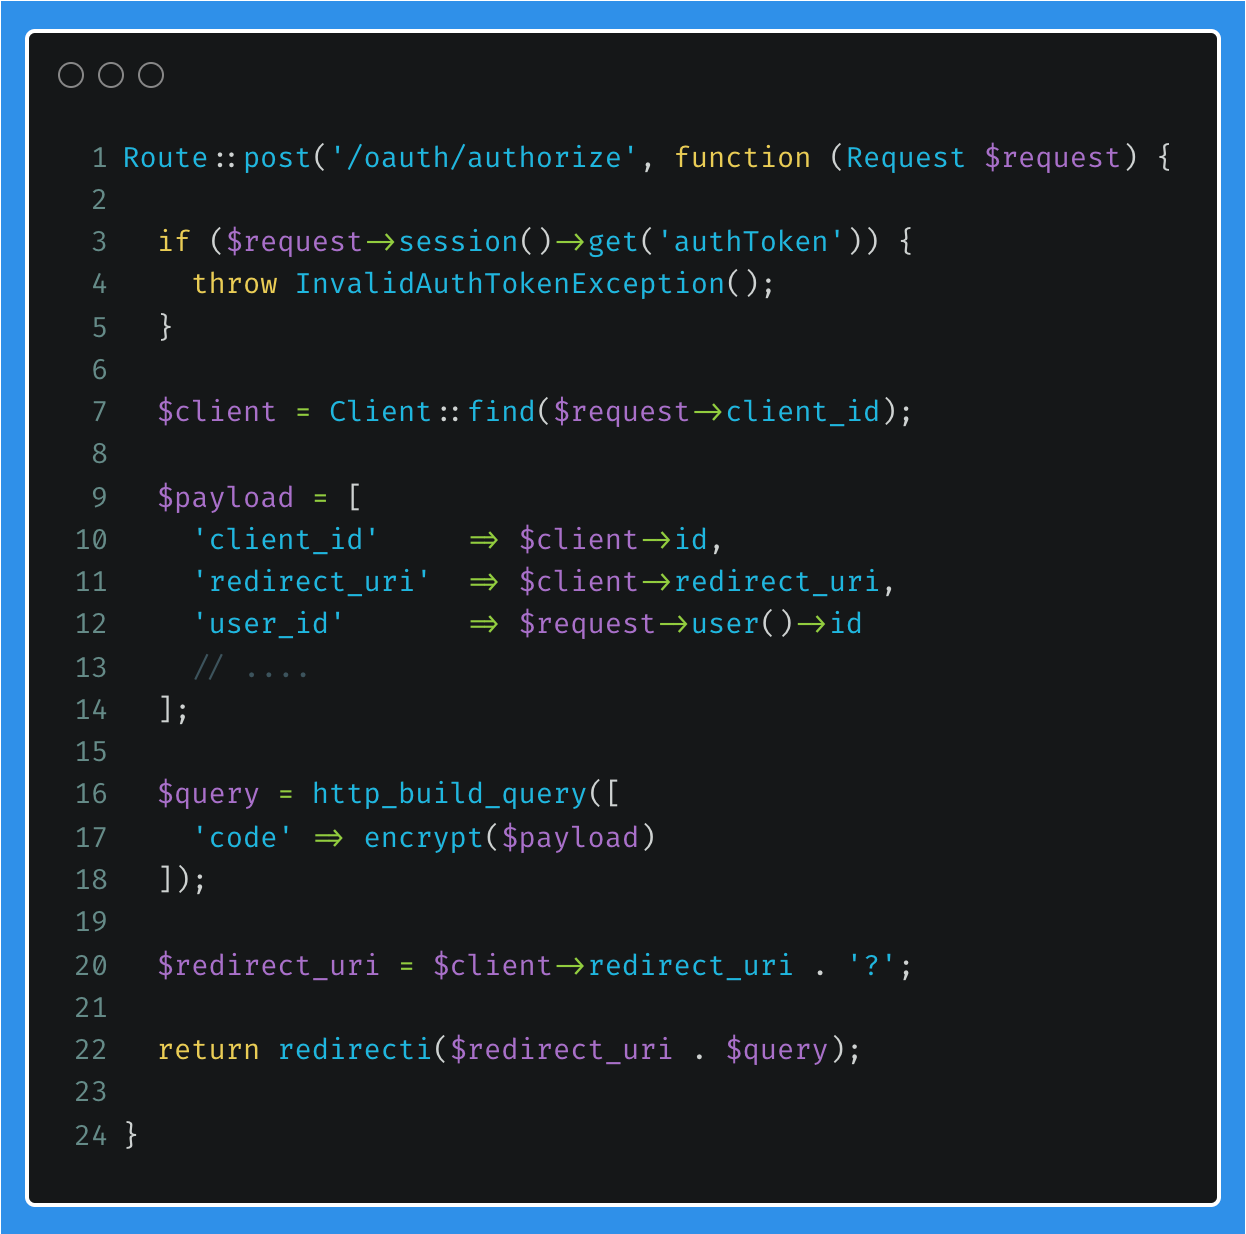
OAuth Service Provider - Redirect with Authentication Code
The route receiving the form post, /oauth/authorize, will add a few properties to the payload array (lines 9 to 14). These properties will later be used by the OAuth Service Provider when received from the Client Application.
This array is then encrypted with a key only known by the OAuth Service Provider, and added to a query string parameter, called code, which will be appended to the redirect URL for the Client Application (lines 16 to 18). Therefore, in theory, there should be no way for the user or the Client Application to influence these properties.
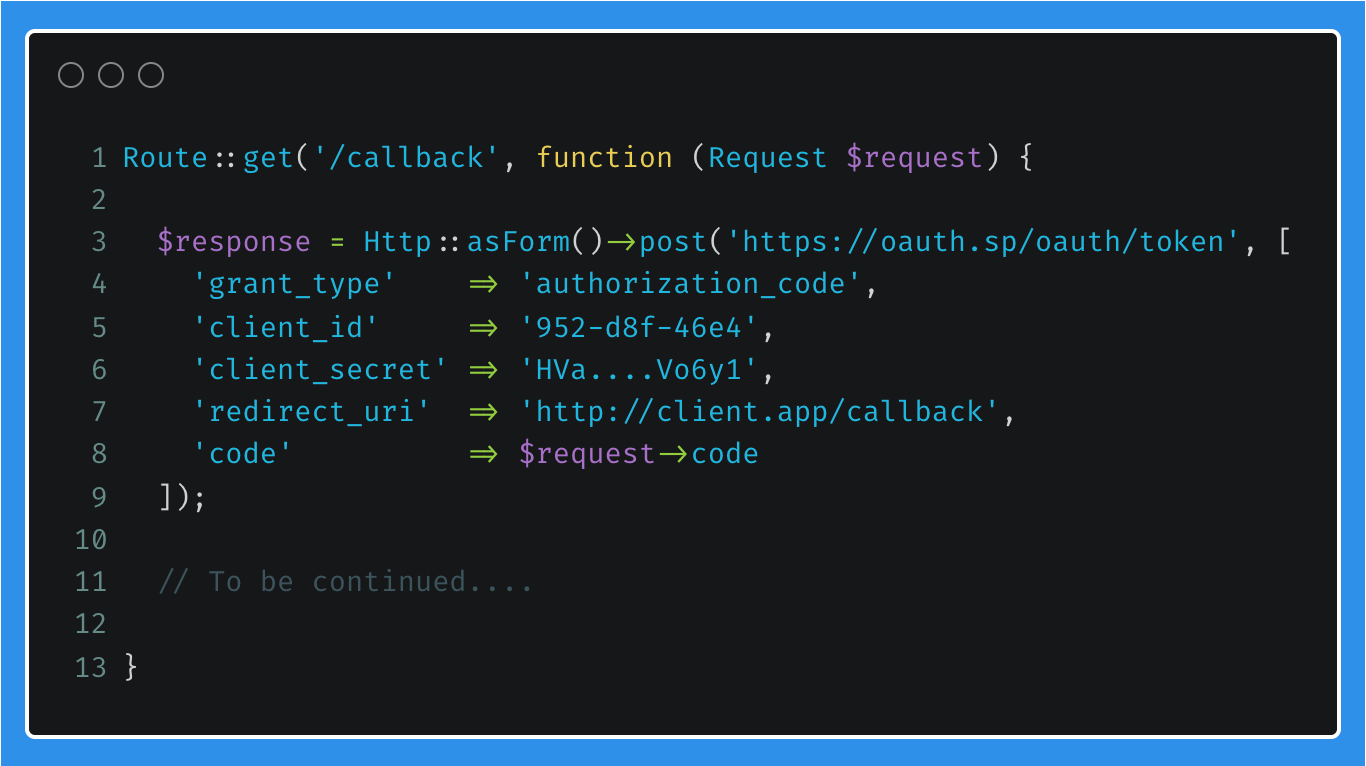
Client Application - Convert Authorization Code to Access Token
The user will make the redirect to the Client Application's redirect URL, passing the encrypted code from the OAuth Service Provider to the callback route.
The Client Application will then make a post directly to the OAuth Service Provider, sending the code just received by the user, as well as other details only known by the Client Application and the OAuth Service Provider, namely the client_secret.
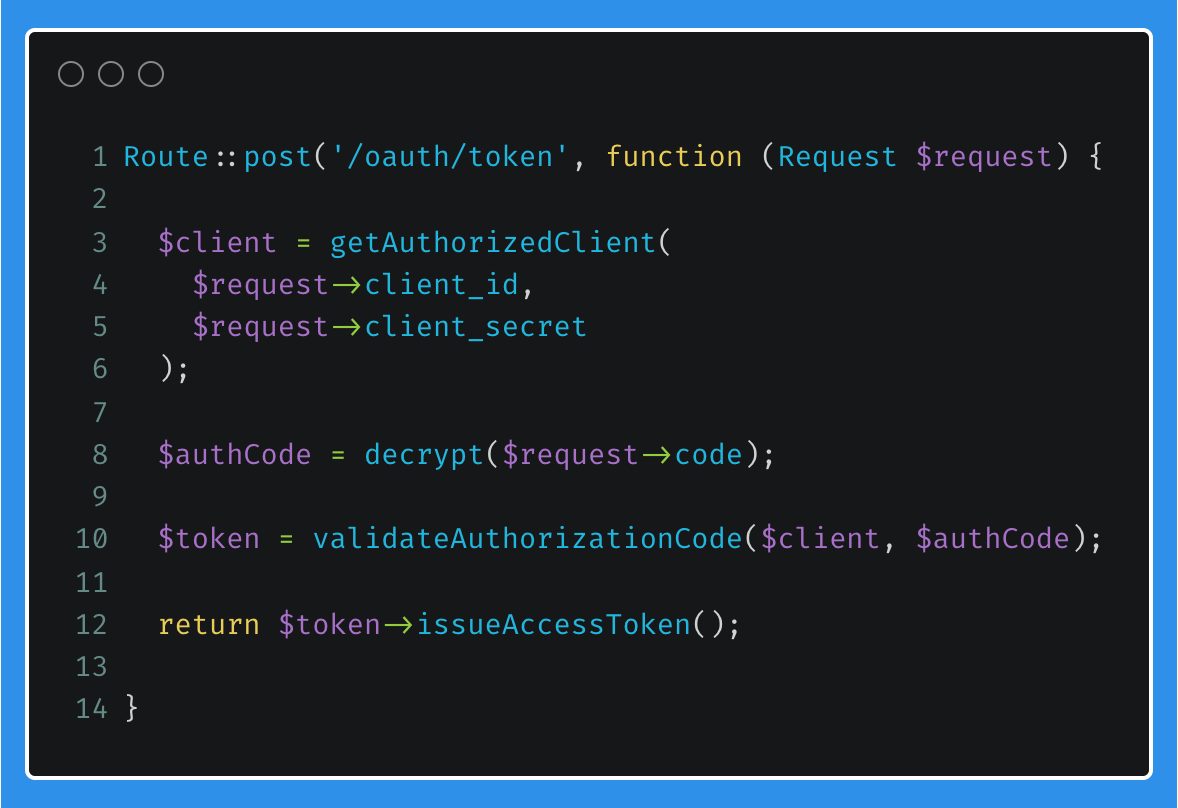
OAuth Service Provider - Issue Access Token
The OAuth Service Provider will receive this request from the Client Application and authorise the Client Application using the client_id and client_secret (lines 2 to 6), as well as decrypting the provided code (line 8) which will contain additional information such as the user's ID.
These properties are then used for validation and authorisation (line 10) after which the Access Token will be issued back to the Client Application.
User
Now that the access tokens for the authenticated user has been obtained, it is possible to obtain the user's details from the OAuth Service Provider to be used by the Client Application. This can generally be achieved by accessing some sort of user info API endpoint which will return a user object for the provided access token.
An example of this can be observed below (lines 13 to 15). The previously obtained access token can now be added to the Authorization header when making the request to the /api/user endpoint.
Once the user details have been obtained from the OAuth Service Provider, it will be possible to create a user profile and authenticate the user to the Client Application. An approach can be seen on lines 17 to 22. In this example, firstOrCreate() will first try to find a user based on a unique value, in this case a user's email address, and if found return the user object. If not found, the user profile will be created based on the fields provided. Remember, these will be fields shared by the OAuth Service Provider, and can be based on scopes.
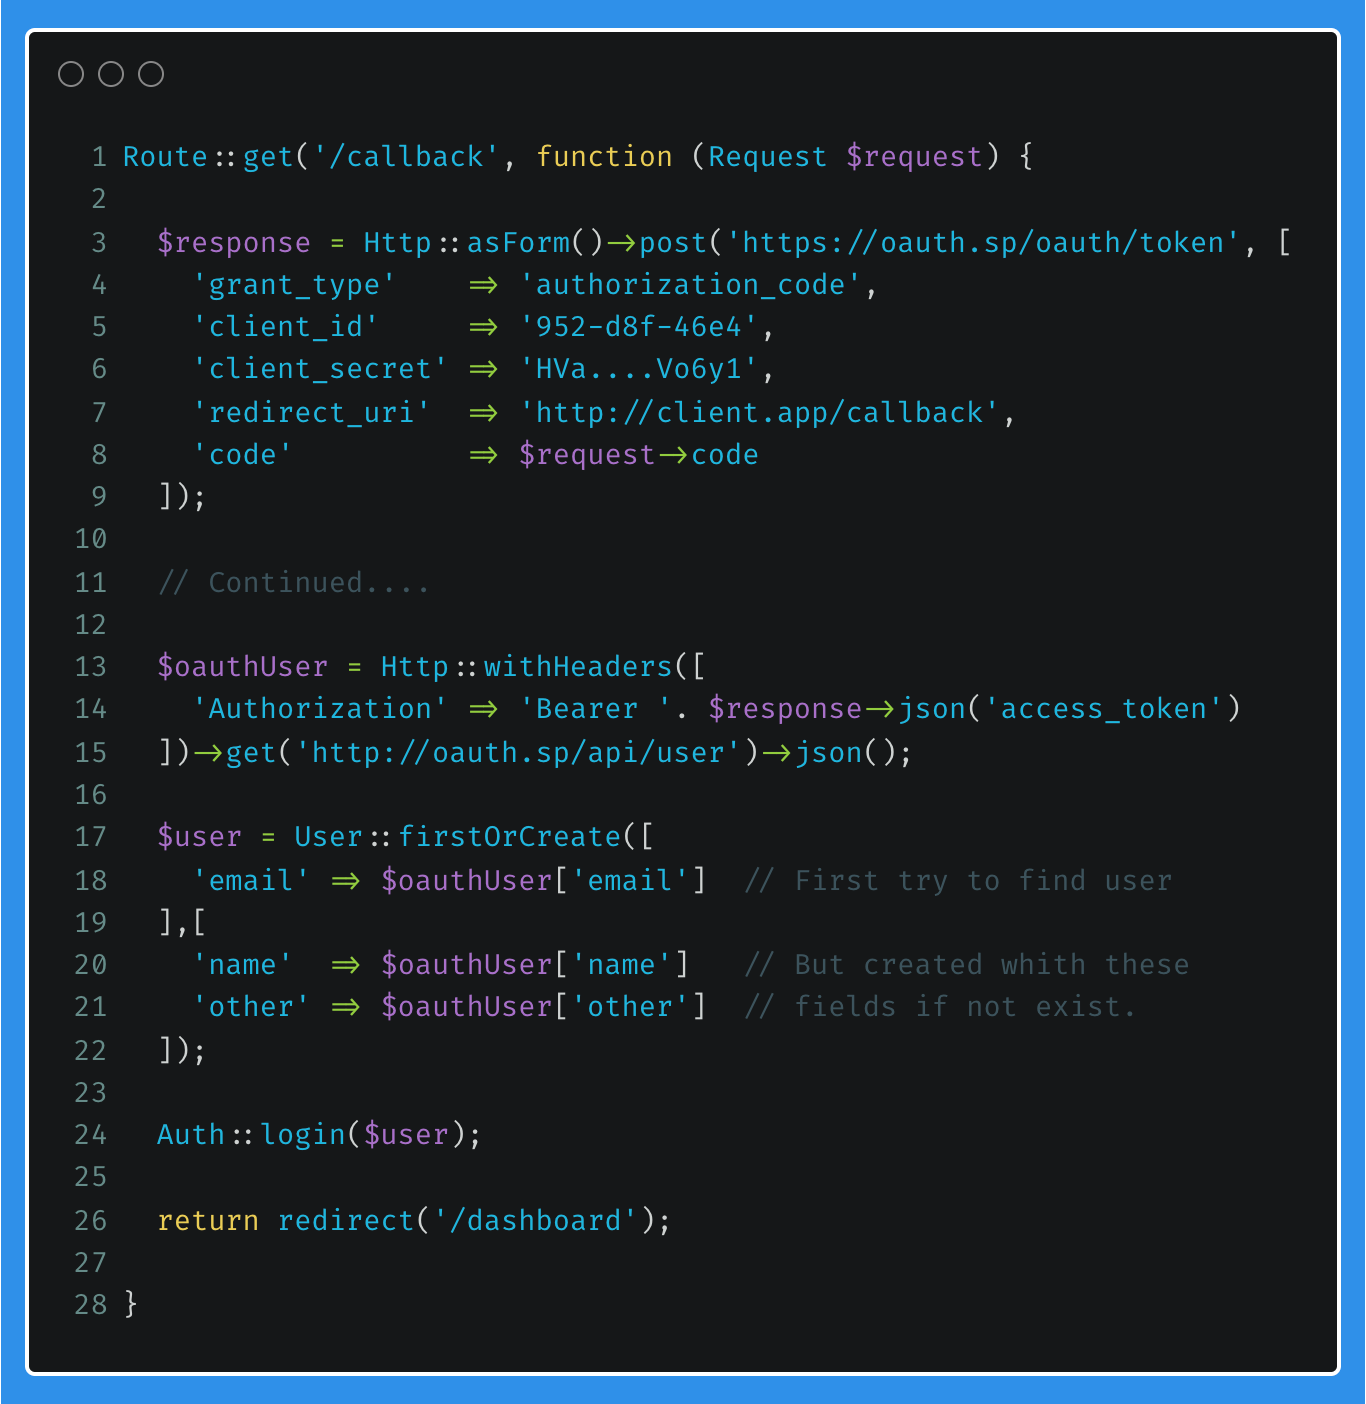
Finally, the user is authenticated to the Client Application and redirected as required.
That is pretty much the gist of it, look out for part two where I want to go into a bit more detail on the Authorization Code flow which makes use of a Proof Key for Code Exchange (PKCE) (defined in OAuth 2.0 RFC 7636).
If you enjoyed the post, please consider to subscribe so that you receive future content in your inbox :)
Psssst, worried about sharing your email address and would rather want to hide it? Consider using a service I created to help with that: mailphantom.io
Also, if you have any questions, comments, or suggestions please feel free to Contact Me.