Laravel - C.R.U.D. me like I am high
Introduction
The idea with this post is to give a quick overview of all the C.R.U.D (Create, Read, Update, Delete) actions within a Laravel app secured with RBAC using Policies, but more importantly, introducing an example app which you can find here:
https://crud.abstractentropy.com/ ️️
❗️ This site is currently off, I am working on getting a new version online️ ❗️
I have to apologise, as this is a long post, and there is even more reading when you look at the application.
So with that lets jump right into it.
These verbs represent the actions taken on the data, but a C.R.U.D. application, so to speak, also needs additional areas to be functional. This can actually make developing a simple C.R.U.D application very complicated for a newcomer starting out their web development journey.
I am going to try and keep it as simple as possible, while trying to hit all the important areas, including Role Based Access Control.
For the sake of simplicity, I try to use generic terms such as Platform and Entity.
However, these can be replaced with something along the lines of <Insert Blogging Platform Name here> and <Insert Publication Name here>.
Publications can have Admins, who manage Editors who in turn manage contributors of resources, which in this example could be Articles or Blog Posts.
Try to think Medium.com here. ;p
Overview and Structure
Alright, so to try and work with the idea of a blogging or publication platform like Medium but using general terms will require a quick list of definitions of the different resource types which I am going to use.
Resource
The word Resource can be used to describe a collection of data on which an action is performed; a user of a web application can essentially be considered a resource. But it is important to note that resource in this example / explanatory application can be defined as the final 'product' of platform. In the case of a blogging or publication platform, like Medium, the resource will generally be the article or blog post. So with that in mind, the first definition follows: A resource, in this case, should be seen as an article or blog post. Here is a somewhat random resource / article I chose from Medium.com.
Platform Admins and Platform Contributors
Platform: this is simple, the platform is the application or website where resources live and actions are performed by users with different roles; it is essentially Medium.com. What does a Platform need though? Well, for this example at least, I want it to have Platform Admins and Platform Contributors as far as Users are concerned, but it also needs Entities. Before I get to Entities, let me defined the aforementioned User roles.
Platform Admins and Platform Contributors are essentially the same, apart from the permissions assigned to each. Both have the ability to Read and Update Entities, and Create, Read, Update, and Delete Entity Admins (definition to follow below). In addition to these actions, Platform Admins can also Create and Delete Entities which the Platform Contributors cannot.
Entities
Entities can be defined as a publication, similar to publications on Medium.com for example. An Entity / Publication on Medium.com would act independently from the platform in the articles that they publish, the Entity / Publication may also want resource / article Owners and Contributors which should generally be created by an Entity Admin as there should be no reason for a Platform Admin, in this example and in the case of Medium.com, to create resource / article Owners and Contributors. So this is where an Entity Admin comes into play.
Entity Admins
The Entity Admin's role will have the ability to add Resource Owners and Resource Contributors for the Entity that they manage. Just a reminder, a resource in this example app is nothing more than an article or blog post.
Resource Owners
A Resource Owner as the name suggests owns the resource, i.e. article or blog post. They have the ability to Create, Read, Update, and Delete a resource. They also have the ability to assign Resource Contributors to the Resources they own.
Resource Contributors
Resource Contributors can only contribute to resources they have been assigned to. For these resource they have Read and Update abilities.
Overview Summary
- Platform: Platform Admins, Platform Contributors, and Entities.
- Entity: Entity Admins, Resources, Resource Owners, and Resource Contributors.
The roles are implemented in such a way that if a user is assigned the Platform Admin role this doesn't allow them to contribute to a Resources as well; they don't have Resource Contributor role permissions. A Platform Admin can only administer the platform.
Setting the Scene using a story
So, let me try and create a scenario. I create a publication platform to where companies can subscribe to. The companies that are subscribed are considered the Entities on this platform. Once a company subscribes, a Platform Admin will create an Entity resource representing the company and an Entity Admin, who will managed the resources for this Entity. And sure, it's not really necessary to have a Platform Admin add an entity, but I am trying to explain multi-tenant permissions.
Once the Entity and Entity Admin are created, the Entity Admin can go on and create Resource Owners and Contributors. Resource Owners in this scenario could be considered a Managing Editor for the publication. The Resource Owner can then create a Resource, which essentially represents an article of sorts. The Resource Owner can not only publish these articles, but also assign Resource Contributors, for example an editor at the company making use of the platform. The editor may only be allowed to make changes or additions to the articles which need to be reviewed and published by the Resource Owner.
The application must be built with the necessary permissions in mind. Meaning that Entity users should not be accessible from other Entity Resources, i.e. Entity Admins, Resource Owners or Contributors. In addition, Platform Admins and Contributors should not be able to actually access the Entity's Resources.
Impersonating and How to use
With the definitions and scenario out of the way, let me quickly explain how to use this app. It is possible to impersonate a user and then perform their actions on the different resources.
Impersonating a user is done by selecting an 'Impersonations' option from the sidebar to the left. This will simulate an authentication attempt and the authenticated user's information will be returned and displayed. Below is an example of how an authenticated user's object is returned, which can be accessed in the view.
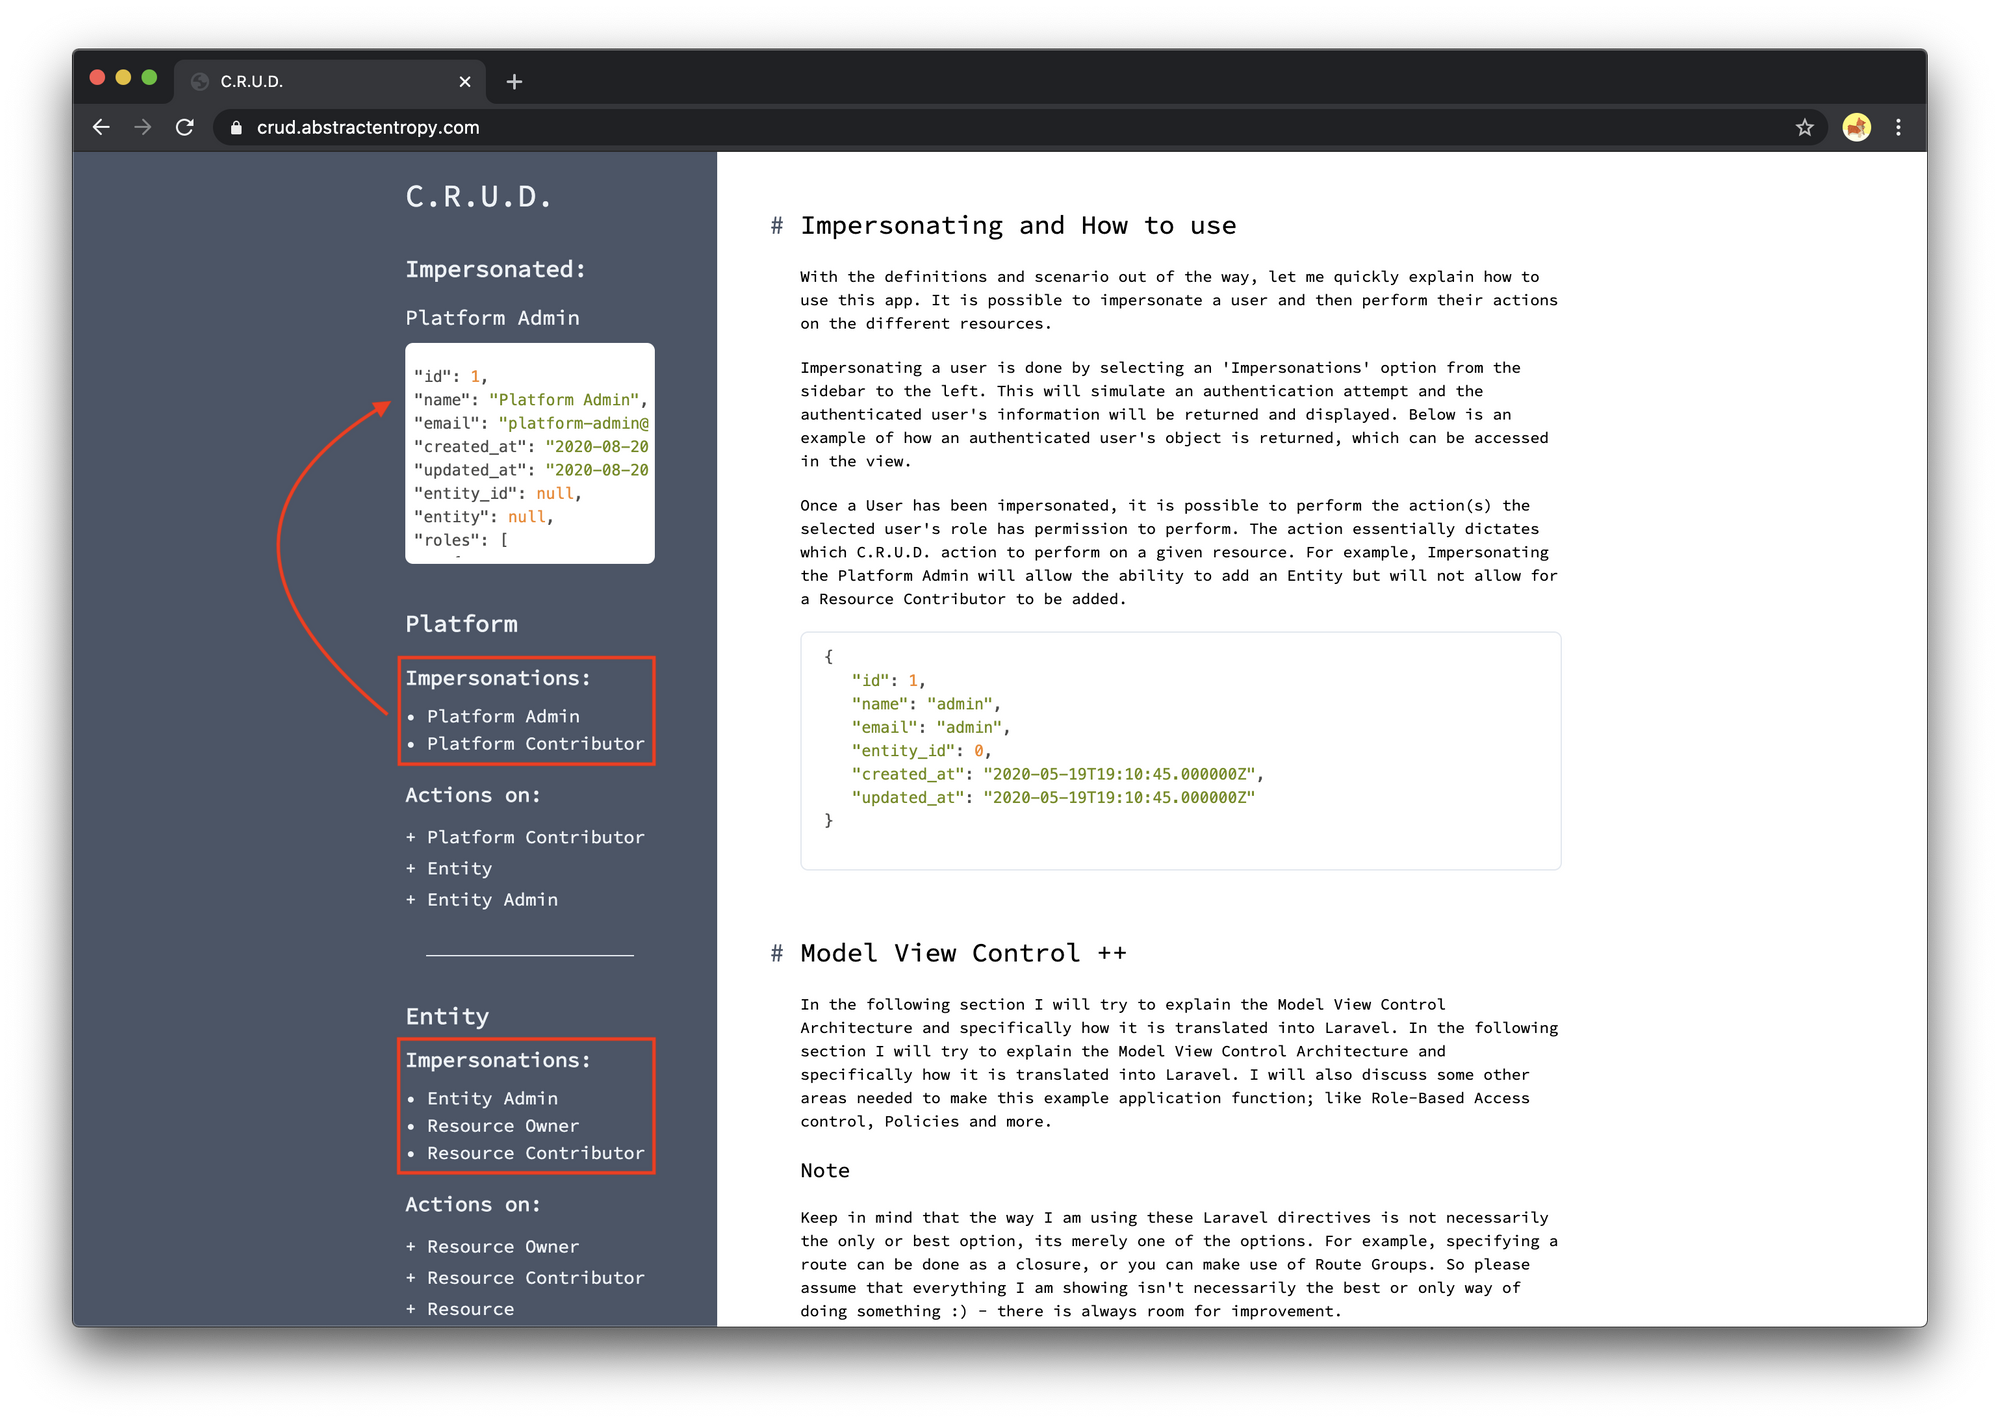
Once a User has been impersonated, it is possible to perform the action(s) the selected user's role has permission to perform. The action essentially dictates which C.R.U.D. action to perform on a given resource. For example, Impersonating the Platform Admin will allow the ability to add an Entity but will not allow for a Resource Contributor to be added.
 {
    "id": 1,
    "name": "admin",
    "email": "admin",
    "entity_id": 0,
    "created_at": "2020-05-19T19:10:45.000000Z",
    "updated_at": "2020-05-19T19:10:45.000000Z"
 }
Model View Control ++
In the following section I will try to explain the Model View Control Architecture and specifically how it is translated into Laravel. In the following section I will try to explain the Model View Control Architecture and specifically how it is translated into Laravel. I will also discuss some other areas needed to make this example application function; like Role-Based Access control, Policies and more.
Note
Keep in mind that the way I am using these Laravel directives is not necessarily the only or best option, its merely one of the options. For example, specifying a route can be done as a closure, or you can make use of Route Groups. So please assume that everything I am showing isn't necessarily the best or only way of doing something :) - there is always room for improvement.
Route
As far as a developer using the Laravel framework is concerned, it all starts here at the routes/web.php file. There is also routes/api.php and some others, but let's not worry about that for now. Obviously the Laravel framework takes care of a few things for you when you visit a Laravel based Wep App, but for now just know that the route will start executing the logic of the application and is defined in routes/web.php. This is the entry point to the application.
Let's use an example whereby the Entity > Read action is selected on the Sidebar. This will instruct the browser to navigate to http://crud_2.0.test/entities, the request will initiate a particular part of the application logic as the Route, entities, is requested. The route is registered in the routes/web.php file. Further, as this request is a standard GET request, the Route is also defined with the expected HTTP method. Finally, te second argument specifies the controller and the function to call. In this case the index method within the EntityController controller.
 <?php

 use Illuminate\Http\Request;
 use Illuminate\Support\Facades\Route;

 Route::get('/entities/', 'EntityController@index');
Controller
I generally, well not just me - most Laravel developers, use controllers to group related requests handling logic into a single class. The controller essentially becomes responsible for the all the C.R.U.D. actions on a specific resource. This pattern is followed so much in the community that Laravel provides Resource Controllers. When adding a Controller use the --resource flag to automatically add all the C.R.U.D. actions as a skeleton.
The table below stipulates all the Actions in the C.R.U.D design pattern with the relevant Verb, URI, as well as the Controller with the method.
| Verb | URI | Action | Route |
|---|---|---|---|
| GET | /entities | index | EntityController@index |
| GET | /entities/create | create | EntityController@create |
| POST | /entities | store | EntityController@store |
| GET | /entities/{entity} | show | EntityController@show |
| GET | /entities/{entity}/edit | edit | EntityController@edit |
| PUT/PATCH | /entities/{entity} | update | EntityController@update |
| DELETE | /entities/{entity} | destroy | EntityController@destroy |
The C.R.U.D. action in this example, Read Index, will be handled by the EntityController which will call the index method. This particular example is simple, it basically gets all the Entities using Laravel's Eloquent ORM
In the example Controller's constructor I specify an auth middleware. This will require a valid authenticated user session before accessing any of the methods within the Controller.
<?php

 namespace App\Http\Controllers;

 use App\Entity;
 use Illuminate\Http\Request;

 class EntityAdminController extends Controller
 {
     public function __construct()
     {
         $this->middleware('auth');
     }

     public function index()
     {
         $entities = Entity::all();
         return view('actions.entity.read', compact('entities'));
     }
 }
Model
In Laravel the Eloquent ORM is a simple ActiveRecord implementation for working with the application's database. Each database table has a corresponding "Model" which is used to interact with that table. Models allow for the ability to query data in tables, as well as work with and manipulate the records in the tables.
Additionally, the Eloquent ORM also provides relationships as Database tables are often related to one another. In my example scenario, an entity has resource owners and contributors, essentially... users of the entity.
To make use of the Eloquent ORM relationships in this scenario I outlined above, a relationship's definition may look something like this.
- The App\Entity has many App\User.
- The App\User belongs to App\Entity
As I have been using Entity in the examples so far, I will continue with the Entity Model, but note that although I mention App\User above it is fairly similar, apart from the method containing return $this->belongsTo(Entity::class);.
In any case, defining the relationships on an instance of the Entity model allows the use of dynamic properties to access the related model as if the property is defined on the model. For example, to access all the users that belongs to an Entity is as simple as using $entity->users;
<?php

 namespace App;

 use Illuminate\Database\Eloquent\Model;

 class Entity extends Model
 {
     protected $fillable = [
         'name'
     ];

     public function users()
     {
         return $this->hasMany(User::class);
     }
 }
View
The final part in the Model View Controller life cycle is the View. The controller and model retrieve and prepare the data that will be sent to the view, if any. The view is essentially the presentation layer or logic which is separate from that of the controller/application logic or layer.
In this example I make use of the Laravel templating engine, called Blade, by specifying a global view helper with two parameters: return view('actions.entity.read', compact('entities'));
- The target view - in this case
actions.entity.read. All views are stored atresources/views/which means this view lives at/resources/views/entity/read.blade.php. The.blade.phpextension is important for the templating engine to function and blade templates can be accessed either by/or.notation. - The data object - in this case the prepared
entitiesobject in json format.
This page you are reading now, is the actual rendered HTML from the /resource/views/about.blade.php view 😀
One of the neat features of the blade templating engine is the second point, the data object. This allows me to access the object in the view, and as a matter of fact, multiple objects can be sent to the view if you so choose.
The data object below will be sent to the view for rendering that which is essentially a JSON payload, and can be accessed by the view. For example, {{ $entity->name }} will render the entity name in the HTML which will be returned during the response part of the request life cycle.
{
    "id": 1,
    "name": "entity",
    "created_at": "2020-05-19T19:11:13.000000Z",
    "updated_at": "2020-05-19T19:11:13.000000Z"
}
It it is important to note that I am not limited to using the Laravel Blade templating engine, the Laravel Application can act as a API 'service' which means that data can be returned as a JSON payload as well.
Role Based Access Control
We are now moving away from the Model View Controller architecture to discuss some other components; starting with Role Based Access control which is achieved through Policies. Fortunately, Laravel has 'resourceful' policies for actions on models when resourceful controllers are used, which is what I am using in this case.
To 'enable' this, the authorizeResource method should be added to the resourceful controller's constructor; $this->authorizeResource(Entity::class, 'Entity');. The authorizeResource method accepts the model's class name as its first argument, and the name of the route / request parameter that will contain the model's ID as its second argument.
To have the required method signatures and type hints both the controller and the policy should be created using the --model flag.
For more information on Authorizing Resource Controllers please see the Authorizing Resource Controllers section from the Laravel Authorization Documentation.
<?php

 namespace App\Http\Controllers;

 use App\Entity;
 use Illuminate\Http\Request;

 class EntityController extends Controller
 {
     public function __construct()
     {
         $this->middleware('auth');
         $this->authorizeResource(Entity::class, 'entity');
     }
}
Having the constructor defined will, for example, automatically use the viewAny method in the App\Policies\EntityPolicy when the index method in the Entity Controller is called as viewAny matched the index or C.Read.U.D action.
<?php

namespace App\Policies;

use App\Entity;
use Illuminate\Auth\Access\HandlesAuthorization;

class EntityPolicy
{
    use HandlesAuthorization;

    /**
     * Determine whether the user can read models.
     *
     * @param    \App\User  $user
     * @return  mixed
     */
    public function viewAny(User $user)
    {
        return $user->abilities()->contains('read_entity') ;
    }

}
At this point it should be noted that the User Model has a $user->abilities() property which is used to make sure the user attempting the action has the required ability.
There are two Many-to-Many relationships at play here:
And finally, to get to a user's abilities, I map over each role to get the abilities.
 <?php
namespace App;

use Illuminate\Contracts\Auth\MustVerifyEmail;
use Illuminate\Foundation\Auth\User as Authenticatable;
use Illuminate\Notifications\Notifiable;

class User extends Authenticatable
{
    use Notifiable;

    /**
    * A user may be assigned many roles.
    *
    * @return  \Illuminate\Database\Eloquent\Relations\BelongsToMany
    */
    public function roles()
    {
        return $this->belongsToMany(Role::class)->withTimestamps();
    }

    /**
    * Assign a new role to the user.
    *
    * @param    mixed  $role
    */
    public function assignRole($role)
    {
        if (is_string($role)) {
            $role = Role::whereName($role)->firstOrFail();
        }

        $this->roles()->sync($role, false);
    }

    /**
    * Fetch the user's abilities.
    *
    * @return  array
    */
    public function abilities()
    {
        return $this->roles
        ->map->abilities
        ->flatten()->pluck('name')->unique();
    }
}
Migrations
I do not want to go into detail on what migrations are and how they should be used, for that I suggested looking at the Laravel Migrations documentation.
I do, however, want to point out a few things which are required for relationships to function which in turn allows me make use of Roles and Abilities or assign a User to a Resource.
Roles Migration
Firstly the roles migration, as can be seen from the code block below, creates two tables containing Roles and Abilities. Then two pivots are created, the first is the ability_role pivot, which enables the Many-to-Many relationship between Abilities and Roles. Secondly, the role_user pivot which enables the Many-to-Many relationship between Roles and User is created.
<?php

 use Illuminate\Database\Migrations\Migration;
 use Illuminate\Database\Schema\Blueprint;
 use Illuminate\Support\Facades\Schema;

 class CreateRolesTable extends Migration
 {
     /**
      * Run the migrations.
      *
      * @return  void
      */
     public function up()
     {
         // Roles Table
         Schema::create('roles', function (Blueprint $table) {
             $table->bigIncrements('id');
             $table->string('name');
             $table->string('label')->nullable();
             $table->timestamps();
         });

         // Abilities Table
         Schema::create('abilities', function (Blueprint $table) {
             $table->bigIncrements('id');
             $table->string('name');
             $table->string('label')->nullable();
             $table->timestamps();
         });

         // ability_role Pivot
         Schema::create('ability_role', function (Blueprint $table) {
             $table->primary(['role_id', 'ability_id']);

             $table->unsignedBigInteger('role_id');
             $table->unsignedBigInteger('ability_id');
             $table->timestamps();

             $table->foreign('role_id')
                 ->references('id')
                 ->on('roles')
                 ->onDelete('cascade');

             $table->foreign('ability_id')
                 ->references('id')
                 ->on('abilities')
                 ->onDelete('cascade');
         });

         // role_user Pivot
         Schema::create('role_user', function (Blueprint $table) {
             $table->primary(['user_id', 'role_id']);

             $table->unsignedBigInteger('user_id');
             $table->unsignedBigInteger('role_id');
             $table->timestamps();

             $table->foreign('user_id')
                 ->references('id')
                 ->on('users')
                 ->onDelete('cascade');

             $table->foreign('role_id')
                 ->references('id')
                 ->on('roles')
                 ->onDelete('cascade');
         });
     }

     /**
      * Reverse the migrations.
      *
      * @return  void
      */
     public function down()
     {
         //
     }
 }
Resources Migration
Secondly the resource migration which also has a pivot table, resource_user, but something else to notice is the user_id and entity_id fields on the Resource Table. These are required for the belongsTo() and hasMany() relationships between a Resource and a User and a Resource and an Entity. When viewing Resources. The Model section will give an overview of how these are used.
(Note: Be sure to impersonate the Resource Owner or Resource Contributor to view Resources)
 <?php

use Illuminate\Database\Migrations\Migration;
use Illuminate\Database\Schema\Blueprint;
use Illuminate\Support\Facades\Schema;

class CreateResourcesTable extends Migration
{
    /**
     * Run the migrations.
     *
     * @return  void
     */
    public function up()
    {

        // Resource Table
        Schema::create('resources', function (Blueprint $table) {
            $table->id();
            $table->string('name');
            $table->text('field');
            $table->foreignId('user_id'); // Essentially the Resource Owner.
            $table->foreignId('entity_id'); // Resource needs to be assigned to Entity.
            $table->timestamps();
        });

        // resource_user Pivot
        Schema::create('resource_user', function (Blueprint $table) {
            $table->primary(['user_id', 'resource_id']);

            $table->unsignedBigInteger('user_id');
            $table->unsignedBigInteger('resource_id');
            $table->timestamps();

            $table->foreign('user_id')
                ->references('id')
                ->on('users')
                ->onDelete('cascade');

            $table->foreign('resource_id')
                ->references('id')
                ->on('resources')
                ->onDelete('cascade');
        });
    }

    /**
     * Reverse the migrations.
     *
     * @return  void
     */
    public function down()
    {
        //
    }
}
Users Migration
Even though there is not much more to say here, I do want to mention that the User model also has a belongsTo() relationship with the Entity Model hasMany(). This is achieved by adding a foreign ID field $table->foreignId('entity_id') in the same way as the previously mentioned migrations.
Conclusion
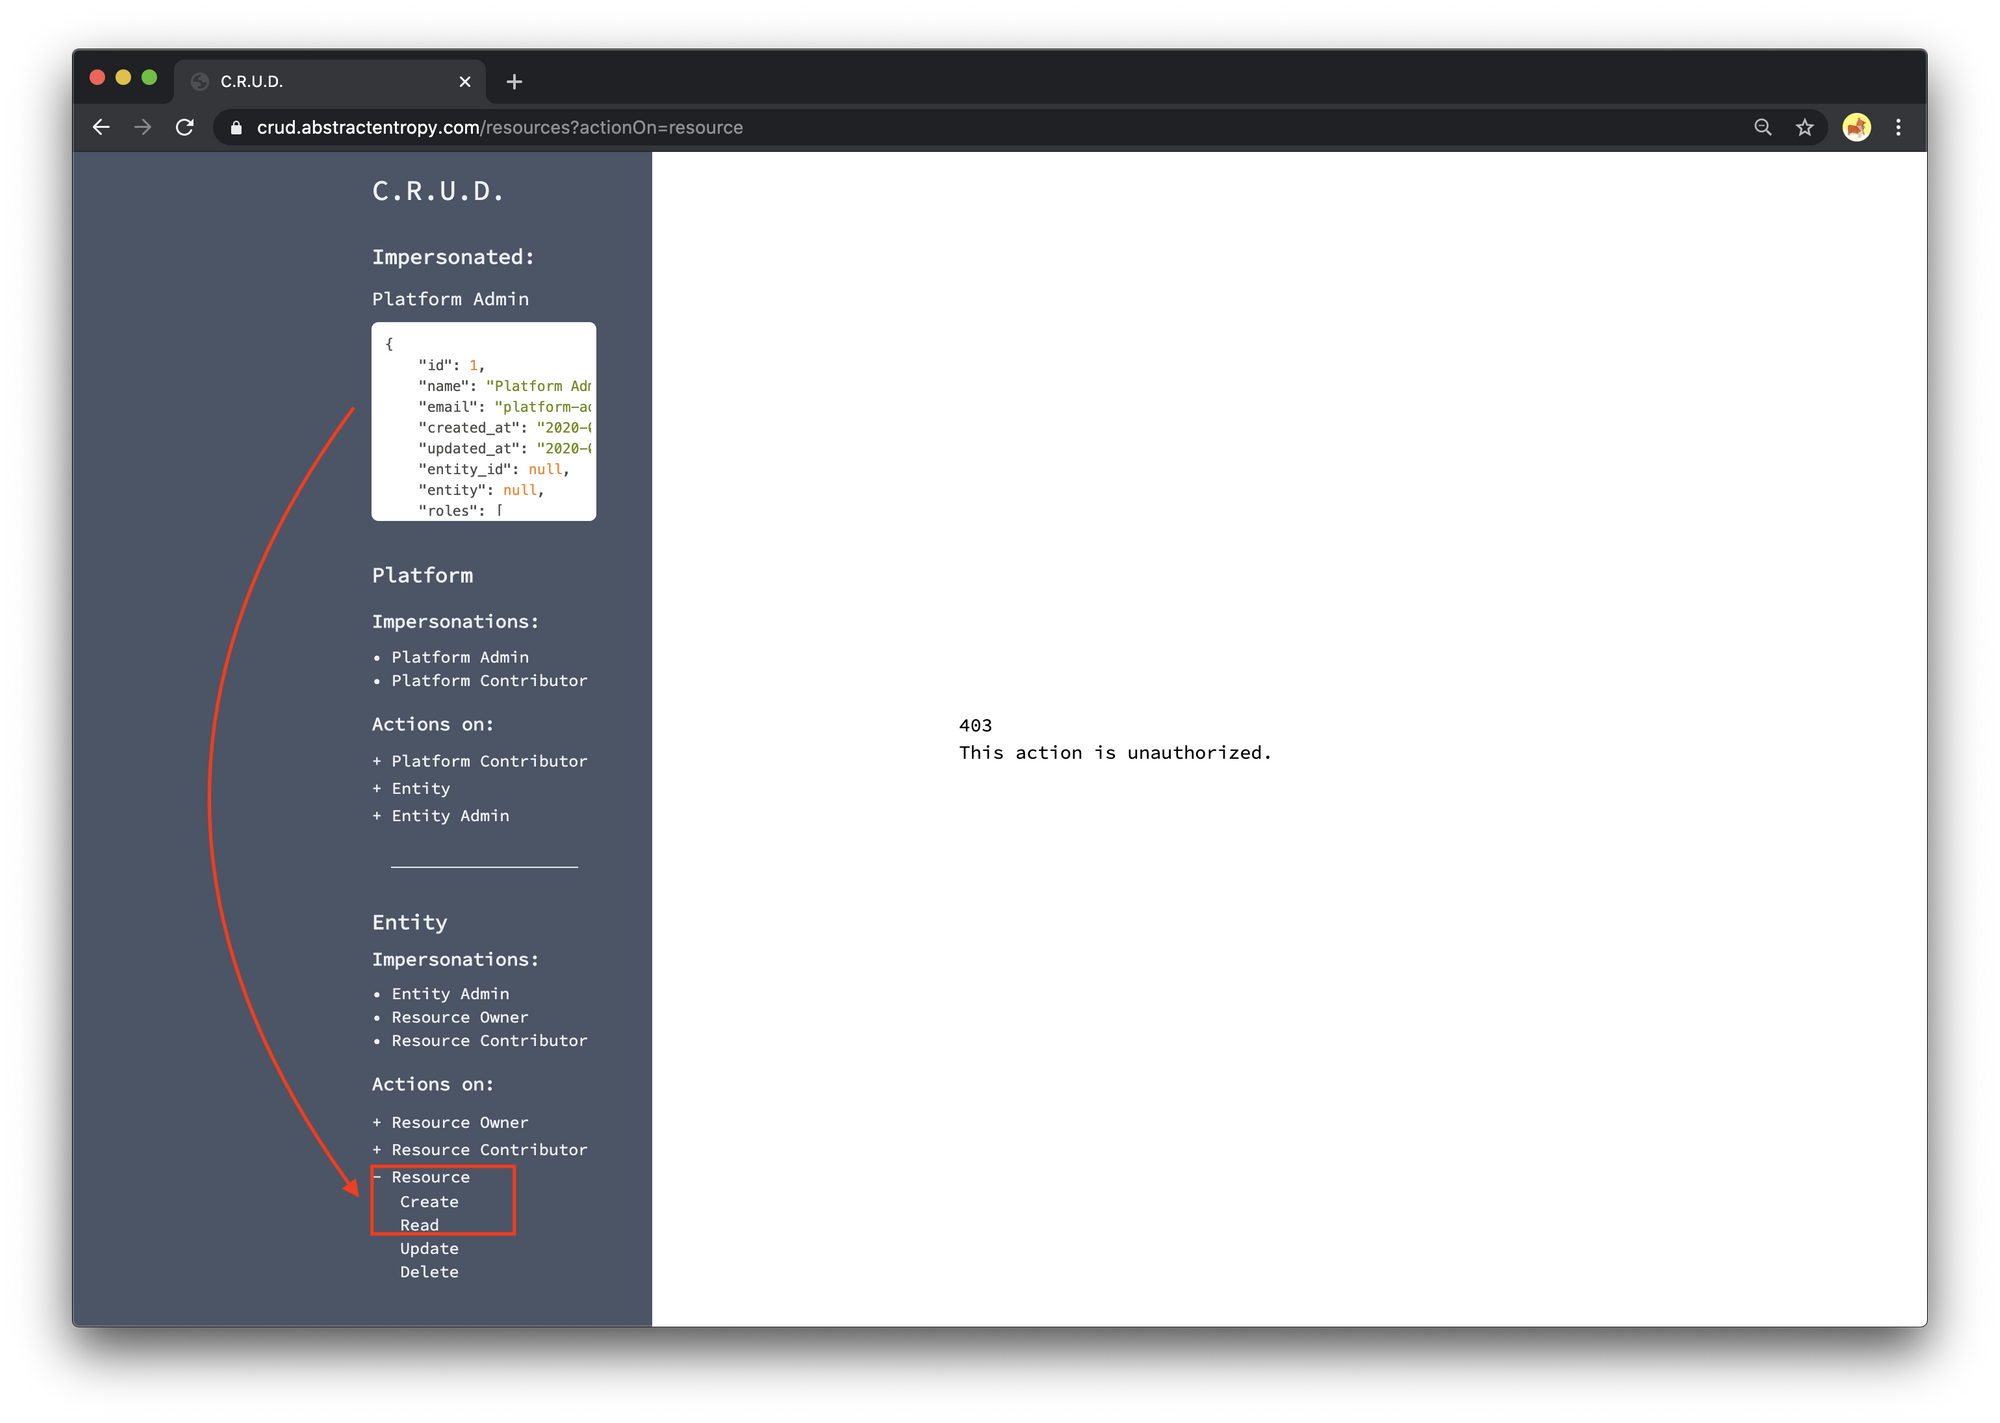
With that, more detail on each of the components (Route, Controller, Model, Policy, and View) can be seen by navigating through the actions in the sidebar. Remember, not all Impersonations will have access to all the actions.
For example, below we are at the Create action on an Entity, while impersonating the Platform Admin.

However, trying to access any action on the resource will give us a 403 This action is unauthorized. error
Thanks for reading
If you enjoyed the post, please consider to subscribe so that you receive future content in your inbox :)
Psssst, worried about sharing your email address and would rather want to hide it? Consider using a service I created to help with that: mailphantom.io
Also, if you have any questions, comments, or suggestions please feel free to Contact Me.